Chapter 6 - Performance Mode
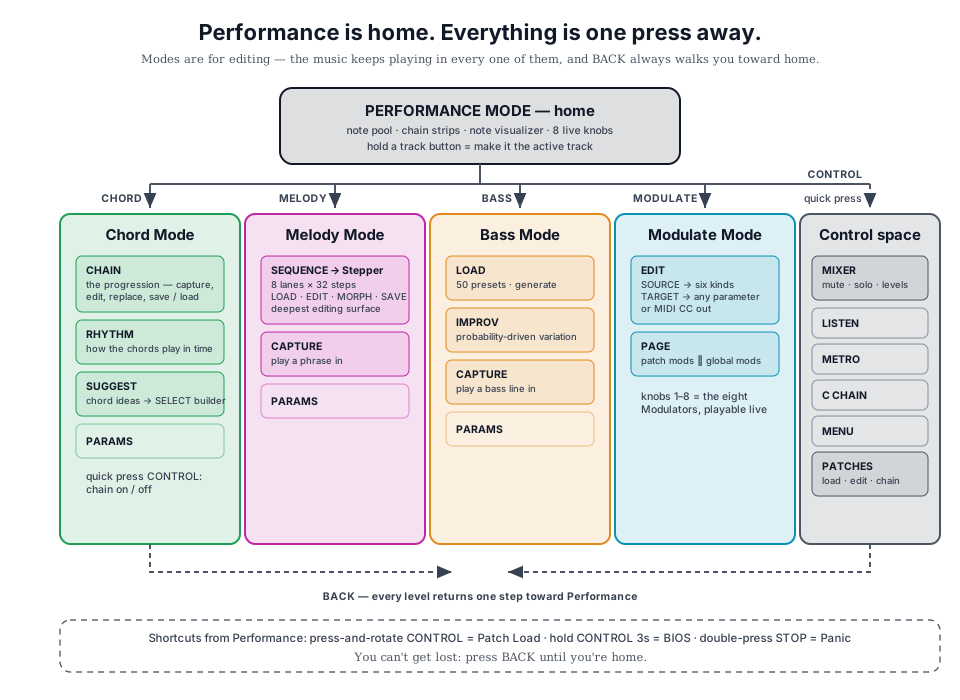
UNA's main screen is Performance Mode, this is UNA's Hub.
From here, a single button press will take you into any Track or Modulation mode.
What's on the display
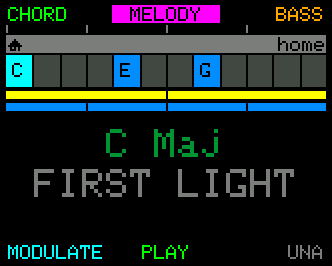
The Performance display is built around showing you, at a glance, what UNA is doing musically:
- The Note Pool. The wide strip across the top of the screen shows the note pool - the set of pitches that belong to the current chord. Every track draws its notes from this pool, so it's where harmony lives visually. The root note of the chord is highlighted - handy for orienting yourself in a progression, or for knowing what note to start a solo on. Played Chords appear as Green and Chord Chain Chords are Blue.
- The Patch Chain strip. The thin yellow bar underneath is your Patch Chain - the arrangement of patches UNA will play through in order (verse, chorus, bridge, and so on). Each block along the strip is one patch in the chain, and each block's width is proportional to how long that patch plays for - so a whole-song section is a wide block, a two-bar interlude is a narrow one. The block that's currently playing is highlighted brighter than the rest. A small marker creeps along the bottom edge of that block as it plays, showing you exactly where you are in it. When there's no Patch Chain running, the strip is hidden. Chapter 14 covers Patch Chains in full.
- The Chord Chain strip. The thin light-blue bar just below the Patch Chain strip works the same way but for chords: it's your Chord Chain - the progression of chords driving the harmony. Each block is one chord; each block's width is proportional to the chord's length in the progression. The currently playing chord is highlighted; the marker along the bottom shows where you are in it. When the chain is off (you're playing chords by hand instead of running the progression), the strip is hidden. Chapter 8 covers Chord Chains in full.
When moving to the next chord, the Note pool shifts to match, so you can see harmony in real time.
-
The Note Visualizer. Shows output notes from all 3 tracks as a rising note animation.
-
Parameter Values. The moment you move a PARAMETER Knob, the name and value are temporarily displayed.
Display views - Notes, Notes + Info, Notes + Info Extra
On top of everything above, you can choose how much extra information UNA overlays on the Performance screen. Rotate the CONTROL Knob (without pressing it) to cycle between three views.
- Notes. Just the note pool, the chain strips, and the note animation. Cleanest look.
- Notes + Info (default). Adds the current chord name, the patch name, and a small
G>Croot read-out (top-right): the note you played lowest, then the root UNA detected from the whole chord. How that root is chosen is set by Root Note, and which tracks follow it by Root Note Tracks (Chapter 17). The read-out only appears while Root Note detection is on - with it OFF (Lowest) the two are always the same note. - Notes + Info Extra. Shows Chord, the root read-out, Tempo (BPM), Current Patch ("A1") , and Patch Name, for when you want everything on-screen at once.
Chord Names: If UNA can't put a name to the shape, it lists the notes instead.
Chord Detection
UNA identifies the current chord automatically. Its colour follows the same rule as the note pool: blue when the chord chain is driving the harmony, green when you're playing chords by hand.
The 6 CONTROL buttons
In Performance Mode, the six CONTROL buttons are assigned as:
| CHORD | MELODY | BASS |
| MODULATE | PLAY / STOP | (unused) |
The top-row buttons - CHORD, MELODY, BASS - are track buttons, and they work in two steps:
- Press a track button whose track is not currently selected - that track becomes the active track. You stay in Performance Mode; nothing else changes. The PARAMETER Knobs now target that track.
- Press it again - now that the track is selected, the same button opens that track's mode.
So switching which track your knobs are editing costs one press, and opening a track's mode costs two. Once a track is selected, a single press takes you straight into its mode - which is what you'll usually be doing once you've settled on a track.
How long you hold the button makes no difference - only the press counts.
The bottom-row buttons each have a single, immediate job:
- MODULATE - opens Modulate Mode (Chapter 12).
- PLAY / STOP - the transport control. (See below).
The bottom-right button does nothing functional. Performance is UNA's home - there is nowhere to go "back" to.
Play, Stop, and Panic Stop
The PLAY / STOP control starts and stops UNA's sequencer. Press to toggle.
Pressing Stop while UNA is playing does a clean stop: the sequencer stops, the music ends. Press again to Play. A short tap while the last notes are still playing out does nothing - wait for the tail to finish, or hold to Panic Stop (below).
Hold PLAY / STOP for about half a second and you trigger Panic Stop. That's UNA's nuclear option - the sequencer stops, every active note is silenced, and all-notes-off / all-sound-off are sent on every MIDI channel, clearing the whole output. Use it when a stuck note is hanging on a synth, something has gone sideways, or when you just want a clean slate. A hold always ends in a full stop, whatever UNA was doing.
You don't have to press Play. When UNA is stopped, holding a note or a chord on a connected keyboard starts the sequencer - that's Live Play (Chapter 5).
Release the keys and it stops. A sustain pedal latches it if you'd rather keep it running while you change chord.
The CONTROL Knob
The CONTROL Knob is how you reach the Control space (UNA's mixer and settings hub). It also doubles as a modifier for live parameter tweaks.
- Quick press (press and release, with nothing else touched) → opens the Control space. Press BACK or quick press the CONTROL Knob again to return to Performance mode.
- Rotate → cycle the Performance display between the three views. (Notes, Notes and Info, Notes and Info+).
- Press and rotate → jump straight to Patch Load (Chapter 14). This is the quick way to change patch without going through the Control space.
- Hold and rotate a PARAM knob → a temporary performance edit of that parameter: the value changes live while you hold, then snaps back to its stored value the moment you release CONTROL. Nothing is saved. (Covered below.)
The music keeps playing the whole time, in every case.
Active Track and the PARAMETER Knobs
The 8 PARAMETER Knobs are always live in Performance Mode. You can adjust parameters without entering a Track mode - just turn a knob and the change happens live.
The PARAMETER knobs only target the active track. The track button LEDs show which track is currently active.
To change the active track, press its track button - CHORD, MELODY, or BASS. A press on a track that isn't already selected simply selects it. (Press the same button a second time to enter that track's mode.)
The display also tells you, by colour and parameter label, which track and which parameter you're changing as you turn a knob.
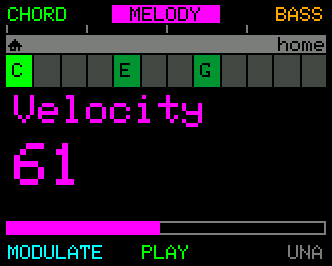
And remember the two parameter layers from Chapter 5: rotate a knob to change a primary parameter, press and rotate to change a secondary parameter. Every track exposes 16 parameters across the 8 knobs.
Temporary edits - push a parameter, then let it snap back
Sometimes you want to push a parameter for a moment and then have it spring straight back. For example, open the gate wide for a one-bar build, drop the velocity for a hushed passage, or lift the octave for a fill. To do this;
- Hold the CONTROL Knob and rotate a PARAMETER Knob: the value moves live, the music responds immediately, and the instant you release the CONTROL Knob it snaps back to where it was.
Nothing is written - your patch keeps its original value. This is a performance gesture, not an edit: the non-destructive way to be expressive over a part you've already dialled in.
A few things worth knowing:
- It works on both layers - hold CONTROL and rotate for a primary parameter, hold CONTROL and press-and-rotate for a secondary.
- You can hold several knobs at once; every temporary change snaps back together when you release CONTROL.
- Temporary values display in yellow, so you can always tell a held edit from a committed one.
- Tempo is the exception. Because tempo is a single device-wide value, not part of the patch, changing it always sticks, even under CONTROL.
The same gesture is available inside Chord, Melody, and Bass Modes, and in Modulate Mode it temporarily rides a modulator's amount (Chapter 12).
Targeted edits - dial a parameter, then let it land
There's a mirror-image gesture to Temporary edits, for when you want to aim at a new value carefully before committing to it. Instead of cycling a parameter though all its intermediate values, you dial it into a new position and let it lock in.
- Hold a PARAMETER Knob and rotate the CONTROL Knob: the on screen value changes, but the music only responds at the moment you release the PARAMETER Knob; at which point the new value is committed to the patch.
A few things worth knowing:
- It works on both layers - hold the PARAMETER Knob and rotate the CONTROL Knob for a primary parameter, or hold the PARAMETER Knob and press-and-rotate the CONTROL Knob for a secondary.
- Staged values display in purple
- Rotating past a value briefly doesn't lock it - commit only happens when you release the PARAMETER Knob.
- Play/Stop or a Panic Stop abandons a staged edit - the value doesn't commit if you interrupt with a button press before releasing the knob.
The same gesture is available inside Chord, Melody, and Bass Modes.
The Control Space - Mixer, Patches, and Settings
The Control space is UNA's mixer (controlling which tracks you hear, how loud, and where they're routed). It is also the launchpad to the Patches Mode, Metronome, the Listen toggle, Chord Chain toggle, and the Menu.
The mixer - three track sliders
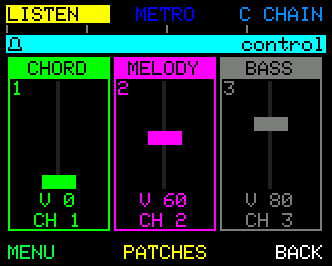
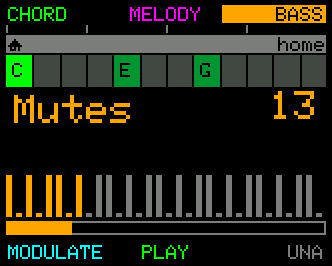
The page shows three vertical sliders side by side - Chord (1), Melody (2), and Bass (3), left to right. Each is drawn in its track colour, with the track name across the top and its number at the slider's top-left. The slider's height is that track's velocity; its MIDI channel is shown just below. A muted track is drawn in grey.
You mix with PARAMETER Knobs 1, 2 & 3 - Knob 1 = Chord, Knob 2 = Melody, Knob 3 = Bass:
- Press → mute / unmute that track.
- Rotate → change that track's velocity (the slider moves).
- Press and rotate → change that track's MIDI channel.
Additional "performance" gestures are available on the knobs in the Control space:
- Hold the CONTROL Knob and press a PARAMETER knob to solo that track (press again to un-solo)
- Hold the CONTROL Knob and rotate a PARAMETER knob for a temporary velocity change that snaps back when you let go.
- Hold the CONTROL Knob and press and rotate a PARAMETER knob for a temporary channel change that snaps back when you let go.
- Hold a PARAMETER Knob and rotate the CONTROL knob for a targeted velocity change that only jumps to the new value when you let go.
- Hold the PARAMETER Knob and press and rotate a CONTROL knob for a targeted channel change that only jumps to the new value when you let go.
Where mutes are stored. By default, mutes are device-wide: mute the Bass Track and it stays muted as you switch patches. If you'd rather each patch remember its own mutes, change Menu > CONFIG > Track Mutes from Global to Per Patch (Chapter 17).
The Controls
The Control space is a single hub, with the 6 CONTROL buttons assigned as:
| LISTEN | METRO | C CHAIN |
| MENU | PATCHES | BACK |
- LISTEN - toggles the Listen behaviour (Chapter 5).
- METRO - opens the Metronome page (time signature, click, volume). Documented below.
- C CHAIN - toggles the chord chain on/off (the same chain described above and in Chapter 8).
- MENU - opens the device-wide Menu (MIDI routing, keyboard split, LED brightness, all globals). Documented below.
- PATCHES - opens the Patch Load screen. (You can also browse patches by rotating the CONTROL Knob while in the Control space.)
- BACK - returns to the mode you came from.
The LISTEN, METRO and C CHAIN controls light up when they're on - the label highlights and its LED glows (Listen = yellow, Metro = magenta, Chain = cyan). The lights track the live state, so they update even when something else changes the setting. In particular, playing a chord on a connected keyboard exits the chord chain, and you'll see the C CHAIN light go out the moment it does.
Menu
The Menu is where UNA's device-wide settings live - everything that isn't part of a patch. MIDI routing, keyboard split, playback behaviour, and so on. These settings persist as you switch patches.
The top-level menu splits into three categories:
| Function | Category | What lives here |
|---|---|---|
| MIDI | Routing & sync | Clock and Transport, input/output channels, Thru, per-port routing, keyboard split, Loop Protection. |
| CONFIG | Playback & feel | Velocity sensitivity, accents, time sort order, solo output and pitch quantize, Live Play, where track mutes are stored, patch-chain behaviour. |
| HELP | On-device reference | Reference info and firmware version. |
Press the corresponding control to drop into a category, then use the PARAMETER Knobs and CONTROL Knob to navigate within it. BACK returns up one level - out of a sub-page, then out of the Menu altogether and back to the Control space. (From the Control space itself, a single CONTROL-Knob quick press returns you to Performance.)
A few useful things to know:
- Menu edits are immediate and persistent. As soon as you change a value, it's saved. You don't have to confirm or "save settings."
- The music keeps playing. You can enter the Menu mid-performance and change a MIDI routing or split point without stopping the sequencer. The transport runs underneath the Menu like it does in any other mode.
- Menu settings are not patch state. Loading a new patch will not change what's in the Menu. The full reference for every Menu setting is in Chapter 17.
Metronome
UNA's Metronome page is where you set the things that govern musical time - time signature, the audible click, click volume - and where you see the bar position visualised as a sweeping clock hand. If you're tracking to a click, recording in time, or wiring UNA into a rig where the time signature matters, this is the page you'll come back to.
You reach the Metronome page from the Control space: quick press the CONTROL Knob to open the Control space, then press METRO.
What's on the page
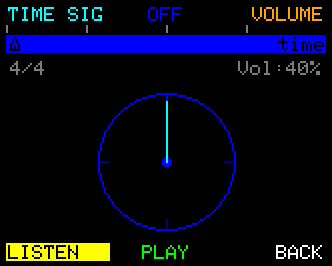
A clock face fills the centre of the screen. The hand sweeps once per bar - at a glance you can see how far through the bar UNA currently is, and the beat tick marks show you where the divisions fall for the current time signature. The header shows the time signature on the left and the click volume on the right.
The controls
| Function | What it does |
|---|---|
| TIME SIG | Selects the time signature for editing. Once selected, rotate the CONTROL Knob to step through the available signatures (4/4, ¾, 2/4, 6/8). Press again to deselect. |
| ON / OFF | Toggles the click on or off. Lights up when the click is on. |
| VOLUME | Selects the click volume for editing. Once selected, rotate the CONTROL Knob to set the level (1–100%). Press again to deselect. |
| BACK | Returns to the Control space, with all changes already applied. |
The pattern is the same for TIME SIG and VOLUME: press to "arm" the setting, rotate the CONTROL Knob to change it, press again (or press a different setting's control) to step out.
A note on tempo
The Metronome page is about the time signature and the click, not tempo. Tempo lives on PARAMETER Knob 1 as its secondary parameter - press and rotate Knob 1 to change BPM from any performance or track mode. Chapter 13 covers tempo, time signatures, and the metronome click in detail.
Loading Patches
From Performance mode, press and hold the CONTROL Knob, then rotate it, and you're in Patch Load mode.
The display shows a 4×2 grid of the 8 patches in the current bank - each cell tagged (A1, A2, …) with its name. The currently-loaded patch is highlighted; the selected patch (the one you'd APPLY next) has a white border.
To pick a different patch, either rotate the CONTROL Knob to walk the grid, or press a PARAMETER Knob (1–8) to jump directly to that slot. Press APPLY to load the highlighted patch. If it's in the same bank as what's currently loaded, the transition is seamless - the new patch enters at the same step/tick the old one was on, so the audience hears a clean crossover.
For fast in-bank switching without touching APPLY, hold CONTROL and press a PARAMETER Knob - that quick-loads the patch under the knob instantly.
Switching banks takes a moment: press BANK to engage bank-select, rotate CONTROL to pick the new bank, then select the patchn and press APPLY.
Cross-bank loads stop playback because the whole bank has to move into RAM - UNA warns you before doing this.
Press CANCEL to leave Patch Load without changing anything. If you're already sitting on the active patch, CANCEL reads as BACK - nothing to cancel.
TIP: For full control over banks and patches, including backups, move and copy, and sharing. See Midicake CONNECT
Chapter 14 has the full reference on banks, editing, copying, and renaming.
Some patterns to try
Here are a few worked recipes that show how Performance Mode flows in real use.
The "warm-up" pattern. Power on UNA, plug a keyboard into the MIDI In, plug your synth into MIDI Out A. Play a few notes - UNA runs whatever patch is loaded. Toggle Listen on, play some chord shapes, watch the note pool shift on the display as UNA follows you. When you hear something you like, turn Listen off; UNA locks to that progression, and now you can solo over the top.
The "switch patches mid-song" pattern. You're playing a verse patch. The chorus is approaching. Press and hold the CONTROL Knob and rotate - you're in Patch Load. Highlight your chorus patch (rotate CONTROL, or press its PARAMETER Knob). At the right moment, press APPLY. UNA crosses over seamlessly; the audience hears the chorus arrive without a glitch. Even faster: hold CONTROL and press the PARAMETER Knob for the chorus slot - patch loads instantly without an APPLY step. Both work only within the current bank - but a set list should live in one bank anyway.
The "drop the band" pattern. During a verse, press the CONTROL Knob to enter the Control space. Press PARAMETER Knob 1 to mute the Chord Track - the chords go silent, but the chord chain still drives the melody underneath. The "band" has dropped out, but the melody continues, harmonically locked to the silent progression. Press Knob 1 again, the chords come back.
The "panic" pattern. A stuck note is droning. Or a chord is ringing on a synth's hold pedal. Or your fingers caught something they shouldn't have. Double-press Stop. Everything stops.
What's next
Chapter 7 is the parameter reference - reach for it when you want to know what any parameter does. The actual editing of the music happens in the dedicated Track modes: Chapter 8 covers Chord Mode, Chapter 9 Melody Mode, Chapter 11 Bass Mode. Each is a deeper dive into a track you've already been hearing.
If you want a one-page reference to everything you've just read, Appendix F has the complete per-mode control-and-knob table.