Chapter 9 - Melody Mode
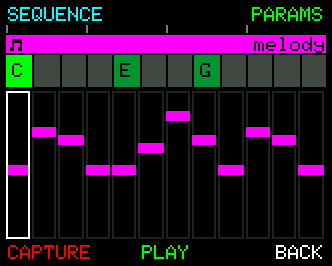
Melody Mode is where the Melody Track gets shaped, on a single screen. Editing individual steps, changing a lane's length and capturing a phrase from your keyboard all happen here. Only a few jobs open a page of their own: the pattern browser (SUGGEST), MORPH and SAVE.
Every edit on this screen is live the moment you make it. Leaving the screen keeps your work - there is nothing to commit. If you change your mind, that is what UNDO is for.
A reminder from Chapter 5: the Melody Track plays single-note lines that follow the current chord or chord chain. Whatever harmony is underneath, the Melody picks notes that fit. You shape the line; UNA keeps it in key.
The melody is eight lanes, not one. PITCH, GATE, VELOCITY, SLICE, OCTAVE, CHANNEL, DELAY and LAYERS each hold their own 32 steps, their own length and their own rotation. This screen shows one lane at a time and everything on it acts on that lane. Chapter 10 is the deep dive on what each lane does and how their independent lengths interact.
Getting in and out
From Home, press TRACKS, then MELODY.
Press BACK to return to Tracks, and BACK again for Home. The music keeps playing throughout, so you can edit mid-performance without stopping.
Reading the screen
The body is the selected lane's grid: one cell per step, each with a bar whose height is that step's value.
- Along the top are the lane's own length and rotation -
16andR0, orSYNCwhen the lane is following the track's STEPS rather than holding its own. Each sits under the Advanced Mode knob that edits it (knob 2 and knob 3), and they update live as you edit them. - Top left reads MUTED while the Melody Track is muted - the one thing that explains a lane full of notes going silent. Otherwise it stays empty, so knob values can use the space.
- Along the bottom: left reads loop over lane - the track's STEPS over the lane's own length (or the selected block's range while MULTI is up). Right is the step the cursor is on.
- A cyan bar marks the selected step. During playback the sounding step gets a white outline as well, so you can see the two independently.
Steps are numbered from 1 on screen, matching the way the panel numbers its knobs and buttons.
The grid always shows the maximum. If the lane is longer than the track's loop, you see the whole lane with the un-played tail dimmed. If it is shorter, you see the whole loop with the lane's values repeating inside it. Nothing is ever hidden, and the two numbers bottom-left tell you which case you are in.
The two button layers
The six buttons have two sets of meanings. A tap of the CONTROL Knob switches between them.
| 1 | 2 | 3 | 4 | 5 | 6 | |
|---|---|---|---|---|---|---|
| EASY | SUGGEST | lane name | UNDO | CAPTURE | PLAY / STOP | BACK |
| ADVANCED | MORPH | lane | PARAMS | SAVE | PLAY / STOP | BACK |
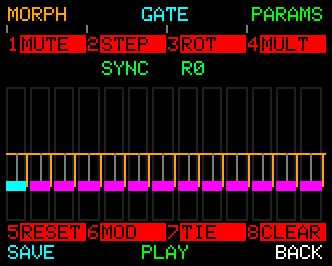
On ADVANCED, the two red bars label what the eight PARAMETER Knobs do when you press them. Each cell shows its knob NUMBER on the left and the action on the right; a cell with a number and no word is a knob that does nothing on this screen.
BACK on ADVANCED returns you to EASY; press BACK again to leave Melody Mode.
Knob 1 (mute) on Advanced Mode mutes the melody track, the same switch as the Mixer's.
Knob 5 is RESET. It puts the whole track back to its defaults - every parameter, and this track's own pattern content with them. It asks first, and the question takes the whole screen - the track view, the knob bars and all - so there is nothing to misread it against. Press it once for a confirm reading Reset / Melody Track? / Params and pattern, then press the same knob again to go through with it. Anything else at all - another knob, another button, a tap of CONTROL - calls it off, and that press is spent cancelling rather than doing its own job. YES sits on button 4 and CANCEL on button 6, so either the knob or the button will do it. A reset also empties the undo history: it is a new starting point rather than another edit to step back through.
Knob 7 is the ornament cycle, knob 8 is CLEAR. Knob 7 walks the selected step - or the whole block - round the lane's ornaments and back: on Velocity that is value →
ACC→OFF→ value, and on Gate value →TIE→SLD→ value. The cell names what the next press will do, and it is blank on the six lanes that have no ornaments. Coming back round puts back the note that was there before either ornament, not the one in between. Knob 8 clears the selected lane to its flat factory baseline, the same act as COMMON button 1.Knob 6 is MOD. Pressing it makes a modulation for the lane you're looking at - Gate lane, Melody Gate - without going to Modulation Mode and finding it in a list. If a Modulator is already aimed there you go straight to it; otherwise UNA takes a free slot and leaves it switched off at its defaults. One BACK returns here. See Chapter 12 - Modulate for the whole story, including what happens when all eight slots are in use.
UNDO is EASY B3. REDO is on the COMMON row: hold CONTROL and press B3.
Choosing the lane - button 2
Button 2 is both the lane selector and the lane indicator. Its label is the name of the lane you are editing - PITCH, GATE, VELOCITY and so on.
- Tap it to move to the next lane. It wraps round from LAYERS back to PITCH.
- Hold it and turn the CONTROL Knob to scrub through the lanes. This stops at PITCH and LAYERS rather than wrapping, so a long sweep lands on an end instead of sailing past it.
Changing lane is never an undo step - looking at something else has not changed anything.
Lanes are always on. If you want a lane to stop contributing, clear it (COMMON button 1 - hold CONTROL).
Choosing a pattern
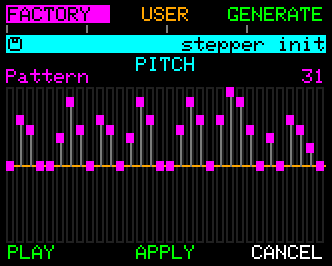
SUGGEST (EASY B1) opens the pattern browser for the lane you are on. Each lane has its own library - a pattern that makes sense for PITCH is not one that makes sense for DELAY.
| 1 | 2 | 3 | 4 | 5 | 6 | |
|---|---|---|---|---|---|---|
| Browser | FACTORY | USER | GENERATE | PLAY / STOP | APPLY | CANCEL |
- FACTORY - turn the CONTROL Knob to walk the lane's 32 factory patterns. The first is the lane's flat baseline.
- USER - turn the CONTROL Knob to walk your 16 user slots for this lane. Saving into them is SAVE, on ADVANCED B4.
- GENERATE - makes a pattern for you. Turn the CONTROL Knob for a new seed, press and turn it to set how far the result strays from the lane's default.
- APPLY keeps what you are hearing; CANCEL puts back the pattern you had when you opened the browser.
Everything previews live - you hear each pattern on the lane as you land on it, with the transport running. The browser opens on the source you used last (FACTORY, USER or GENERATE), and the whole visit, however much you audition, is one UNDO step back on the melody screen.
CLEAR (COMMON button 1 - hold CONTROL) returns the lane to its flat factory baseline - no offset on every step. That is the blank canvas, and the way to silence a lane.
In BASIC the browser has no USER, and it opens on FACTORY every time (BASIC mode).
Editing steps
The core gestures live on the CONTROL Knob:
- Turn the CONTROL Knob to move the cursor along the steps.
- Hold the CONTROL Knob and turn to change the selected step's value.
That is the whole of it for a single step. Three ADVANCED slots extend it.
STEP and ROT - the lane's length and rotation
Knob 2 (step) and Knob 3 (rot) on Advanced Mode are plain value knobs: turn that same knob to change the value there and then. There is nothing to arm first or release afterwards.
The top-right label follows as you turn.
Each lane's length is independent. PITCH might run at 8, GATE at 12, VELOCITY at 5, each cycling at its own rate against the track's STEPS. Turn the length down past 1 and the lane enters SYNC, where it stops holding its own length and follows the track's STEPS instead. Turn back up and it takes an independent length again.
ROT shifts the whole lane's values left or right within its own grid - useful when a pattern you like starts on the wrong beat.
MULT - editing a run of steps together
Knob 4 (mult) builds the block, two ways:
- Turn it to extend a block outward from the current step - one-handed.
- Hold it and turn the CONTROL Knob for the same thing two-handed, which is the easier shape for a long sweep.
With a block active, hold the CONTROL Knob and turn and every step in the block moves together - relatively, so the shape between them is kept. The footer shows the block's range in place of the cursor's step number.
Nothing on the ADVANCED knobs latches.
step,rotandmultare all plain turns of their own knob, so none of them claims the CONTROL turn and none of them has to be released before the next. A clean tap ofmultclears the block, and tapping again puts the same block back.
The special values on GATE and VELOCITY
Two lanes have values beyond their normal range, and you reach them by simply pushing past the end:
On the GATE lane, keep turning past the longest gate and you get:
- TIE - extends the previous step's note across this one.
- SLIDE - legato overlap into the next step, with no gap between notes.
On the VELOCITY lane, push past either end:
- ACCENT - past the top; plays the step at full velocity.
- MUTE - past the bottom; silences the step entirely.
The footer names the value as you reach it, so you always know which one you're on. There is no separate button or modifier - the edit gesture simply keeps going.
Undo and redo
Melody Mode remembers the last 16 states for as long as you are on the screen.
- UNDO is EASY B3, REDO is COMMON B3 (hold CONTROL).
- A record covers one lane - its values, length and rotation - plus which lane it was. So undo crosses lanes: edit PITCH, switch to GATE, edit that, and stepping back walks through both. Undo switches the view to the lane it restores, so what you are looking at always matches what just changed.
- One press undoes one act. A whole press-and-turn drag counts as one however many detents it took, a MULTI block edit counts as one, and so does a whole visit to the pattern browser.
- Pressing CAPTURE records the state first, so one UNDO steps back over the whole take.
The history clears each time you come into the screen fresh. Stepping out to MORPH, SAVE, PARAMS or CAPTURE and back does not clear it.
MORPH and SAVE
Both live on Advanced Mode and both open a screen of their own for the selected lane.
- MORPH (ADVANCED B1) is the three-stage transformation pipeline - reshaping a lane's values without touching individual steps. Chapter 10 covers it in full.
- SAVE (ADVANCED B4) writes the current lane into one of its 16 user slots. Also Chapter 10.
Entering either clears Advanced Mode, and BACK from them returns you to the melody screen in Easy Mode.
The PARAMETER Knobs
The eight PARAMETER Knobs work the same way as elsewhere on UNA: rotate a knob to edit its primary parameter live, or press-and-rotate to edit its secondary. The display shows the parameter name and value as you turn.
Pressing a knob has a meaning too - see the global knob-press map in Chapter 7. On Advanced Mode the presses are the lane actions above instead.
Chapter 5 has the full mental model.
Track Parameters
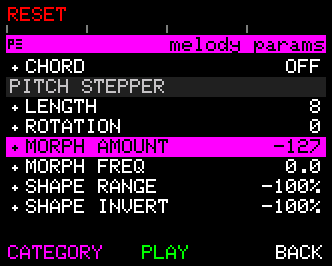
Press PARAMS (ADVANCED B3) to open the Melody Track parameters menu. Parameters are grouped into categories you can walk through - the CONTROL Knob steps through categories and rows, press-and-rotate changes values.
- PRIMARY - the parameters that affect individual notes and steps. Most of these are the primary layer of the PARAMETER Knobs (OCTAVE, CHANNEL, DELAY, LAYERS, GATE, VELOCITY, PITCH, SLICE), plus the toggle-style parameters that don't sit on a knob directly: MODE, DELAY TYPE, VOICE MODE, SLICE TYPE.
- SECONDARY - the parameters that affect the sequence as a whole. These are the secondary layer of the PARAMETER Knobs: STEPS, ROTATE, JUMP, DIRECTION, TIME, MUTES, ACCENTS.
- LOCKS - OCTAVE, NOTE, CHORD. The override layer that pins the track's voicing regardless of the chord chain. Chapter 7 covers Locks in full.
- PITCH STEPPER, GATE STEPPER, … - one category per lane, holding LENGTH, ROTATION, MORPH AMOUNT, MORPH FREQ, SHAPE RANGE, SHAPE INVERT, FLT EUCLID and FLT DEVIATE. The same values the melody screen's own controls reach, listed out.
Quick shortcut: you don't have to scroll to reach a parameter. Press a PARAMETER Knob (1-8) to jump the menu highlight straight to that knob's parameter - press once for the primary, or press and hold CONTROL and a PARAMETER Knob for the secondary.
For a full reference to every parameter - what it controls, its range, and its default - see Chapter 7 - Track Parameters.
Capturing a melody - Melody Record
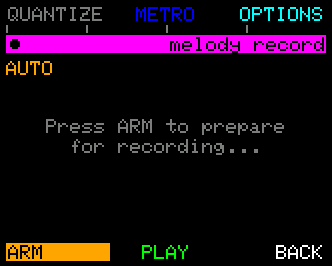
Press CAPTURE (EASY B4) to enter Melody Record. This is where you play a phrase on your keyboard and UNA writes it into the Melody Track's sequence.
While recording, a few things happen automatically: the Melody Track is muted (so the existing sequence doesn't play over you), the chord chain is paused (so what you play isn't transposed by a shifting chord), and MIDI Thru is enabled (so you hear yourself as you play). When you finish, those reset to whatever they were before.
Just press ARM and play
There's no preparation to do. UNA auto-quantizes what you play against its best-guess grid, uses sensible defaults for velocity, gate, and timing capture, and gets out of your way. The fastest path from an idea in your head to a Melody Track sequence is: ARM, play your phrase, END, APPLY.
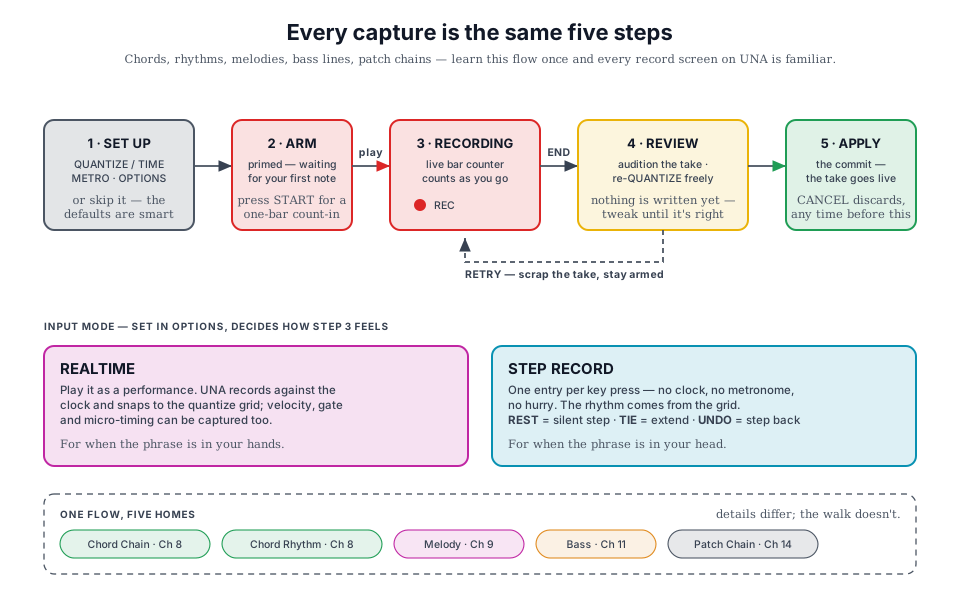
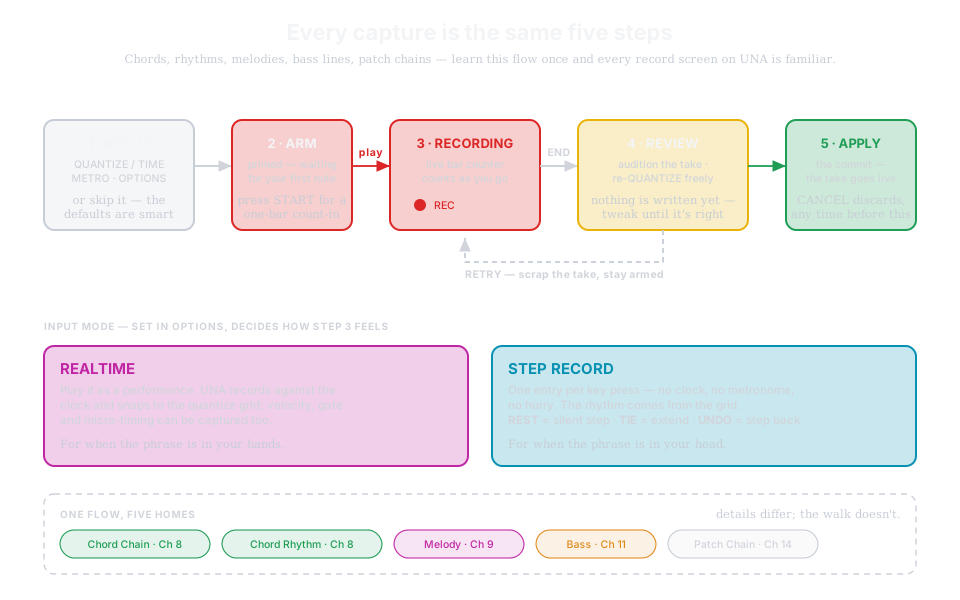
When you press ARM, UNA waits for the first note. As soon as you play, the capture begins. Recording continues until you press END.
Alternatively, Press Start to hear a count in before recording starts. Useful for keeping in time during playback, or leaving a gap at the beginning of a capture. If the sequencer was stopped, only the click plays during the count-in, and the other tracks come in from the top on the downbeat.
The capture loop ends on your last note-off, not on END. UNA times the loop from your first note to your last note-off, then quantizes the end of the recording. So you don't need to be super accurate when pressing END.
While recording, a live bar counter appears on the screen so you can see how many bars you've captured at a glance - useful for pacing longer phrases without losing count.
Notes you play on the capture screen never change the chord, whatever LISTEN is set to. LISTEN is back as you left it when you leave the screen.
Tuning the capture (optional)
If the defaults don't suit - you want a specific snapping grid, a count-in click, or a change to how UNA captures velocity or gate - the pre-record screen exposes the most-used controls directly, and OPTIONS opens the full settings list.
| Function | What it does |
|---|---|
| QUANTIZE / TIME | Before a realtime take QUANTIZE is locked at AUTO and UNA picks the grid; you can change it after the take. In Step Input mode this is TIME, the note length: press to select, then rotate the CONTROL Knob. |
| METRO | Toggle a count-in metronome click during capture. Useful when you're recording without an existing groove to lean on. |
| OPTIONS | Open Melody Record Options - the full configuration list (see below). |
| ARM | Prime capture. |
| BACK | Return to Melody Mode without recording. |
Realtime vs. Step Input
Two ways to capture, set in Options:
- Realtime Input. You play the phrase as you'd play any instrument - UNA captures the timing of your performance. Velocity is captured (optional). Gate length per note is captured (optional). Subtle timing offsets (swing, lay-back) are preserved in per-step delays (optional).
- Step Record Input. UNA advances one step per note you play. You don't have to play in time - the rhythm comes from the grid, not from your performance. In Step Record mode three controls take on entry-aid roles: REST (insert a silent step), TIE (extend the previous note across this step), UNDO (delete the last step).
The step meter
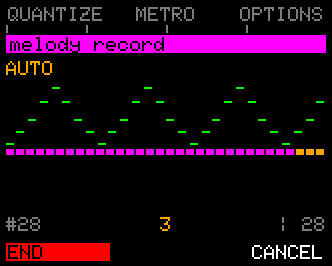
A melody has 32 steps. While you play, the row of cells across the middle of the screen shows how many you have used. It keeps filling while you rest or hold a note, because silence takes steps too. Until UNA has heard enough notes to work out the grid, the cells are just outlines.
How far 32 steps go depends on the grid your playing implies: 2 bars of sixteenths, 4 bars of eighths. Play a couple of offbeats and the grid gets finer, so the cells jump and flash white. The last four cells are orange, and the screen counts down the last four steps.
When the cells run out, capture ends on the step boundary and the loop starts playing.
After you stop
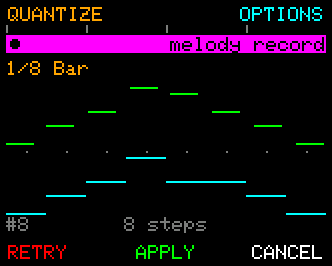
When you press END, the captured phrase is in a buffer but not yet committed. UNA shows the raw notes you played above, and the auto-quantized version below (here snapped to a ⅛ Bar grid, and current chord pitches); plus the note/step counts along the bottom. You can:
- QUANTIZE - re-quantize the buffer with a different grid setting.
- OPTIONS - adjust capture options (e.g. swap to a different scale derivation, then re-apply).
- RETRY - start over.
- APPLY - write the phrase into the Melody Track sequence. This is the commit.
- CANCEL / BACK - discard.
If the take needs more than 32 steps at the grid you choose, a red +N after the step count shows how many won't fit. Turn QUANTIZE to a coarser grid until it goes.
You can audition, tweak, audition again, and only commit when it sounds right.
Melody Record Options
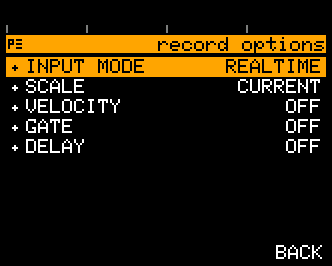
Press OPTIONS from the Melody Record screen for the full configuration list. Rotate the CONTROL Knob to move through it; hold and rotate to change the selected value.
| Option | Choices | What it does |
|---|---|---|
| INPUT MODE | Realtime / Step Record | The capture style described above. |
| SCALE | Current / Derive | "Current" forces the phrase into the active scale; "Derive" infers a scale from the notes you played. |
| VELOCITY | ON/OFF | Whether per-note input velocity is captured. |
| GATE | ON/OFF | Whether per-note input gate length is captured. |
| DELAY | ON/OFF | Whether per-step input micro timing is captured. |
| PLAY ON END | OFF/ON | What END does when the sequencer was stopped before you pressed START. |
| LOOP ON | LAST NOTE/PRESS END | Where the loop ends: when your last note ends, or where you press END. |
Setting VELOCITY, GATE, and DELAY to ON will give you a phrase that sounds the way you played it. Set each to OFF and you'll get a phrase with uniform dynamics and timing; sounding more mechanical, and perhaps, easier to layer Modulation on top later.
PLAY ON END. OFF is the default: the sequencer stops again at END. With ON, it keeps playing, so you hear the phrase you just played, in time, while you decide. APPLY keeps it playing as you go back to the Melody screen. RETRY and CANCEL stop it. With METRO off, nothing was playing during the take, so END starts the sequencer from the top. If the sequencer was already running when you pressed START, it keeps running either way, and in Step Record PLAY ON END does nothing.
LOOP ON. LAST NOTE is the default: the loop ends when your last note ends. PRESS END keeps recording until you press END, so the rests after your last note become part of the loop. Handy for staccato phrases. The loop length rounds to the nearest bar line, so pressing END just after a bar line ends the loop on that bar. The take still stops by itself at the 32-step limit. In Step Record LOOP ON does nothing.
What happens to existing settings on capture
A safety detail worth knowing: when you commit a fresh capture, the three Lock parameters (LockOctave, LockNote, LockChord) reset to OFF, and the lane morph parameters reset to defaults. This is intentional - a fresh capture plays back uncoloured by old overrides, so you hear what you played. If you want to re-apply Locks after the capture, re-set them in PARAMS.
Back on the melody screen, one press of UNDO steps back over the whole take.
The Lock controls
The Melody Track exposes the same Lock Octave / Lock Note / Lock Chord controls as the Chord and Bass tracks. They're documented in detail in Chapter 7.
Use the Locks for the same compositional tricks: pin the octave to a fixed range, force the root, or constrain the melody to a specific chord-type's intervals regardless of what the chord chain says.
Worked Recipes - for Melody
The "just get me a pattern" recipe. From Home: TRACKS → MELODY → SUGGEST, then turn the CONTROL Knob. You're auditioning the PITCH library live. Press APPLY when one fits. Tap button 2 to move to VELOCITY and do it again. Two visits and you have a line with dynamics.
The "build a groove from scratch" recipe. Tap button 2 until it reads VELOCITY. Turn CONTROL to step 1, hold and turn up past the top for an ACCENT. Move to step 5, 9, 13, same again - you have a 4-on-the-floor. Tap button 2 to GATE; find steps 2 and 4 and push past the top for TIE. Tap to PITCH and walk through setting each step's degree.
The "one gesture, four steps" recipe. Tap CONTROL for ADVANCED, then turn knob 4 (
mult) to extend the block across four steps. Now hold CONTROL and turn - all four move together, keeping their shape. Tap knob 4 to clear the block.The "polyrhythm" recipe. On PITCH, tap CONTROL for ADVANCED and turn knob 2 (
step) to length 5. Tap button 2 to GATE, set 7. To VELOCITY, set 3. The three lanes now cycle at 5, 7 and 3 against the track - they won't line up again for many bars, and the melody reshapes itself as they drift.The "play it once, keep it" recipe. MELODY → CAPTURE. Make sure INPUT MODE is Realtime (in OPTIONS). Press ARM. Play your phrase. END. If it's right, APPLY. If it's not, RETRY.
What's next
Chapter 10 is the deep dive on the eight lanes - what each one does, how their independent lengths interact, and the MORPH pipeline. Chapter 12 (Modulate) is a useful companion: a Modulate slot pointed at a Melody parameter, or at a lane's Morph Amount or Rotation, will evolve it automatically over time.