Chapter 15 - MIDI
MIDI is how UNA talks to everything else - the keyboard you play into it, the synths it drives, the DAW that syncs to it, the outboard effects it modulates. This chapter is the reference for that plumbing: the physical connectors, the routing settings, and the patterns for common rig scenarios.
Chapter 17 documents the individual Global settings; this chapter shows you how they impact UNA's MIDI behaviour. If you're wondering "why isn't my synth playing," this chapter's Common Rigs section is likely where you'll find the answer.
The physical layer
UNA has three MIDI inputs and four MIDI outputs. Two of the ports - USB-C and USB Host Type-A - are bi-directional, so they show up in both lists.
Inputs
- USB-C - connects UNA to a computer. UNA appears as a class-compliant USB MIDI device. Any DAW or MIDI software will see it without drivers.
- USB Host Type-A - the rectangular USB-A jack on the rear. Plug a USB MIDI controller into this port (a keyboard, a pad controller, an expression pedal with USB) and its notes reach UNA directly, no computer required.
- MIDI In (TRS Type-A) - a 3.5 mm TRS jack. For 5-pin DIN gear, use the TRS→DIN cable included. For gear that already uses TRS Type-A, plug in a straight TRS cable.
All three input paths are active at once. UNA merges them into a single stream and applies the Input Channel filter to what comes in.
A word about the USB Host port and power. UNA supplies bus power to whatever you plug into the USB Host jack. A compact controller is fine. A large device, such as one with lots of LEDs, screens or motorised faders, can draw more power than UNA can give. The symptom is UNA resetting or the controller failing to start up. If a controller misbehaves on the Host port, power it from its own supply (or a powered USB hub) and it will behave. See Chapter 19 if you're chasing an issue.
Outputs
- MIDI Out A (TRS Type-A) - 3.5 mm TRS jack for outgoing MIDI. Cable supplied for DIN.
- MIDI Out B (TRS Type-A) - a second independent output.
- USB-C - the same USB-C port that acts as an input also sends UNA's output back to the computer.
- USB Host Type-A - the same USB Host port that accepts controller input also sends MIDI out to whatever is plugged in. Useful for controllers that expect return traffic - LED feedback, screen updates, motorised faders driven from UNA.
TRS Outputs A and B are independently routable - the same track can go out of both, or you can split Melody to A and Bass to B, or send only one track to each. Configured in the Menu (Chapter 17); explained below.
A note about TRS Type-A
MIDI over 3.5 mm jacks has two competing wiring standards, Type-A and Type-B. They differ only in which way round the two MIDI signal wires sit on the ring and tip.
UNA uses Type-A, the wiring the MIDI Association adopted as the official standard. Two TRS→DIN cables are included for connecting 5-pin DIN gear.
If your gear uses Type-B (some manufacturers standardised on it before the spec settled) a plain TRS cable will not work between it and UNA. You need a Type-A-to-Type-B crossover cable. If you're unsure which your device uses, its manual will say.
Input
UNA's input side is governed by six Global settings, all in Menu > MIDI (Chapter 17).
Three of them form a hierarchy of scope, and reading them in this order is the whole trick: MIDI Input Channel decides which notes UNA claims; Thru Track Mode decides whether those claimed notes are echoed back out; and MIDI Thru decides which kinds of message may leave UNA at all. Each one governs exactly its own scope and nothing else.
MIDI Input Channel
Which channel UNA listens to for note-on/note-off messages, to set the global chord or capture input, from your external keyboard.
| Value | Meaning |
|---|---|
| OFF | Ignore all MIDI input. UNA doesn't accept keyboard input. |
| 1-16 | Accept notes only on the selected channel. |
| OMNI | Accept notes on any channel. |
Setting to a specific channel is the safest choice, and not only to stop UNA building chords from several connected devices at once: it is also what tells UNA which notes are yours. Thru Track Mode and the other Thru Track settings only ever act on notes arriving on this channel, so a specific channel is what lets a second keyboard or a DAW track pass through untouched while your own playing gets echoed, re-channelled and quantised. OMNI collapses that distinction - every note becomes your playing.
CC Input Channel
The channel gate for UNA's remote-control CC map. See below for the full map: Controller CCs - the hidden remote surface.
This setting does not cover:
- Any MIDI CC acting as a Modulator's source. Each Modulator carries its own channel and CC number, set via LEARN or the Assign screen (Chapter 12).
- The sustain pedal (CC 64). Enabled globally via the Sustain Pedal setting and read on the same channel as your notes.
| Value | Meaning |
|---|---|
| OFF | No remote-control CCs are consumed. Default - opt in only when you want a controller driving panel actions. |
| 1-16 | Accept remote-control CCs only on the selected channel. |
| OMNI | Accept remote-control CCs on any channel. |
PC Input Channel
Which channel UNA listens to for Program Change, to switch patch from your keyboard or DAW. See Chapter 17.
CC Input Toggle
Tells UNA what kind of button your controller sends on the remote-control CCs, so a press does exactly one thing.
Every remote action is edge-detected - it fires only when a CC crosses the on/off threshold (value 64), so a repeated value or a swept knob/fader fires once instead of dozens of times.
There are two standard button styles, and they need opposite handling:
| Value | Meaning |
|---|---|
| MOMENTARY | Default. The button sends 127 when pressed and 0 when released (like a piano key or drum pad). Toggles flip once per press; the release is ignored. |
| LATCHING | The button sends 127 on the first press and 0 on the next (it stays down until pressed again - many footswitches and DAW "toggle" buttons). Toggles follow the button's position, so UNA stays in sync with it. |
Under LATCHING the toggle follows the button's position: down (127) switches the action on, up (0) switches it off, so UNA stays in step with a latched controller and its indicator light. A high value always means the addressed target is active - Solo Melody down solos Melody, and the Mute CCs act as track on/off switches (down leaves the track playing, up mutes it), matching Solo so that high always means the track is heard.
-
If a toggle only reacts to every other press, switch to LATCHING.
-
If a toggle only stays active while you hold the button, switch to MOMENTARY.
-
One-shot actions (Panic, patch/bank step, tempo nudge) fire once per press in either style.
- Modulator MIDI CC sources always track the knob's value directly (0-127).
Thru Track Mode
Whether the notes you play into UNA are echoed straight back out to the outputs, so your synth hears them as you play.
This setting is about notes, and only about notes arriving on the MIDI Input Channel - the ones UNA might claim. Traffic on any other channel is somebody else's instrument passing through, and none of the modes below touch it.
| Value | Meaning |
|---|---|
| OFF | UNA captures your playing silently. Your synth hears only UNA's sequenced output. |
| AUTO | UNA echoes your notes only when Listen is off - so you hear yourself soloing over UNA, but the chords you set or capture don't pass through while you're setting them. |
| ON | UNA always echoes your playing. Simplest wiring for a single-cable rig where UNA is the only path to your synth. |
AUTO is the "smart mode" for playing along with UNA. You can play the keys and hear yourself as a soloist over the underlying sequence.
MIDI Thru
The master gate: which kinds of message may leave UNA at all, on any channel and any port.
| Value | Meaning |
|---|---|
| OFF | Nothing passes through. Notes included. |
| NOTES ONLY | Notes pass. Everything else is blocked. |
| NOTES + CC | Notes, plus CC, pitch bend and channel aftertouch. |
| ALL (default) | Everything, including Program Change and incoming clock and transport. |
NOTES + CC deliberately covers the pitch wheel and channel aftertouch as well as CC. All three are expression - they follow the hand that plays the notes, so they travel with them. Program Change and clock belong to the session rather than the performance, which is why they need ALL. That split is what lets a DAW-slaved rig forward your playing to a synth without also forwarding the clock it is already following.
How the two work together
MIDI Thru is consulted first, for everything. Only if it lets notes through is Thru Track Mode asked about your own playing.
| Message | OFF | NOTES ONLY | NOTES + CC | ALL |
|---|---|---|---|---|
| Notes - on the MIDI Input Channel | - | -> Thru Track Mode | -> Thru Track Mode | -> Thru Track Mode |
| Notes - any other channel | - | passes | passes | passes |
| CC, pitch bend, channel aftertouch | - | - | passes | passes |
| Program Change | - | - | - | passes |
| Clock, Start / Stop / Continue | - | - | - | passes |
And for the notes handed on to it:
| Note on the MIDI Input Channel | OFF | AUTO (default) | ON |
|---|---|---|---|
| Chord zone, Listen on | - (still feeds UNA) | - (still feeds UNA) | echoed |
| Free zone, Listen on (split set) | - | echoed | echoed |
| Whole keyboard, Listen off | - | echoed | echoed |
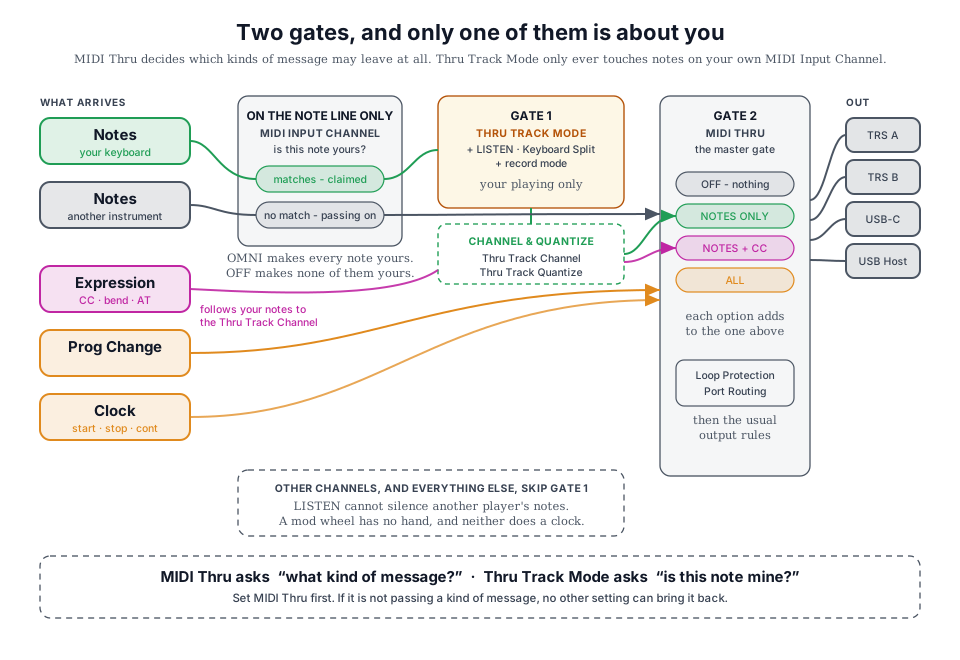
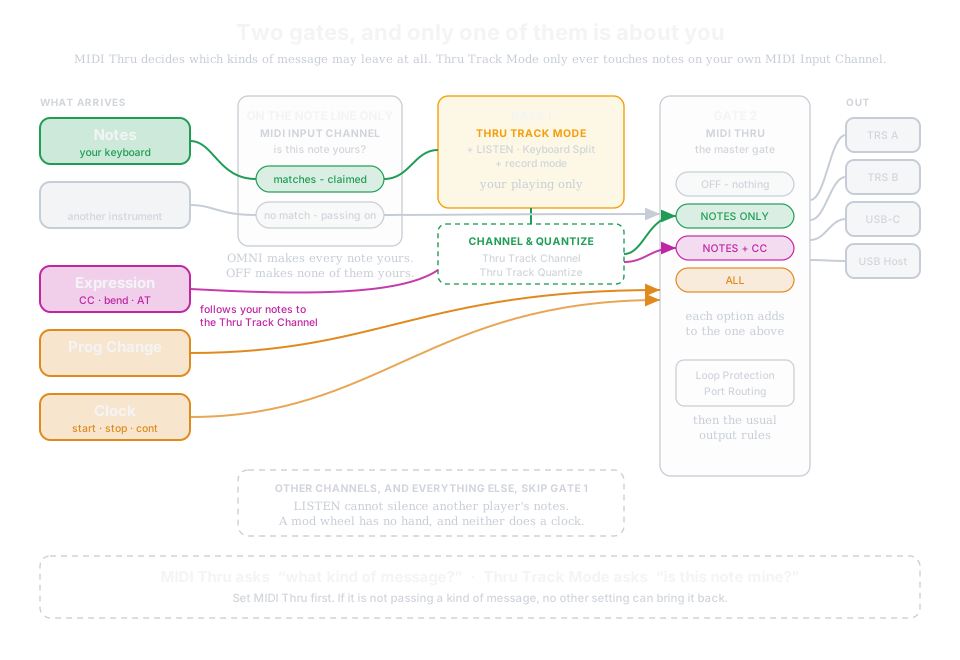
Thru Track Mode says nothing about CC, pitch bend, Program Change or clock - those follow MIDI Thru alone. That is deliberate. Listen and the Keyboard Split answer the question which notes is UNA claiming? - and a mod wheel has no hand, so there is nothing to claim. Holding a chord with Listen on while bending the pitch or riding the filter with your other hand works exactly as you would expect. It also means you can set Thru Track Mode to OFF and MIDI Thru to ALL to hear none of your own playing while your wheels and your DAW's clock keep flowing.
Thru works on every port, and by default a port passes input straight back out of itself - a keyboard on USB-C is thru'd back out USB-C, so a single USB cable to a computer carries both your playing and UNA's sequence, and a keyboard on TRS IN reaches a synth on TRS OUT A/B.
If your computer is patched to echo UNA's output back to its input - some DAW setups do this when local-off is unavailable - set MIDI Loop Protection to ALL PORTS to close the same-port path everywhere. Likewise, if you have deliberately run a TRS OUT back round to UNA's TRS IN, set it to TRS ONLY. See MIDI Loop Protection below.
Output
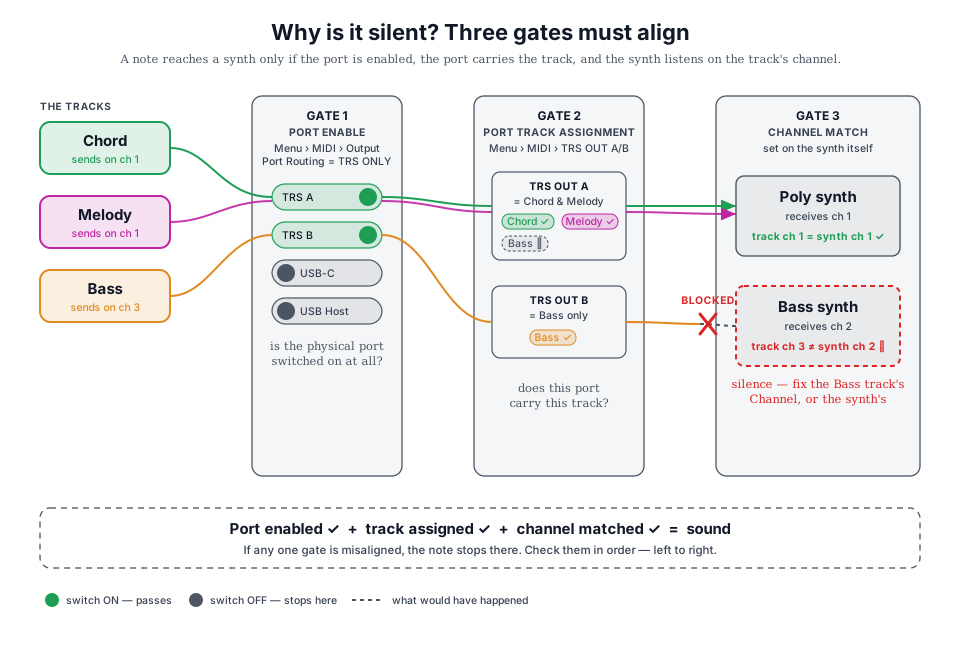
Output routing is a two-tier system:
- Master Port Routing - decides which physical ports can emit
- TRS Port Track Assignment - decides which tracks go through each enabled TRS port.
Combined, you have granular control over which track goes where.
Enabling and Disabling MIDI Ports
MIDI Output Port Routing (Menu > MIDI item 6) is the top-level switch.
It gates which physical outputs are live.
| Value | Ports enabled |
|---|---|
| All | TRS A, TRS B, USB-C, USB Host (default) |
| TRS + USB | TRS A, TRS B, USB-C |
| TRS + HOST | TRS A, TRS B, USB Host |
| HOST + USB | USB-C, USB Host |
| TRS ONLY | TRS A, TRS B |
| USB ONLY | USB-C |
| HOST ONLY | USB Host |
The USB Host output routes MIDI back to a controller - useful if the controller has a display or LEDs that requires feedback from UNA. Not needed for most rigs.
Set to All if you're not sure.
TRS Port Track Assignment
Each TRS output has its own routing setting, to determine which tracks (Melody, Chord, Bass) emit through that port.
TRS OUT A Routing and TRS OUT B Routing (Menu > MIDI items 7 and 8) share the same seven-option list:
| Value | Tracks routed |
|---|---|
| ALL | Melody + Chord + Bass (default) |
| Chord & Melody | (no Bass) |
| Chord & Bass | (no Melody) |
| Melody & Bass | (no Chord) |
| Chord only | |
| Melody only | |
| Bass only |
This is where a "split rig" pattern comes together - set OUT A to "Chord & Melody" going to your poly synth, and OUT B to "Bass only" going to your bass synth. Each synth gets exactly what it should play.
It's useful to split outputs where you don't wish to daisy chain MIDI cables. It can also help reduce MIDI message latency; although this is rarely a concern.
Per-track MIDI channels
Each track has its own MIDI output channel, set as a track parameter (Chapters 8, 9, 11). The Channel parameter accepts values 1-16.
By default the channels are device-wide - one shared set of three channels used by every patch, all on channel 1 out of the box - so a patch change never re-routes your rig. Menu > CONFIG > Track Channels (Chapter 17) can store them per patch instead, for patches that address different gear.
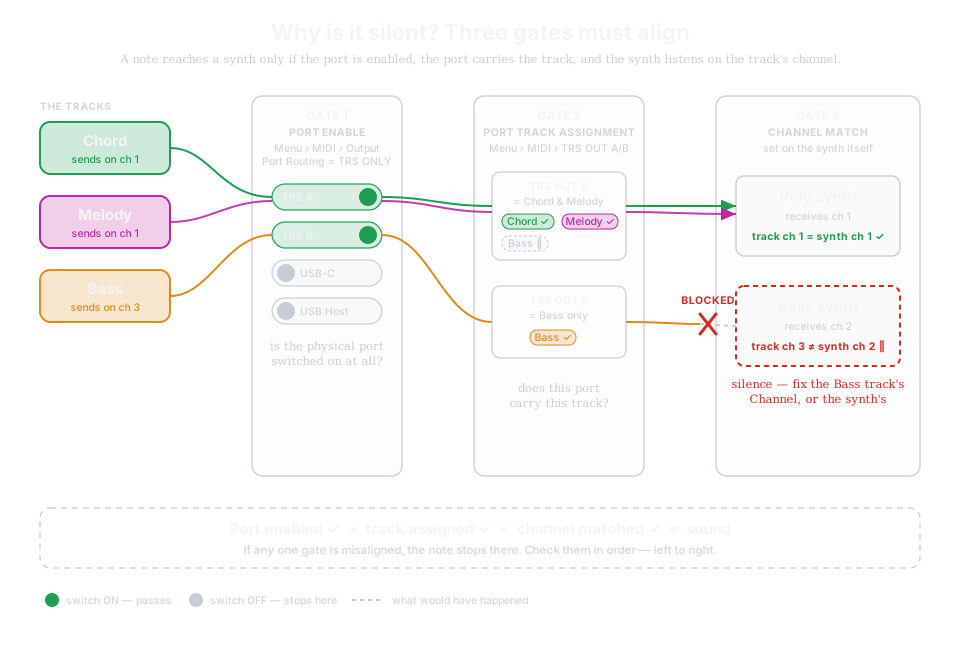
For a note to reach a synth, three things need to align:
- The master port enable (previous section) has to include the physical port.
- That port's per-port routing has to include the track.
- The synth has to be listening on the track's channel.
If any one of those is misaligned, you'll get silence. The Common Rigs section below shows a couple of worked examples.
Keyboard Split
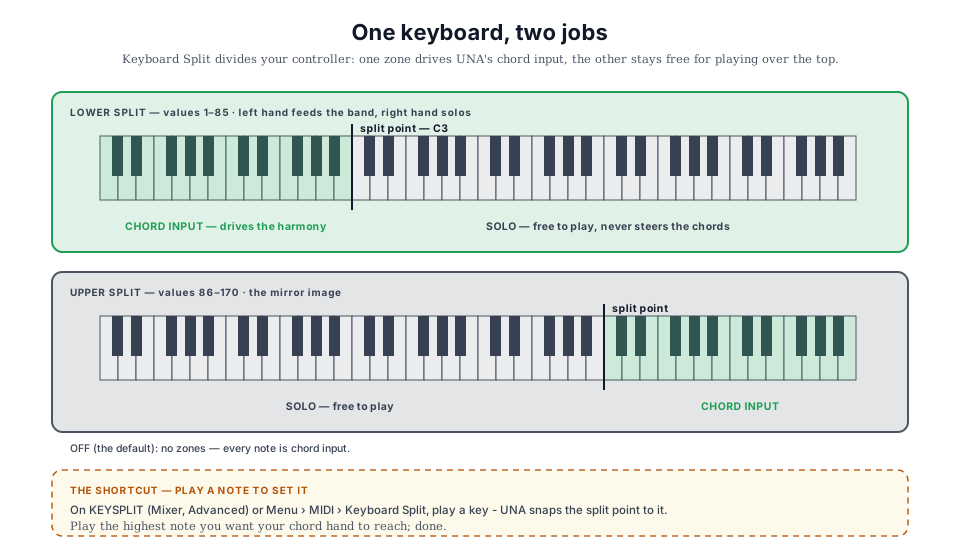
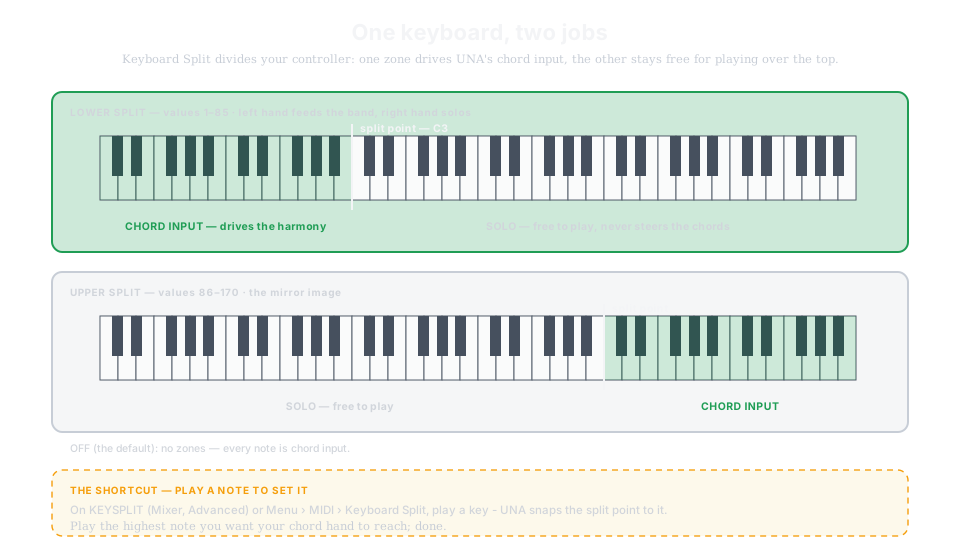
Keyboard Split divides your controller into two zones. One zone drives UNA's chord input (the notes UNA uses to capture or select chords); the other zone stays free for solo playing over the top.
There are two ways in. The quick one is the Mixer's Advanced Mode: from the Mixer, tap CONTROL and press KEYSPLIT for a screen of its own. APPLY and CANCEL both return you to that same Advanced Mode, so the trip out and back is one press each way.
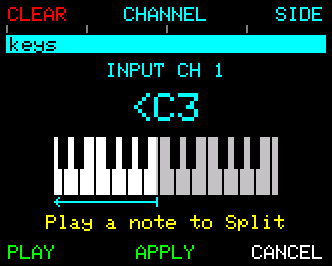
The read-out names the split point and which side is UNA's - <C3 means UNA takes everything below C3, C3> everything above it - and the keyboard underneath shows the same thing, with UNA's half lit and your half greyed.
| Control | What it does |
|---|---|
| Play a note | Sets the split point to that key. Always live on this screen. |
| Rotate CONTROL | Jump by octave (C1, C2, C3...). All the way left is NO SPLIT. |
| Press + rotate CONTROL | Move the split point one note at a time. |
| CLEAR | Turn the split off. |
| CHANNEL | The MIDI Input Channel - which channel UNA listens to. Tap to step to the next one (OFF, 1-16, OMNI, round again); hold it and rotate CONTROL to sweep. It is the same setting as Menu > MIDI > MIDI Input Channel, and the read-out above the split shows it. |
| SIDE | Swap which half is UNA's, keeping the split point where it is. |
| PLAY / STOP | The transport (button 4). |
| APPLY | Keep the split you set, and go back to the Mixer. |
| CANCEL | Put the split and the input channel back to what they were when you opened the screen, and go back. |
Everything on this screen takes effect as you do it - the split you are auditioning is the split UNA is using, because you set it by playing against it. CANCEL is the way out of one you did not mean, without having to remember the note you started from.
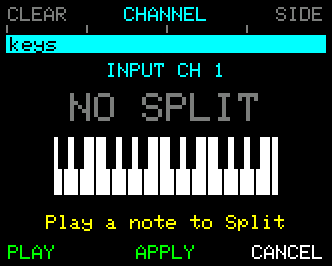
With the split off the screen reads NO SPLIT and the keyboard is drawn whole, every key lit and no arrow - because that is what off means: the entire span is UNA's and there is no free half. The MIDI channel UNA listens on sits above the read-out, and Play a note to Split sits under the keyboard.
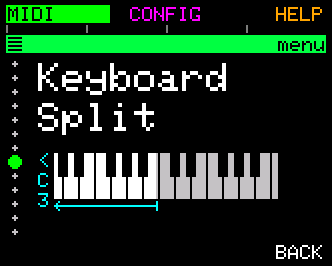
The other way in is Menu > MIDI > Keyboard Split, which edits the same setting in place with the same play-a-note shortcut.
How the value encodes the split
| Value | Behaviour |
|---|---|
| OFF | All notes go to chord input. |
| 1-85 | Lower split. Notes below the split point drive chord input; notes above are free for solo. The value encodes the split point as an offset. |
| 86-170 | Upper split. Notes above the split point drive chord input; notes below are free for solo. |
The "play a note to set it" shortcut
Playing a MIDI note snaps the split point to that note. Play the highest note you want the left hand to reach, and UNA sets the split there.
This is much faster than rotating the CONTROL Knob to hunt for the right note number. It is always live on the KEYSPLIT screen; in the Menu it works while Keyboard Split is the currently displayed item.
What reaches the outputs
With Thru Track Mode set to AUTO and Listen on, the free zone is echoed to the MIDI outputs while the chord zone is not - the chord hand is feeding UNA, so you hear the band it drives rather than the notes themselves. Set Thru Track Mode to ON and both zones are echoed. Either way MIDI Thru must be allowing notes through in the first place: it is the outer gate, so MIDI Thru = OFF silences the free zone no matter what Thru Track Mode says.
Your free hand is a solo, so it carries the two Thru Track settings from Menu > CONFIG: Thru Track Channel puts it on its own MIDI channel, and Thru Track Quantize snaps it to the harmony your other hand is holding. Together those turn a split keyboard into two independent voices - chords to one synth, a "no wrong notes" lead to another.
Note range
UNA's MIDI input note range is C0 (12) to B6 (95) - a wide range that covers most keybeds.
Notes outside that range are clamped to the boundary. If you play higher than B6 on your controller, UNA reads it as B6.
Chord-tracking works across the full range, but chords that voice into notes above B6 will fold their upper notes down. If a chord ends up sounding lower than you expect, check that its natural voicing isn't hitting the ceiling.
UNA outputs notes in the full 0-127 MIDI pitch range. (C-1 to G9)
MIDI Loop Protection
MIDI Loop Protection (Menu > MIDI item 14) controls whether UNA echoes thru'd input back out of the same port it arrived on. It has three settings:
-
OFF (default): every port passes its input straight back out, letting UNA act as a plain MIDI thru/merge box on all three - a keyboard into UNA's TRS IN passed on to a synth on UNA's TRS OUT, and a keyboard on USB-C thru'd back out USB-C. This suits almost every rig.
-
TRS ONLY: MIDI arriving at the TRS input is not re-transmitted from the TRS outputs. USB and USB Host stay free to pass their own input back out. Choose this only if you have deliberately cabled a TRS OUT back round to UNA's TRS IN.
-
ALL PORTS: no port echoes its own input. Use this when your computer is patched to send UNA's output back to its input, which would otherwise loop over USB.
UNA has separate TRS IN and TRS OUT A/B sockets, so sending TRS input out of TRS is ordinary MIDI thru rather than feedback - a loop can only form if you physically patch an output back to the input. The same is true of USB, where MIDI IN and MIDI OUT are separate endpoints. That is why protection is off unless you ask for it.
Whichever setting you pick, input is always free to cross to the other ports if thru and routing allow it - loop protection only ever affects the round trip back out of the port the message came in on.
The setting gates all thru traffic - notes, CCs, Program Change and clock/transport alike - not just notes.
Changing this setting while you're holding a key sends an all-notes-off to any port it has just closed, so a held note can't be left hanging.
MIDI Learn
UNA can learn an incoming CC - a mod wheel, aftertouch, a slider - and bind it to a parameter without you knowing the CC number in advance.
Learn belongs to the Modulation system rather than to MIDI setup, so it's documented with the rest of it: see Chapter 12 - Modulate, under Choosing a source → MIDI CC.
The one thing worth knowing here: UNA does not respond to CC messages for direct parameter control. A CC reaches a parameter only by way of a Modulator.
Controller CCs - the hidden remote surface
UNA responds to a fixed set of CC numbers on the CC Input Channel as remote controls for the hardware itself.
This lets you drive UNA's mixer, performance settings, Track, Mod, and Patch controls from a MIDI controller. Useful for pre-programmed automation, a foot controller that toggles Listen while you're playing, or a DAW that switches patches between song sections.
The CC numbers used here sit in the parts of the MIDI CC space that manufacturers rarely touch, so a normal controller's mod wheel, volume, pan or pedals never collide with these actions.
Every action is edge-detected - it fires only when the CC crosses the on/off threshold (value 64), so repeats and swept knobs/faders never re-fire.
Whether the release (value < 64) also counts as a press depends on the CC Input Toggle setting (see Input, above):
- Momentary ignores it (one press = one action)
- Latching treats it as the button's "off" press so toggles follow the button's position.
| CC | Action |
|---|---|
| 85 | Patch Prev |
| 86 | Patch Next |
| 87 | Bank Prev |
| 88 | Bank Next |
| 89 | Mod Select (value scales to a modulator index) |
| 90 | Mod Toggle (arm / disarm the selected modulator) |
| 102 | Select Chord Track |
| 103 | Select Melody Track |
| 104 | Select Bass Track |
| 105 | Mute Chord |
| 106 | Mute Melody |
| 107 | Mute Bass |
| 108 | Solo Chord |
| 109 | Solo Melody |
| 110 | Solo Bass |
| 111 | Toggle Listen |
| 112 | Toggle Live Play |
| 113 | Toggle Metronome |
| 114 | Toggle Chord Chain |
| 115 | Toggle Patch Chain |
| 116 | Cycle Thru Track Mode (OFF ↔ ON) |
| 117 | Tempo Down (nudge by 1 BPM) |
| 118 | Tempo Up (nudge by 1 BPM) |
| 119 | Select MIDI Thru (0-31 Off, 32-63 Notes, 64-95 Notes + CC, 96-127 All) |
| 123 | Panic (All Notes Off + Stop) |
What's not on this map, and why.
- Play / Stop / Continue are driven by native MIDI transport messages, not CCs.
- Direct patch select is driven by Program Change.
- Continuous parameter values (pitch, velocity, etc.) are reached via the CC-as-modulation-source path.
- Assign a Modulator with a MIDI CC source and point it at the parameter (Chapter 12).
Most users won't use these mapping - but it's there for when you want to control something externally.
SysEx
UNA does not support sysex messaging for any user facing features.
Interaction with Midicake CONNECT is via WebSerial and WebUSB protocols.
Common Rigs
Four worked patterns that cover the vast majority of MIDI setups.
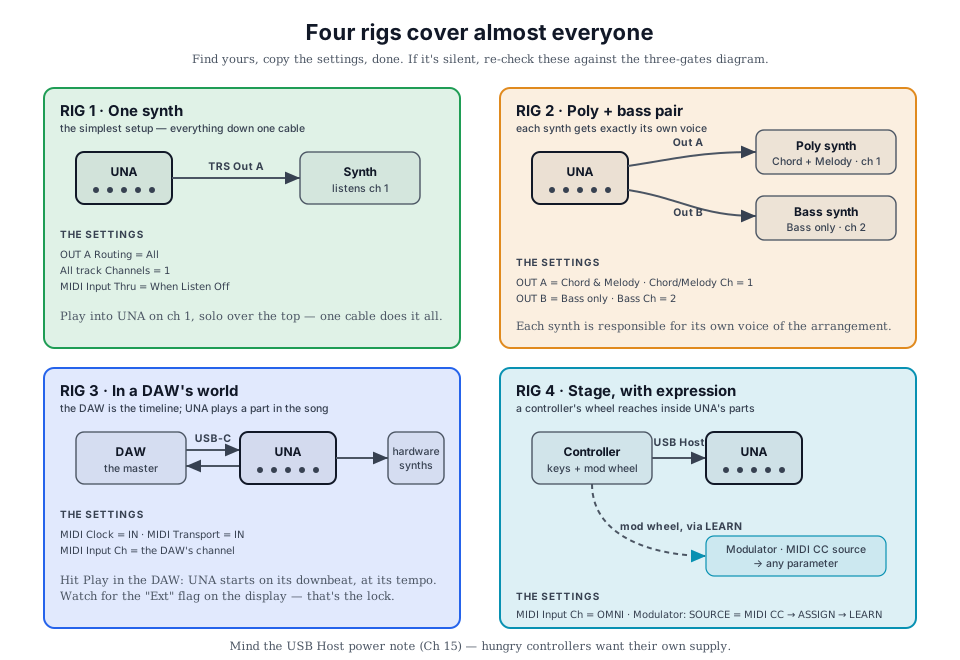
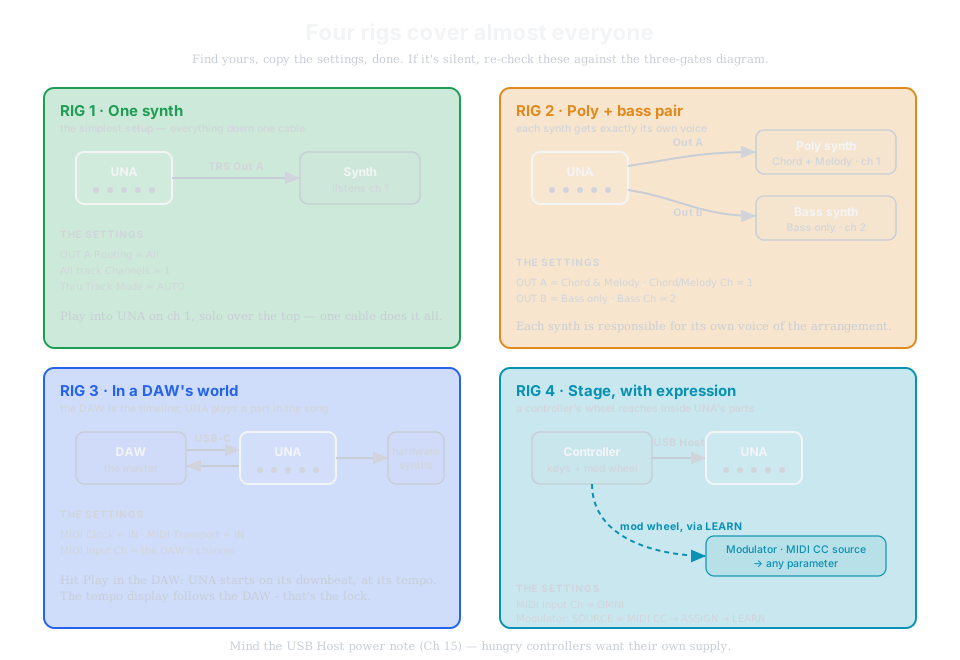
Rig 1 - Solo synth over MIDI Out A
You have one keyboard synth. UNA feeds it. Simplest setup.
- UNA's MIDI Out A → keyboard's MIDI In.
- Menu > MIDI > MIDI Output Port Routing = All.
- Menu > MIDI > TRS OUT A Routing = All (all three tracks reach the synth).
- All three tracks' Channel parameters set to 1 (the synth listens on channel 1).
- Menu > MIDI > Thru Track Mode = AUTO (so you can solo over the top).
Play into UNA on channel 1; UNA plays out to the synth on channel 1. Done.
Rig 2 - Split poly/bass synth pair
You have a poly synth and a bass synth. UNA drives both.
- UNA → MIDI Out A → poly synth.
- UNA → MIDI Out B → bass synth.
- Menu > MIDI > TRS OUT A Routing = Chord & Melody.
- Menu > MIDI > TRS OUT B Routing = Bass only.
- Melody and Chord track channels set to whatever the poly synth listens on (say, 1).
- Bass track channel set to whatever the bass synth listens on (say, 2).
Now the poly synth gets your chords and melody, and the bass synth gets your bass line. Each responsible for its own voice.
Rig 3 - UNA in a DAW-driven rig
Your DAW is the master. UNA plays a role in the song.
- DAW → UNA (USB-C). UNA is a USB MIDI device.
- Menu > MIDI > MIDI Clock = IN and MIDI Transport = IN (Chapter 17).
- Menu > MIDI > MIDI Input Channel = the channel your DAW sends UNA on.
- UNA's tempo will follow the DAW's clock (Chapter 16).
- UNA's outputs can go to hardware synths via TRS OUT A / B as usual, or back to the DAW via USB-C to be recorded.
Rig 4 - Live rig with a controller
You're on stage. You want a controller you can slide expression into UNA.
- Controller → UNA (USB Host Type-A).
- Menu > MIDI > MIDI Input Channel = OMNI (accept anything).
- Configure a Modulator with MIDI CC source (Chapter 12); LEARN your mod wheel to it; point it at whatever parameter you want to sweep. The Modulator captures the channel and CC number during LEARN - no global setting needed.
Now your live playing drives UNA's sequenced parts, and your mod wheel reshapes UNA's output on the fly.
Cross-references
- Chapter 5 - the Modulate / Listen / Play mental model that underlies most MIDI decisions.
- Chapter 12 - Modulators, especially MIDI CC as source and MIDI CC as target output.
- Chapter 14 - Midicake Connect for patch backup and firmware updates.
- Chapter 16 - Sync & Clock in depth.
- Chapter 17 - every MIDI Global setting, item by item.
- Chapter 21 - MIDI Implementation Chart (standard reference table).