Chapter 6 - Home
UNA's main screen is Home, this is UNA's Hub.
This chapter describes EXPERT. In BASIC, Home has a shorter row and a simpler screen - see BASIC mode.
From here, a single button press will take you into any Track or Modulation mode.
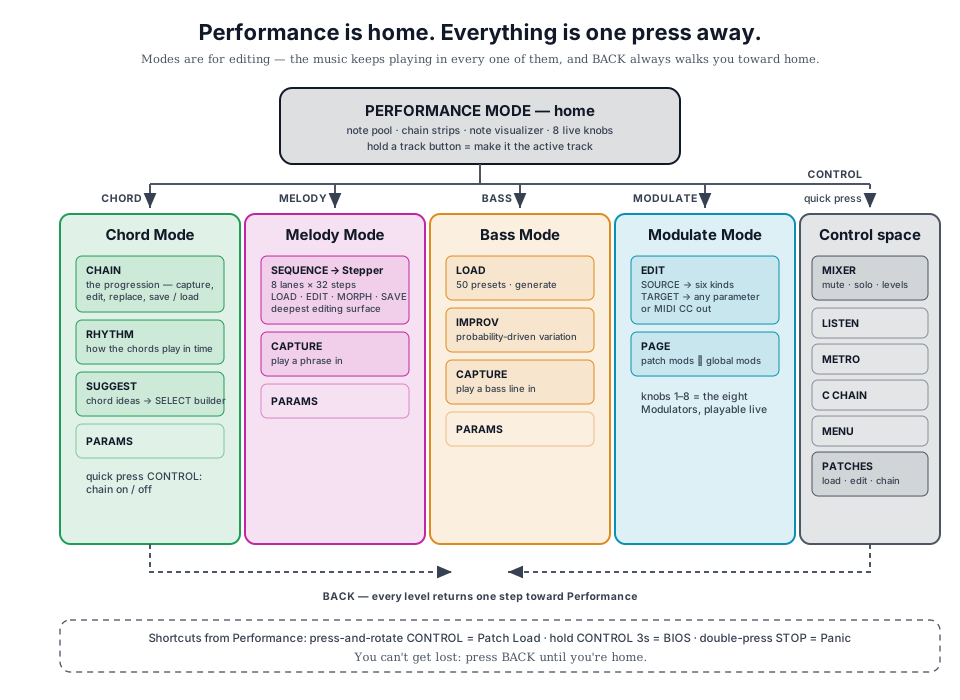
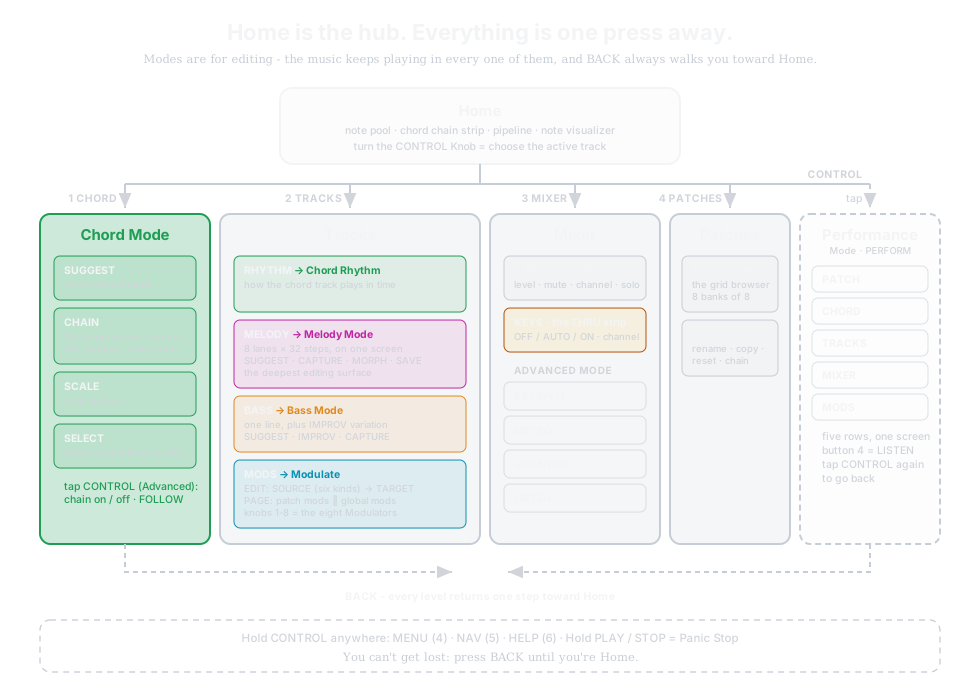
What's on the display
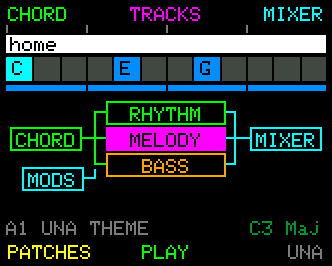
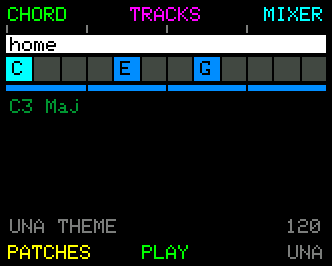
The Home display is built around showing you, at a glance, what UNA is doing musically:
- The Note Pool. The wide strip across the top of the screen shows the note pool - the set of pitches that belong to the current chord. Every track draws its notes from this pool, so it's where harmony lives visually. The root note of the chord is highlighted - handy for orienting yourself in a progression, or for knowing what note to start a solo on. Played Chords appear as Green and Chord Chain Chords are Blue.
- The Chord Chain strip. The thin light-blue bar just below the note pool is your Chord Chain - the progression of chords driving the harmony. Each block is one chord; each block's width is proportional to the chord's length in the progression. The currently playing chord is highlighted; a marker along the bottom shows where you are in it. When the chain is off (you're playing chords by hand instead of running the progression), the strip is hidden and the pipeline moves back up into the space. Chapter 8 covers Chord Chains in full. (The matching Patch Chain strip lives on the Tracks screen.)
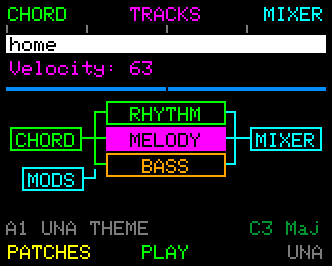
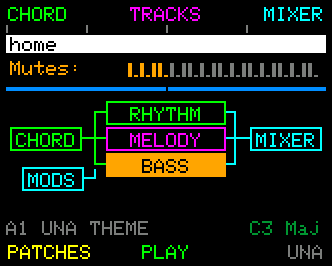
- The pipeline. CHORD feeds the three track lanes - RHYTHM, MELODY and BASS - which merge into the MIXER. The selected track's lane is drawn inverted, so the screen always says which track the PARAMETER Knobs are pointed at.
- The bottom line. The patch name on the left, and on the right the chord you are hearing - green when you are playing it yourself, light blue when the chord chain is driving it.
When moving to the next chord, the Note pool shifts to match, so you can see harmony in real time.
-
The Note Visualizer. While the sequencer is running, the body dims and the note roll appears over it - the notes all three tracks are sending, rising up the screen. Stop, and it fades back up to the still picture. This happens whichever view you are on, and however the sequencer was started: the PLAY button, an external clock, or simply playing a note.
-
Parameter Values. The moment you move a PARAMETER Knob, the name and value are temporarily displayed.
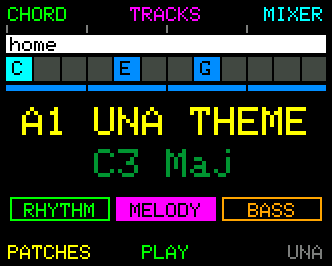
Home's four views - pipeline, info, corners and clear
Home's body can be any of four things: press and turn the CONTROL Knob to step between them, one view per detent - right for the next, left for the previous, wrapping round both ways. UNA remembers which one you left it on. (In BASIC, Home has one body and the turn does nothing.)
- The pipeline (above, and the default). The picture of how UNA is wired - CHORD feeding the three lanes into the MIXER, with the selected lane inverted.
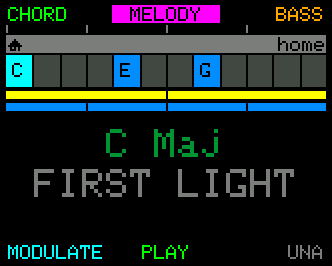
- The info view. The patch name and the chord you are hearing in large type, over the three tracks side by side with the selected one highlighted. The same information as the pipeline's bottom line, big enough to read from across a room or off a stand.
- The corners view. Small read-outs in the four corners of the body: the chord top-left,
the detected root top-right (shown as "played>detected", e.g.
G>C, when a track follows it), the patch name bottom-left and the tempo bottom-right.
- The clear view. Nothing at all - just the chain strip, and the notes while it plays.
Every view takes the note roll over the top while the sequencer runs (the corners' text stays on top of the notes), and the chain strip sits above them all.
Every detent moves one view. The order is pipeline, info, corners, clear, and round again.
The Tracks display views - Notes, Notes + Info, Notes + Info Extra
Three further overlay views live on the Tracks screen (button 2), separate from Home's four above. There, tap the CONTROL Knob for the Advanced Mode and press VIEW (Knob 8) to cycle between them:
- Notes. Just the note pool, the chain strips, and the note animation. Cleanest look.
- Notes + Info (default). Adds the current chord name, the patch name, and a small
G>Croot read-out (top-right): the note you played lowest, then the root UNA detected from the whole chord. Which tracks follow that detected root is each track's own ROOT NOTE setting (Chapter 7, or all three at once on Scale Options). The read-out only appears while at least one track is on DETECT - with every track on LOWEST nothing acts on the difference, so there is nothing to show. - Notes + Info Extra. Shows Chord, the root read-out, Tempo (BPM), Current Patch ("A1") , and Patch Name, for when you want everything on-screen at once.
Rotating the CONTROL Knob selects the track, on Home and on Tracks alike - it is not what changes the view. Press and rotate is Home's view flip. On Home the chord name is always on screen: bottom-right on the pipeline, and in large type on the info view.
On the Tracks Advanced Mode, Notes + Info Extra drops its two bottom corners (patch slot and patch name): the knob bar sits in that band while the layer is up. The top row - chord, root and tempo - stays, so you can see VIEW take effect without leaving the layer.
Chord Names: If UNA can't put a name to the shape, it lists the notes instead.
Chord Detection
UNA identifies the current chord automatically. Its colour follows the same rule as the note pool: blue when the chord chain is driving the harmony, green when you're playing chords by hand.
The 6 CONTROL buttons
Home has one row of buttons. A tap of the CONTROL Knob opens Performance Mode (below), which has a row of its own.
| 1 | 2 | 3 | 4 | 5 | 6 | |
|---|---|---|---|---|---|---|
| EASY | CHORD | TRACKS | MIXER | PATCHES | PLAY / STOP | UNA |
Every one of these is a single press.
- CHORD - opens Chord Mode, the harmony screen (Chapter 8).
- TRACKS - opens the Tracks screen, the way in to RHYTHM, MELODY, BASS and MOD.
- MIXER - opens the mixer and its settings hub (see The Mixer, below).
- PATCHES - opens the Patch Load screen (Chapter 14).
- PLAY / STOP - the transport control. (See below).
- UNA - the splash. Home is home; there is nowhere to go "back" to.
Track select is the CONTROL Knob - rotate it to walk RHYTHM → MELODY → BASS - and the COMMON row has the rest: hold the CONTROL Knob from anywhere and MENU is button 4, NAV (the list of screens) is button 5 and HELP is button 6. On Home, button 1 is TUTORIAL (Chapter 3), so the walkthrough is one grip away, and button 3 is MODE, which opens SELECT MODE (below). LISTEN is one tap away, on Performance Mode's button 4.
| 1 | 2 | 3 | 4 | 5 | 6 | |
|---|---|---|---|---|---|---|
| COMMON (hold CONTROL) | TUTORIAL | - | MODE | MENU | NAV | HELP |
SELECT MODE - BASIC or EXPERT
UNA has two modes. EXPERT is everything this manual describes. BASIC is a simple one-track arpeggiator with fewer screens and its own patch (BASIC mode).
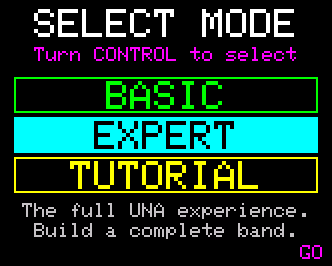
Hold the CONTROL Knob and press MODE (button 3). Turn the CONTROL Knob to choose BASIC, EXPERT or TUTORIAL (BASIC plus the guided walkthrough), then press GO (button 6). The screen opens on the mode you are in, so GO on its own leaves everything as it was. You can't switch while the sequencer is running: GO greys out and STOP appears on button 4.
UNA also shows SELECT MODE at every power-on. To skip it, set Startup Screen in the Menu's CONFIG list (Settings) to BASIC or EXPERT, and UNA starts straight in that mode; set it back to SELECT MODE to be asked again.
The Tracks screen
Button 2 opens Tracks, the hub over the three track screens - and the screen that carries the note roll, the chain strips and the three display views described above.
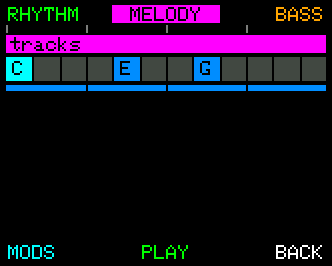
| 1 | 2 | 3 | 4 | 5 | 6 | |
|---|---|---|---|---|---|---|
| EASY | RHYTHM | MELODY | BASS | MODS | PLAY / STOP | BACK |
| ADVANCED | RHYTHM | MELODY | BASS | LISTEN | PLAY / STOP | BACK |
| COMMON | - | - | - | MENU | NAV | HELP |
Buttons 1-4 open their screen on a single press. RHYTHM goes straight to Chord Rhythm: Tracks is about the chord track, and its rhythm is what you came for - Chord Mode is still one press from Home.
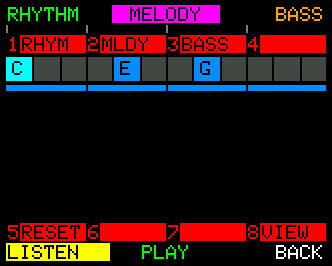
A tap of the CONTROL Knob switches to ADVANCED, exactly as it does on Home.
- RHYTHM, MELODY and BASS open the three tracks - the same three doors Easy Mode has. They are repeated here so a latched ADVANCED does not have to be dropped to reach a track. The layer stays up behind them, so BACK puts you down on ADVANCED again.
- Button 4 is LISTEN.
- The knob bars carry five controls. RHYM, MLDY and BASS (Knobs 1-3) mute their track - the same mutes the Mixer holds. VIEW (Knob 8) cycles the display through Notes, Notes + Info and Notes + Info Extra. RESET (Knob 5) puts all three tracks back to their defaults. It asks first: press the same knob again, or YES (button 4), to go through with it.
What a mute does
A mute silences a track - it does not stop it. The part keeps running underneath: its notes go on scrolling down the lane, drawn in grey, while nothing leaves the MIDI sockets. Anything the track already had sounding is cut the instant you mute, so the silence is immediate rather than trailing off at the end of the note.
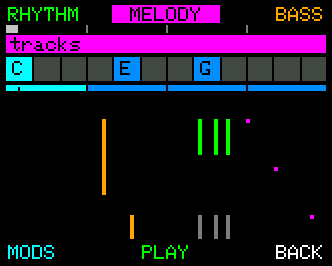
The lane above catches a mute landing mid-bar. The chord notes that made it out are still green; everything after the mute is grey. Unmuting rejoins the part wherever it has got to - it does not restart it, and it does not land off the beat - so you can drop a track out for a bar and bring it back without losing your place. Where two tracks share a pitch, the live one is always drawn on top of the muted one.
The mutes live on the ADVANCED knob bar - tap CONTROL for Advanced Mode and press knobs 1, 2 or 3, labelled RHYM / MLDY / BASS. These are the same mutes the Mixer holds: whichever you reach for, there is only one switch per track.
Holding CONTROL brings up the COMMON row, which says the same thing here as on every other screen: MENU, NAV and HELP on 4, 5 and 6, and nothing on 1, 2 and 3.
To select a track rather than mute one, rotate the CONTROL Knob: it walks RHYTHM -> MELODY -> BASS and stops at each end, on either layer. The selection is deliberate and survives BACK to Home.
Play, Stop, and Panic Stop
The PLAY / STOP control starts and stops UNA's sequencer. Press to toggle.
Pressing Stop while UNA is playing does a clean stop: the sequencer stops, the music ends. Press again to Play. A short tap while the last notes are still playing out does nothing - wait for the tail to finish, or hold to Panic Stop (below).
Hold PLAY / STOP for about half a second and you trigger Panic Stop. That's UNA's nuclear option - the sequencer stops, every active note is silenced, and all-notes-off / all-sound-off are sent on every MIDI channel, clearing the whole output. Use it when a stuck note is hanging on a synth, something has gone sideways, or when you just want a clean slate. A hold always ends in a full stop, whatever UNA was doing.
You don't have to press Play. When UNA is stopped, holding a note or a chord on a connected keyboard starts the sequencer - that's Live Play (Chapter 5).
Release the keys and it stops. A sustain pedal latches it if you'd rather keep it running while you change chord.
The CONTROL Knob
The CONTROL Knob opens Performance Mode, selects the active track, and doubles as a modifier for live parameter tweaks.
- Quick press (press and release, with nothing else touched) → opens Performance Mode, the performance screen described in the next section. The same tap there brings you back.
- Rotate → selects the active track, RHYTHM → MELODY → BASS, stopping at each end. The pipeline highlights the selected lane, and the PARAMETER Knobs follow.
- Hold and rotate a PARAM knob → a temporary performance edit of that parameter: the value changes live while you hold, then snaps back to its stored value the moment you release CONTROL. Nothing is saved. (Covered below.)
The music keeps playing the whole time, in every case.
Performance Mode
Performance Mode - PERFORM, as it names itself in the corner - is the screen to sit down at with a keyboard and play from. Everything on it is something another screen already does; its job is to put the live gestures on one surface, label them permanently, and never make you change screen mid-song. Tap the CONTROL Knob on Home to open it; tap again, or press BACK, to leave. The music keeps playing either way.
Performance Mode opens on a card first: HERE BE DRAGONS! OK (button 5) goes on to the screen and RUN AWAY (button 6) backs out. HELP (button 2) explains the screen, and I GOT IT (button 4) goes on and stops the card showing again.
Five rows, always in this order and always all on screen: PATCH, CHORD, TRACKS, MIXER and MODS. One is open - tall, with a picture in it - and the other four are closed strips that still show what they are doing: the patch chain creeping along, the chord chain, the three tracks firing, the mixer's four chips, the eight modulators moving. Each row keeps its own colour, and the coloured rails down the sides tell you at a glance where one ends and the next begins.
| 1 | 2 | 3 | 4 | 5 | 6 | |
|---|---|---|---|---|---|---|
| EASY | MODE | (the open row) | UNDO | LISTEN | PLAY / STOP | BACK |
| COMMON (hold CONTROL) | - | - | REDO | MENU | NAV | HELP |
- MODE steps to the next row and wears that row's colour. Turning the CONTROL Knob does the same walk, one row per detent - and so does holding MODE and turning it.
- Button 2 names the open row - PATCHES, CHORD, TRACKS, MIXER or MODS - and pressing it opens that row's own screen. BACK from there brings you here again.
- PLAY / STOP is the transport, as everywhere; hold it for a Panic Stop.
- LISTEN is the listen toggle, lit while on, on button 4. This is where LISTEN lives for Home.
- UNDO and REDO are drawn but not yet active - they are reserved for a coming undo history, and pressing them does nothing.
The two rows of labels above and below the picture are the eight PARAMETER Knobs: the top row is knobs 1 to 4, the bottom row knobs 5 to 8, and each cell says what that knob does on the open row. A cell showing only its number is a knob that row does not use. When you touch a knob its cell lights in the row's opposite colour, so you can see which one you have hold of.
The CONTROL Knob does two things here, and they are the same on every row. Turn it to change the open row - the same walk MODE makes, so the whole screen is reachable from the knob your hand is already on. Hold and turn it for that row's own gesture: browse the patches, walk the chord's degrees, or pick the track or modulator the row is pointing at. Each row is described below.
PATCH
The patch name, its bank and number, and the patch chain.
| Control | What it does |
|---|---|
| Hold + turn CONTROL | Browse the patches. The name changes as you turn; the patch loads when you let go, so a sweep past three patches loads one, not three. |
| Knob 1 - CHAIN | Press to turn the patch chain on or off. |
| Knobs 2 and 4 - EVOLV, BANK | Labelled but not yet active - reserved. Knob 3 is empty. |
CHORD
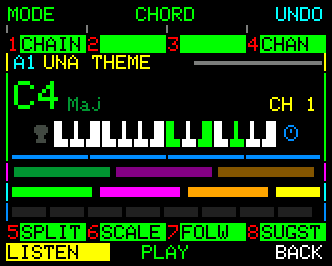
The current chord in full - root and octave large, quality and inversion small - drawn as it is actually voiced on a piano, with the sustain pedal (a foot) and incoming CC (a knob) shown as icons either side of the keys. The MIDI input channel is in yellow, the keyboard split above it as an arrow (<C4 or C4>; nothing at all when the split is off), and the chord chain along the bottom.
| Control | What it does |
|---|---|
| Hold + turn CONTROL | Walk the chord through the diatonic degrees of the key it is in - I, ii, iii, IV, V, vi, vii - hearing each one. The degree is named in grey beside the chord as you go. Turning back left stops on the chord you started from, so the gesture is always undone by reversing it. |
| Knob 1 - CHAIN | Press to turn the chord chain on or off. |
| Knob 4 - CHAN | Turn to set the MIDI Input Channel (OMNI at the bottom). Press to flash which read-out it points at. |
| Knob 5 - SPLIT | Press to open the Keyboard Split screen (Chapter 15). |
| Knob 8 - SUGST | Press to open Chord Suggest, offering a next chord. |
| Knob 6 - SCALE | Press to open Scale Options (Chapter 8). |
| Knob 7 - FOLW | Labelled but not yet active - reserved. |
TRACKS
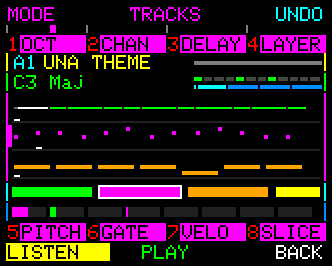
The three tracks as lanes: the rhythm as one thin line per layer with a grey progress dot, the melody and bass as pitch slots that light as the notes play. The eight knobs here are the same parameters they are on every track screen - OCT, CHAN, DELAY, LAYER, PITCH, GATE, VELO, SLICE, with the secondary parameter on press-and-turn - acting on the active track.
| Control | What it does |
|---|---|
| Hold + turn CONTROL | Select the active track: RHYTHM, MELODY, BASS. It stops at the ends rather than cycling round, and it is the same selection the MIXER row picks - the same grip on both rows. |
| Knobs 1 to 8 | The active track's parameters, exactly as on Home. |
MIXER
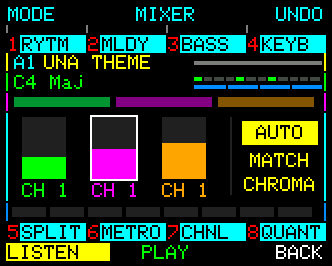
Three faders - RHYTHM, MELODY, BASS - with each track's MIDI channel beneath in its own colour, and the THRU strip to the right showing the Thru Track Mode, Channel and Quantize. A muted track's fader is hollow; the selected track is ringed in white. The channel and quantize grey out while the mode is OFF.
| Control | What it does |
|---|---|
| Hold + turn CONTROL | Select a track - the same grip TRACKS uses, for the same selection. |
| (the level) | On the faders themselves: knobs 1, 2 and 3, below. |
| Knobs 1, 2, 3 - RYTM, MLDY, BASS | One knob per fader: press to mute, turn for level, press and turn for the MIDI channel. |
| Knob 4 - KEYB | Turn to set the Thru Track Mode - whether your own playing passes through: OFF, AUTO or ON. (The strip it sets is labelled THRU on the mixer itself.) |
| Knob 5 - SPLIT | Press to open the Keyboard Split screen. |
| Knob 6 - METRO | Press to open the Metronome page. |
| Knob 7 - CHNL | Turn to set the Thru Track Channel. It takes effect when you let go of the knob. |
| Knob 8 - QUANT | Turn to set Thru Track Quantize - CHROMA, CHORD, PENTA, SCALE or BLUES (Chapter 17). |
Pressing knob 4, 7 or 8 flashes the read-out it controls, so you can find it before you turn.
MODS
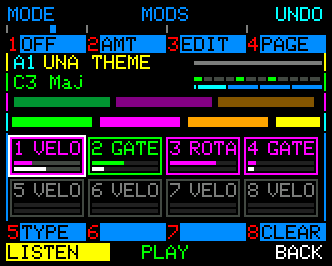
The eight modulators of the current page as tiles, each in the colour of the track it targets and grey when off. Every tile carries two bars: the upper is the amount you have set, the lower is the modulator's live output right now, so you can see it moving.
| Control | What it does |
|---|---|
| Hold + turn CONTROL | Select a modulator; the selected tile is ringed in white. |
| Knob 1 - ON / OFF | Press to turn the selected modulator on or off. The label says what the press will do. |
| Knob 2 - AMT | Turn for the selected modulator's amount. Press-and-turn does the same thing, so it does not matter which way you grab it. |
| Knob 3 - EDIT | Press to open the full modulator editor. Not available while a patch chain is running - the chain would swap the modulators out from under the editor. |
| Knob 4 - PAGE | Press to step to the next page of eight. |
| Knob 5 - TYPE | Press to switch it between loop and one-shot. |
| Knob 8 - CLEAR | Press to turn off every modulator on this page. |
The COMMON row
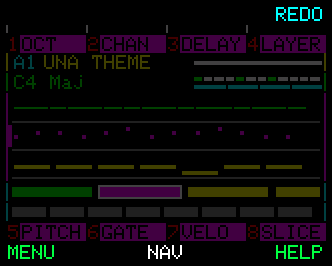
Hold the CONTROL Knob and the buttons become - | - | REDO | MENU | NAV | HELP, the same held-CONTROL row as every other screen. MENU, NAV and HELP work as they do everywhere. REDO, like UNDO on the main row, is reserved and not yet active.
Active Track and the PARAMETER Knobs
The 8 PARAMETER Knobs are always live on Home. You can adjust parameters without entering a Track mode - just turn a knob and the change happens live.
The PARAMETER knobs only target the active track, and the pipeline view shows which one that is - the selected lane is drawn inverted.
Two ways to change it, both staying on HOME:
- Rotate the CONTROL Knob - steps RHYTHM → MELODY → BASS, stopping at each end rather than wrapping round. The quickest. (Press and rotate is not this - it swaps the view.)
- Tap CONTROL for Performance Mode, turn CONTROL to the TRACKS row, then hold and turn CONTROL. The same walk, with the three tracks drawn in front of you as you make it.
There is a third way, one level down: the Tracks screen takes the same CONTROL rotate, on either of its layers. That selection is deliberate too, so it is still in force when you come back out here. Simply opening a track from there is not a selection, and does not change it.
A screen that pins a track for you does not change your selection. Chord Mode works on the chord track whichever one you had chosen, so it borrows the selection while you are in there and hands it back on the way out. Selecting is a deliberate act; being taken somewhere is not.
The display also tells you, by colour and parameter label, which track and which parameter you're changing as you turn a knob.
And remember the two parameter layers from Chapter 5: rotate a knob to change a primary parameter, press and rotate to change a secondary parameter. Every track exposes 16 parameters across the 8 knobs.
Temporary edits - push a parameter, then let it snap back
Sometimes you want to push a parameter for a moment and then have it spring straight back. For example, open the gate wide for a one-bar build, drop the velocity for a hushed passage, or lift the octave for a fill. To do this;
- Hold the CONTROL Knob and rotate a PARAMETER Knob: the value moves live, the music responds immediately, and the instant you release the CONTROL Knob it snaps back to where it was.
Nothing is written - your patch keeps its original value. Use it during a performance to push a part you've already dialled in.
A few things worth knowing:
- It works on both layers - hold CONTROL and rotate for a primary parameter, hold CONTROL and press-and-rotate for a secondary.
- You can hold several knobs at once; every temporary change snaps back together when you release CONTROL.
- Temporary values display in yellow, so you can always tell a held edit from a committed one.
- Tempo is the exception. Because tempo is a single device-wide value, not part of the patch, changing it always sticks, even under CONTROL.
The same gesture is available inside Chord, Melody, and Bass Modes, and in Modulate Mode it temporarily rides a modulator's amount (Chapter 12).
Targeted edits - dial a parameter, then let it land
There's a mirror-image gesture to Temporary edits, for when you want to aim at a new value carefully before committing to it. Instead of cycling a parameter though all its intermediate values, you dial it into a new position and let it lock in.
- Hold a PARAMETER Knob and rotate the CONTROL Knob: the on screen value changes, but the music only responds at the moment you release the PARAMETER Knob; at which point the new value is committed to the patch.
A few things worth knowing:
- It works on both layers - hold the PARAMETER Knob and rotate the CONTROL Knob for a primary parameter, or hold the PARAMETER Knob and press-and-rotate the CONTROL Knob for a secondary.
- Staged values display in purple
- Rotating past a value briefly doesn't lock it - commit only happens when you release the PARAMETER Knob.
- Play/Stop or a Panic Stop abandons a staged edit - the value doesn't commit if you interrupt with a button press before releasing the knob.
The same gesture is available inside Chord, Melody, and Bass Modes.
The Mixer
The Mixer is where you decide which tracks you hear, how loud, and on which MIDI channel - and what happens to the notes you play yourself. Open it with MIXER (button 3) on Home. It is also on the NAV screen (hold CONTROL, button 5), and on Performance Mode's MIXER row, button 2 (which reads MIXER) opens it too.
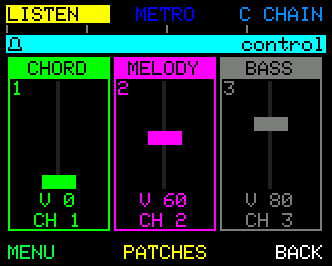
The screen has four strips:
- Three faders - RHYTHM, MELODY and BASS, left to right, each in its track colour. The fader's height is that track's velocity (
V), and its MIDI channel (CH) is shown below it. A muted track is drawn in grey, and a soloed one carries an S. - The THRU strip, the yellow band underneath. It is your own playing passing through UNA: the Thru Track Mode (OFF, AUTO or ON) on the left, and the Thru Track Channel your notes go out on, on the right. AUTO passes your notes through while Listen is off. The channel can be MATCH (the channel you play on), a fixed channel 1-16, or TRACK (the channel of the track you last selected).
The selected strip has a white ring.
| 1 | 2 | 3 | 4 | 5 | 6 | |
|---|---|---|---|---|---|---|
| EASY | RHYTHM | MELODY | BASS | KEYS | PLAY / STOP | BACK |
| ADVANCED (tap CONTROL) | KEYSPLIT | METRO | QUANTIZE | LISTEN | PLAY / STOP | BACK |
| COMMON (hold CONTROL) | SOLO | SOLO | SOLO | MENU | NAV | HELP |
Easy Mode - one button per strip
- RHYTHM, MELODY, BASS and KEYS each select a strip. KEYS selects the THRU strip.
- Tap the strip you are already on to toggle it: a track mutes / unmutes, and THRU steps to its next mode (OFF → AUTO → ON).
- Turn the CONTROL Knob to set the selected track's velocity; press and turn it to set the selected strip's MIDI channel (for THRU, its output channel). The Thru Track Mode itself is set with the button, not the knob.
- Hold a strip's button and use the CONTROL Knob to mix that strip without selecting it: turn for level (THRU: its mode), press and turn for channel, press and release for mute (THRU: its next mode).
- PARAMETER Knobs work as they do on every track screen, on the selected track - OCT, CHAN, DELAY, LAYER, PITCH, GATE, VELO, SLICE, with the secondary parameter on press and turn.
Selecting a track also makes it the track the rest of UNA is pointed at. Selecting THRU does not, so you can visit it without losing your place.
Advanced Mode - one knob per strip
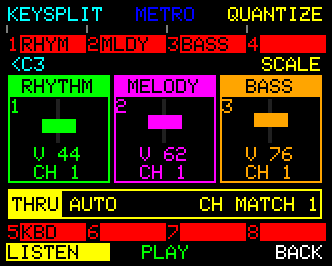
Tap CONTROL. An info row appears above the faders with the Keyboard Split on the left and the Thru Track Quantize on the right, and each fader is numbered for the knob that edits it.
- KEYSPLIT - opens the Keyboard Split screen (Chapter 15). Leaving it brings you back to this layer.
- METRO - opens the Metronome page (below). Lit while the click is on.
- QUANTIZE - tap to step the Thru Track Quantize (CHROMA, CHORD, PENTA, SCALE, BLUES); hold it and turn the CONTROL Knob to sweep.
- LISTEN - toggles Listen (Chapter 5).
- BACK - returns to Easy Mode, not out of the Mixer.
The knobs now address the strips directly: Knobs 1, 2 and 3 are RHYTHM, MELODY and BASS, and Knob 5 (labelled KBD) is THRU. Every one has the same three gestures:
- Rotate → level (THRU: its mode).
- Press → mute / unmute (THRU: its next mode).
- Press and rotate → MIDI channel (THRU: its output channel).
Two more work on the track knobs (1-3) here:
- Hold the CONTROL Knob and rotate or press-and-rotate a knob for a temporary velocity or channel change that snaps back when you let go.
- Hold a knob and rotate (or press and rotate) the CONTROL Knob for a targeted velocity or channel change that only lands when you let go of the knob.
Solo
Hold CONTROL: buttons 1, 2 and 3 read SOLO, in the RHYTHM, MELODY and BASS colours. Press one to solo that track, press it again to un-solo. You can keep holding CONTROL and solo round the three tracks to find the one you want. A lit SOLO is the track currently soloed.
Muting from here works exactly as it does on Tracks: the track carries on playing silently, its notes keep scrolling in grey, and unmuting rejoins the part in progress. Solo is the same switch seen from the other side - the tracks it turns off are muted, not stopped - so the part you solo away from is still there when you come back to it.
Where mutes are stored. By default, mutes are device-wide: mute the Bass Track and it stays muted as you switch patches. If you'd rather each patch remember its own mutes, change Menu > CONFIG > Track Mutes from Global to Per Patch (Chapter 17).
Menu
The Menu is where UNA's device-wide settings live - everything that isn't part of a patch. MIDI routing, keyboard split, playback behaviour, and so on. These settings persist as you switch patches.
The top-level menu splits into two lists, plus help:
| Function | Category | What lives here |
|---|---|---|
| MIDI | Routing & sync | Clock and Transport, input/output channels, Thru, per-port routing, keyboard split, Loop Protection. |
| CONFIG | Playback & feel | Velocity sensitivity, accents, time sort order, Thru Track channel and quantize, Live Play, where track mutes are stored, patch-chain behaviour, Startup Screen. |
| HELP | Setting help | A short explanation of the setting you are on. BACK closes it. |
Press the corresponding control to drop into a category, then turn the CONTROL Knob to move through it. BACK returns up one level - out of a sub-page, then out of the Menu altogether and back to the screen you opened it from. Open the Menu from any screen by holding the CONTROL Knob and pressing MENU (button 4).
A few useful things to know:
- Menu edits are immediate and persistent. As soon as you change a value, it's saved. You don't have to confirm or "save settings."
- The music keeps playing. You can enter the Menu mid-performance and change a MIDI routing or split point without stopping the sequencer. The transport runs underneath the Menu like it does in any other mode.
- Menu settings are not patch state. Loading a new patch will not change what's in the Menu. The full reference for every Menu setting is in Chapter 17.
Metronome
UNA's Metronome page is where you set the things that govern musical time - time signature and the audible click - and where you see the bar position visualised as a sweeping clock hand. If you're tracking to a click, recording in time, or wiring UNA into a rig where the time signature matters, this is the page you'll come back to.
You reach the Metronome page from the Mixer: press MIXER (button 3), tap CONTROL for Advanced Mode, then press METRO. Performance Mode's MIXER row opens it too (knob 6, METRO).
What's on the page
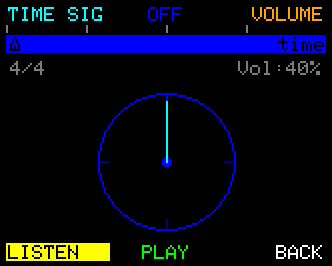
A clock face fills the centre of the screen. The hand sweeps once per bar - at a glance you can see how far through the bar UNA currently is, and the beat tick marks show you where the divisions fall for the current time signature. The header shows the time signature on the left.
The controls
| Function | What it does |
|---|---|
| TIME SIG | Selects the time signature for editing. Once selected, rotate the CONTROL Knob to step through the available signatures (4/4, ¾, 2/4, 6/8). Press again to deselect. |
| ON / OFF | Toggles the click on or off. Lights up when the click is on. |
| LISTEN | Toggles Listen (external keyboard input) without leaving the page. |
| BACK | Returns to the screen you came from, with all changes already applied. |
The buttons run TIME SIG · ON / OFF · - · LISTEN · PLAY / STOP · BACK.
TIME SIG works by arming: press it, rotate the CONTROL Knob to change it, press again to step out.
A note on tempo
The Metronome page is about the time signature and the click, not tempo. Tempo lives on PARAMETER Knob 1 as its secondary parameter - press and rotate Knob 1 to change BPM from any performance or track mode. Chapter 13 covers tempo, time signatures, and the metronome click in detail.
Loading Patches
From Home, press PATCHES (button 4) and you're in Patch Load mode.
The display shows a 4×2 grid of the 8 patches in the current bank - each cell tagged (A1, A2, …) with its name. The currently-loaded patch is highlighted; the selected patch (the one you'd APPLY next) has a white border.
To pick a different patch, either rotate the CONTROL Knob to walk the grid, or press a PARAMETER Knob (1-8) to jump directly to that slot. Press APPLY to load the highlighted patch. If it's in the same bank as what's currently loaded, the new patch enters at the same step/tick the old one was on, so the audience hears a clean crossover.
For fast in-bank switching without touching APPLY, hold CONTROL and press a PARAMETER Knob - that quick-loads the patch under the knob instantly.
Switching banks takes a moment: press BANK until you reach the bank you want (or hold it and rotate CONTROL), then select the patch and press APPLY.
Cross-bank loads stop playback because the whole bank has to move into RAM - UNA warns you before doing this.
Press CANCEL to leave Patch Load without changing anything. If you're already sitting on the active patch, CANCEL reads as BACK - nothing to cancel.
TIP: For full control over banks and patches, including backups, move and copy, and sharing. See Midicake CONNECT
Chapter 14 has the full reference on banks, editing, copying, and renaming.
Some patterns to try
Here are a few worked recipes that show how Home flows in real use.
The "warm-up" pattern. Power on UNA, plug a keyboard into the MIDI In, plug your synth into MIDI Out A. Play a few notes - UNA runs whatever patch is loaded. Toggle Listen on, play some chord shapes, watch the note pool shift on the display as UNA follows you. When you hear something you like, turn Listen off; UNA locks to that progression, and now you can solo over the top.
The "switch patches mid-song" pattern. You're playing a verse patch. The chorus is approaching. Press PATCHES (button 4) - you're in Patch Load. Highlight your chorus patch (rotate CONTROL, or press its PARAMETER Knob). At the right moment, press APPLY. The chorus patch comes in at the same point in the bar, with no gap. Even faster: hold CONTROL and press the PARAMETER Knob for the chorus slot - patch loads instantly without an APPLY step. Both work only within the current bank - but a set list should live in one bank anyway.
The "drop the band" pattern. During a verse, press MIXER (button 3) on Home and tap RHYTHM twice - once to select it, once to mute it. The chords go silent, but the chord chain still drives the melody underneath. The "band" has dropped out, but the melody continues, harmonically locked to the silent progression. Tap RHYTHM again and the chords come back.
The "panic" pattern. If a note is stuck or a chord keeps ringing on a synth's hold pedal, hold PLAY / STOP for about half a second. UNA stops and sends all-notes-off on every channel.
What's next
Chapter 7 is the parameter reference - reach for it when you want to know what any parameter does. The actual editing of the music happens in the dedicated Track modes: Chapter 8 covers Chord Mode, Chapter 9 Melody Mode, Chapter 11 Bass Mode. Each is a deeper dive into a track you've already been hearing.
If you want a one-page reference to everything you've just read, Appendix F has the complete per-mode control-and-knob table.