Chapter 5 - Core Concepts
Three Tracks
UNA plays three musical tracks at the same time:
- The Melody Track - a sequence of notes that follows the underlying chord progression.
- The Chord Track - the chord progression itself, played out audibly as a rhythm or drone.
- The Bass Track - an independent bass line that follows the same progression.
You don't switch between tracks, they all play together. What you switch between are modes - and modes are how you interact with each track.
The three tracks are musically independent: changing the Bass Track's parameters doesn't affect the Melody Track, and changing the melody doesn't perturb the bass. What the tracks do share is harmony. The played chord or chord progression you've captured creates a note pool - the set of pitches that make up the current chord - and every track draws its notes from that pool. When the chord changes, every track shifts to the new harmony together, keeping it coherent.
There's only one tempo for the whole unit, but each track has its own time parameter that decides how fast it advances against that tempo. Combined with optional dotted or triplet rhythms per track, this allows the Melody Track to run at one rate, the Bass Track at another, and watch polyrhythms emerge naturally over the same beat.
The Tracks can each be enabled or disabled at will, via the Mixer.
Modes are for editing.
When you power on, you land on Home - UNA's home screen. From here, a single button press takes you into one of the four main modes:
- Chord Mode - edit the Chord Chain (progression) and Chord Track.
- Melody Mode - edit the Melody Track.
- Bass Mode - edit the Bass Track.
- Modulate Mode - set up the modulation that evolves your tracks over time.
In addition, a quick press of the CONTROL Knob on Home opens Performance Mode, the performance screen (Chapter 6). On the screens that have an Advanced Mode, which is most of them, the tap switches layer instead; the few that have neither ignore it. The Mixer is MIXER, button 3 on Home, and the Menu is on the COMMON row of every screen (hold CONTROL, button 4).
The crucial part: the music keeps playing regardless what mode you are in. Pressing the BACK button returns you to previous mode.
The COMMON row - the same six buttons, everywhere
Hold the CONTROL Knob on almost any screen and, after about half a second, the panel changes shape. The wait is deliberate: the row is for when you have stopped to look for it, not something to trip over mid-performance.
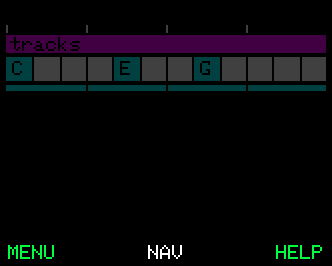
The six buttons relabel to a set that says the same thing wherever you are, and everything between the two button rows dims to a flat wash - so the six buttons are the only live thing on the panel and you can see at a glance that the row is up. It is a layer over your work, not a change to it: let go and everything is exactly as you left it.
- The buttons - MENU is 4, NAV is 5 and HELP is 6, always. Buttons 1 to 3 belong to the screen you are on: usually CLEAR and REDO, blank where a screen has neither.
- The knobs keep doing their own jobs. Holding CONTROL does not take them away: press one and it does whatever that knob does on the layer you are on, and nothing jumps you to another screen. NAV (button 5) is the way to every screen.
Three screens give the held knob press a job of their own:
| Screen | Press a knob while holding CONTROL and it will |
|---|---|
| Melody | jump to that knob's lane |
| Patches | load the patch that knob sits over |
| Modulate | flip that modulator between one-shot and loop |
And on every screen, turning a knob while CONTROL is held is a temporary performance edit that snaps back when you let go - so the row stands down the moment you turn something, and stays down for the rest of that hold. The one exception is Home, where holding CONTROL and turning it cycles the body view, so the row stays up and you can keep turning.
NAV - getting anywhere from anywhere
You do not have to walk back to Home to change screen. Hold the CONTROL Knob and press button 5 - the held-CONTROL COMMON row, which says the same thing on every screen - and NAV opens: a list of the twelve screens you actually move between. Turn the CONTROL Knob to pick one, then tap it, or press GO.
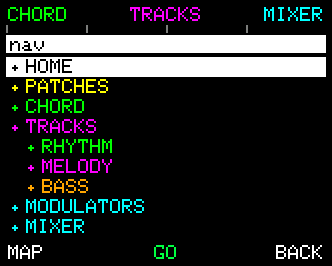
Each screen is drawn in its own colour, and Rhythm, Melody and Bass are stepped in under Tracks because those three live inside another screen. CHORD, TRACKS and MIXER have buttons of their own, for the three you reach for most.
The selection opens on the screen you came from, so NAV says where you are before it asks where you want to go. Open it from somewhere that is not on the list - a capture screen, a save screen - and it rests on the screen that one lives inside.
GO takes you there as though you had walked. NAV does not stay underneath you: go to Melody and BACK steps up to Tracks and then Home, exactly as it would had you pressed your way in. BACK in NAV itself means never mind - it returns you to the screen you came from with nothing changed.
The map
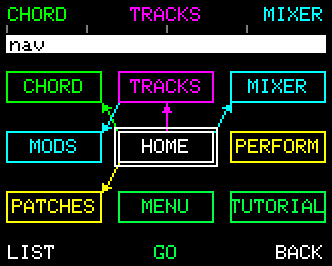
Press button 4 and the list becomes a map. The button always names the view it takes you to, and UNA remembers which one you were last in.
The map holds the same twelve screens, drawn where their buttons are. Chord sits up and to the left of Home because Home's top-left button opens Chord; Patches sits down and to the left because the bottom-left one does. The arrows are those buttons. Only Home and Tracks have any, because they are the only two screens whose buttons open other screens - which is itself worth knowing.
The screen you have selected is ringed in white and always sits in the middle, with its neighbours around it; turning the CONTROL Knob slides the map beneath it, one box to the right and then down to the next row. Everything else works exactly as it does on the list.
Because NAV opens on the screen you came from, the ringed box is the one place on the picture you already recognise - and every other box then reads as a direction from it rather than as a name to search for. It also decides how much of the map you see at once: arrive from Home, in the middle, and the window is full; arrive from Patches, in a corner, and it is not.
Once you have used it a few times the map is faster than reading, because it is a picture of your own hands: you stop looking for a name and start reaching for a direction.
The Chord Chain vs. the Chord Track
Once you've recorded a chord progression in Chord Mode, UNA holds an internal chord chain (the sequence of chords you captured). The chord chain drives all Tracks: as the chord changes through the progression, the Melody, Bass, and Chord Track's notes adapt to stay in harmony.
Whether those chords come out as sound is a separate choice. Enable the Chord Track and UNA sends the chord notes out as MIDI to your synth. Disable the Chord Track and the chord chain still drives the melody - you just don't hear the chords directly.
This separation is the reason UNA suits very different setups. A solo synth player might enable all three tracks for a full-band sound. A live keyboardist soloing over the top might enable only the Melody Track and rely on UNA's chord-awareness to stay in key.
The key, and what sets it
Key and Mode are patch settings, not device-wide ones - they save and load with the patch like any track parameter. Key is set on the Scale Options screen and Mode follows the Scale you declare there. Key defaults to Auto, which means UNA works the key out from the chords in the chain.
They matter beyond Suggest: the chord chain shows a scale degree beside the chord you are hearing, and a degree is counted from a key. When the key is Auto the chain shows its guess in grey; when you have pinned one it shows it in colour. (See Chapter 8.)
Two things set the key for you, and they are deliberately not the same:
| APPLY, in the chord chain browser | Declares the key of the progression you applied. |
| KEY, the chord chain's ADVANCED knob 7 | Sets it outright, and transposes the chain to match in the same detent - so the key read-out and the music move together and the degree beside the chord name stands still. Turning it while Key is on Auto declares one, counting on from whatever had been inferred. This is the quickest way to pin a key. |
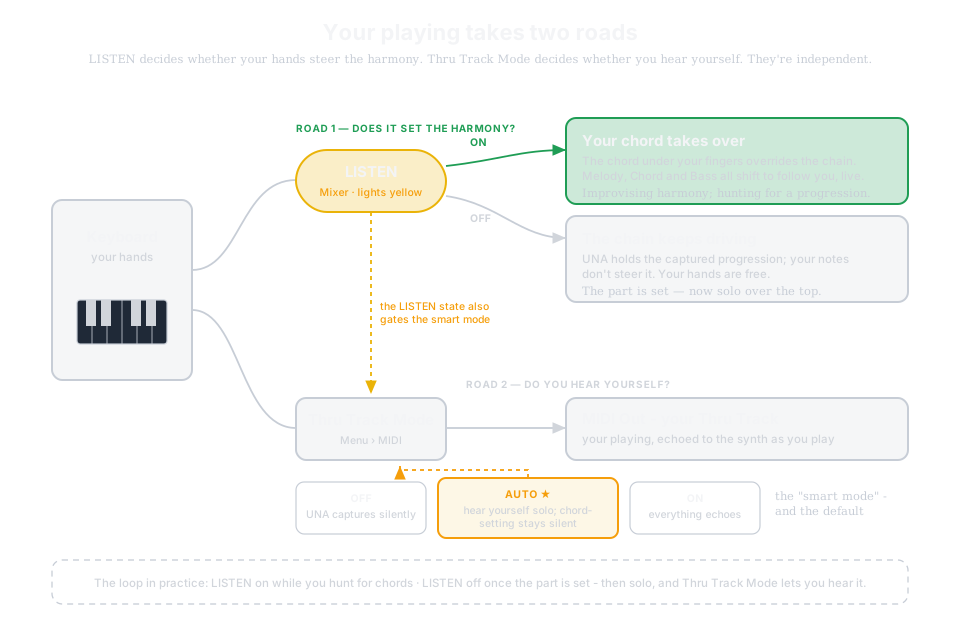
The LISTEN toggle
You can reach the LISTEN toggle on button 4 of Advanced Mode of Chord, Tracks and the Mixer, on Performance Mode, and on the Metronome page. Tap the CONTROL Knob to get to an Advanced Mode.
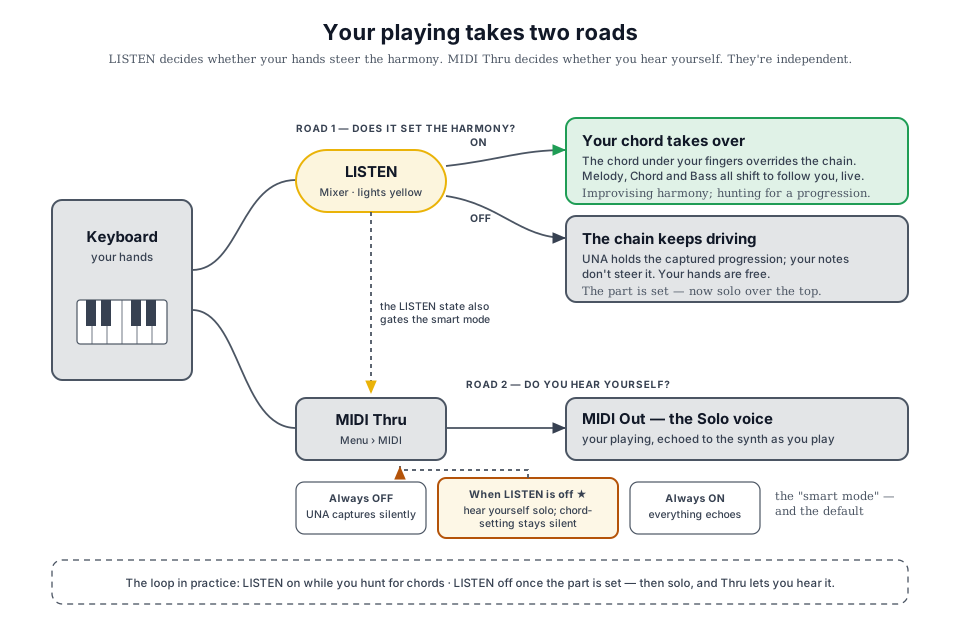
With LISTEN on, the notes you play on a connected keyboard override the captured chord chain. Every track shifts to fit the chord under your fingers. Use this when you're improvising harmony, exploring an arrangement, or playing UNA against a song where the chords change in ways you haven't pre-recorded.
With LISTEN off, UNA continues playing the current chord or the captured chord chain. The tracks play predictably - and you're free to solo on top.
A Menu option, Thru Track Mode, controls whether your incoming notes are also routed straight through to your synth so you hear them as you play.
There are three choices:
- OFF - UNA captures silently
- AUTO (default) - UNA echoes your notes only when LISTEN is off: you hear yourself soloing, but the chords you set or capture don't pass through
- ON - your playing is always passed through
It applies to your own notes, on the MIDI Input Channel - a second keyboard on another channel passes through regardless of LISTEN. A separate MIDI Thru setting decides which kinds of message (notes, CC and pitch bend, Program Change, clock) may leave UNA at all.
See Chapter 15 for the full reference.
You can toggle LISTEN constantly: on while you're searching for the chords, off once the part is set and you want UNA to drive itself.
Play and Stop
UNA's sequencers are either running or stopped. Use the PLAY/ STOP control to switch between the two.
When playing, clock and note messages are sent via the MIDI Outs. When stopped, the music holds - you can wire things up, edit a track, or load a patch without any sound coming out. You don't need to stop to make changes.
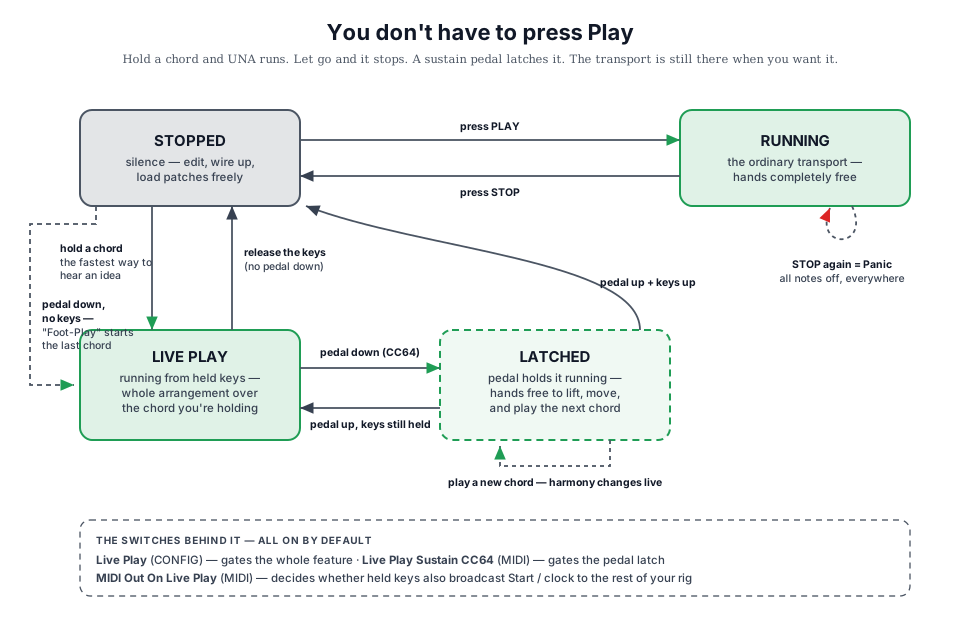
Live Play
There's a third way to make UNA run...
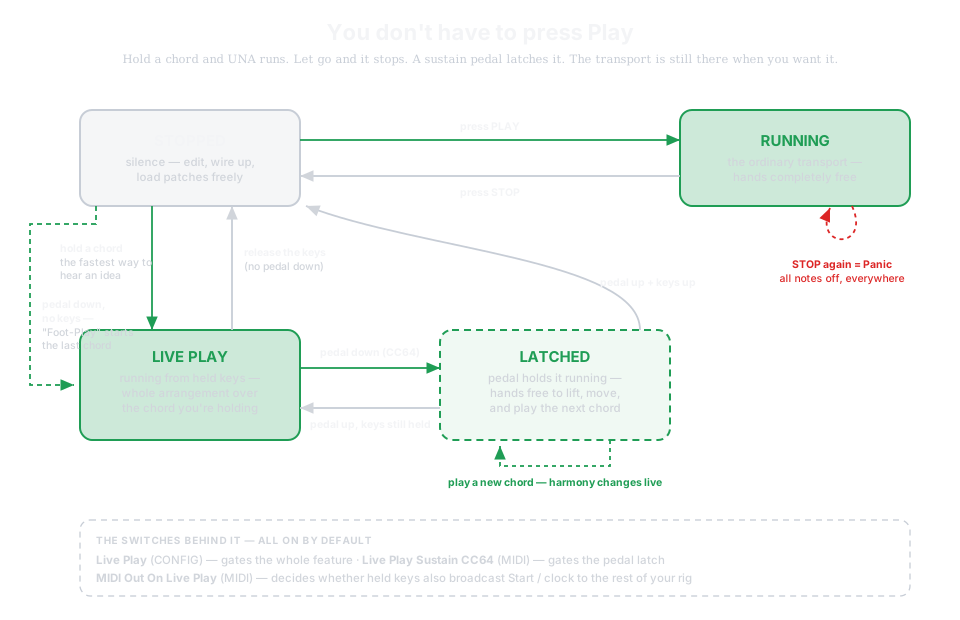
Even when stopped, hold a note or chord on a connected keyboard and UNA starts playing. Let go of the keys and it stops again. This is Live Play, and it's the fastest way to hear an idea: no transport, no arming, just play a chord and the whole three-track arrangement runs over it.
Holding a chord down to keep the music going is fine for an audition, but awkward if you want to change the chord. So using a sustain pedal solves it: press your pedal (CC64) and Live Play latches, staying alive while you lift your hands, change chord, and play again. Release the pedal and the keys and Live Play will end.
Both behaviours are on by default and can be turned off in the Menu - Live Play and Live Play Sustain (CC64) (Chapter 17). Chapter 16 covers how Live Play interacts with clock and transport.
Deterministic Playback
Patch and parameter changes apply immediately, even mid-bar. When you switch a parameter or load a new patch, the resulting pattern continues as if it had always been playing, picking up at the position UNA was already at, so nothing restarts.
What's underneath: the sequencer
The Melody Track is a step sequencer, up to 32 steps long - all visible on the display at once. The Tempo, along with each track's time parameter, controls how fast the sequencer advances; the time signature determines how steps fit into bars.
Internally, UNA runs at a high time-resolution - 384 ticks per bar - which gives precise control of swing and microtiming, without the music feeling locked to a stiff grid.
The Bass Track is also a sequencer, but with a different editing surface. While, the Melody Track exposes a per-step grid called the Stepper (Chapter 10), where each parameter is editable on every step, the Bass Track evolves through a variability-driven system called Improv (Chapter 11). The design intent: Melody is where you sculpt notes precisely; Bass is where you set up rules and let UNA generate variation.
The Chord Track is structured around chord chains rather than a step grid; it isn't sequenced the same way. Instead, it can play Chord rhythms or drones, that can pad out your sound. (See Chapter 8).
Track Parameters
The 8 PARAMETER Knobs control parameters on the currently selected track. There are two levels of parameters per knob:
- Rotate a knob → adjust the primary parameter.
- Press and rotate a knob → adjust the secondary parameter.
[DIAGRAM - Knobs and parameters] The two-layer model: rotate for parameters 1-8, press-and-rotate for 9-16; art pending.
That gives 16 parameters per track, all reachable from the same 8 physical knobs. The display always shows the parameter you're currently changing (name and value).
There's a loose but useful distinction between the two levels:
- Primary parameters can affect individual steps
- Secondary parameters affect the sequence as a whole
Pitch and gate length, for instance, live on the primary layer. You can give each step its own pitch, and its own gate. Parameters that apply to the whole sequence, e.g. number of steps, direction, patterns, etc. live on the secondary layer.
Note: only primary parameters can be step-sequenced, and step-sequencing only happens on the Melody Track (Chapter 10).
For a full reference to every parameter - what it controls, its range, and any track-specific quirks - see Chapter 7 - Track Parameters.
Temporary Changes
To temporarily change a value;
- press and hold the CONTROL Knob while you turn a PARAMETER knob
...to nudge the associated parameter value (e.g. Velocity) for as long as you hold - it snaps back the moment you let go. It's a performance gesture for non-destructive, in-the-moment tweaks, and it leaves your patch untouched.
Targeted Changes
To jump to a specific parameter value, without invoking every value between the current and the desired value;
- press and hold a PARAMETER knob while you turn the CONTROL knob
This sets the new value when you release both knobs. It's a gesture that prevents unwanted behaviour, such as cycling through (and hearing) every synth on every MIDI Channel between your current and targeted channel.
The Control Knob
The CONTROL Knob's role changes by mode.
On Home a quick press opens Performance Mode, the performance screen, and the same tap there comes back. On Chord, Tracks, Chord Rhythm, Melody, Bass and the Mixer it does something else again: those screens have a second layer of button meanings - the Advanced Mode - and the tap switches between them. The mixer is a button on Home instead (MIXER, button 3). The Advanced Mode is where the less-used half of each screen lives; HELP is on the held-CONTROL COMMON row, button 6, everywhere.
Yet, for example, in Chord > Edit, it selects the current chord. In Modulate Mode, it selects the modulator. Appendix F has the complete per-mode reference.
Modulate - variation that evolves over time
Once a track is set up, a Modulator can evolve its parameters automatically, over bars or minutes. A Modulator changes how a parameter drifts over the next stretch of music - turning a static loop into something that moves.
Every Modulator has two ingredients: a source and a target.
- The source is what generates the modulation value.
-
UNA offers: a Waveform (LFO-like time-based modulation), a Random value that re-rolls per step, Step Sequence and Time Sequence patterns , or user input from an external MIDI CC, mod wheel, aftertouch, or UNA's own knobs.
-
The target is what the Modulator moves.
- It can be any track or sub-mode parameter (Pitch, Gate, Modulator Amount, and so on), or it can be a MIDI CC output - so a Modulator can drive an external synth's filter cutoff as easily as it can drive one of UNA's own parameters.
One Modulator has one source and one target. To modulate several parameters together, use several Modulators - they can share the same source, so a single "ramped" waveform can drive the Melody pitch, Chord Rhythm timing, and CC-mapped filter sweep on an outboard synth, all locked in phase.
Modulators can also target other Modulators - a slow wave can move a fast wave's Amount, letting a long swell shape the intensity of a fast tremolo.
Each Modulator can run continuously or as a one-shot - a one-shot fires when triggered and runs for a time period you decide. Great for one-bar fills and live drama.
There are two kinds of Modulator, distinguished by scope.
- Patch Modulators save with a patch, so they're song tools - the modulation belongs to this arrangement, and switching patches switches Modulators with it.
- Global Modulators persist across every patch, so they're studio tools - a slow evolution that shapes a whole set, a live-controlled CC output that always drives your outboard reverb, a manual macro you keep on hand for the whole session.
Both kinds of Modulator behave identically; only their scope differs.
(See Chapter 12 for the full Modulator reference.)
Patches and banks
A patch is a complete snapshot of what you've built: chord chain, track parameters, steppers, modulators, and the state of every mode.
UNA stores 64 patches across 8 banks (A-H); 8 per bank.
Patches autosave whenever you edit - you don't have to think about saving.
A patch doesn't include device-wide settings: MIDI input channels, output routing, clock and sync, and so on. Those live as "Globals" in the Menu and persist as you switch between patches. (Chapter 14 covers the patch system in full; Chapter 17 covers global menu options.)
Performing with patches
In live performance, patches are the building blocks of a song. You might create a Verse patch, Chorus patch, Bridge patch, and so on.
Switching patches mid-performance keeps the playback position: the new patch picks up from wherever you were in the bar, without a jump.
You can also create a fully automated song arrangement using Patch Chains, which are cover fully in Chapter 14.
Clock - internal or external
UNA can be the clock source, generating MIDI clock for synced gear, or it can follow an incoming clock from your DAW, drum machine, or modular system. The mode is set in Menu > MIDI. (See Chapter 16).
Tempo can be set via the secondary function of PARAMETER knob 1; making it easily accessed on Home and in all Track modes.
Chapter 16 also covers transport messages - Start, Stop, Continue - and how UNA both responds to and emits them.