Chapter 12 - Modulate
Chord Mode gives the piece its harmony; Melody and Bass give it its shape and lines. Modulate is where those pieces stop being static and start to evolve - a filter that swells over 8 bars, a groove that mutates every pass, an accent that fires when you quick press a control in the middle of a chorus, a mod wheel on your keyboard that reaches inside a track and reshapes it live.
A Modulator takes a source and points it at a target. Everything else in this chapter is choosing the source, choosing the target, and shaping how strongly and how often the modulation happens.
Getting in and out
From Home, press TRACKS, then MOD.
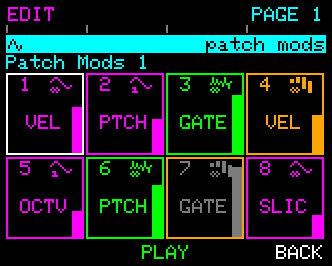
The page shows the current 8 Modulators - either the patch page (Mod 1-8 in cyan) or one of the two global pages (Global Mod 1-8 or 9-16 in green). The 8 PARAMETER Knobs each correspond to one of those displayed 8 Modulators.
| EDIT | PAGE | |
| PLAY / STOP | BACK |
- EDIT - opens the selected Modulator's edit page, where you pick its source, target, and settings.
- PAGE - cycles through the three pages: patch → global 1 → global 2 → patch. The label colour tells you which page you're on (cyan for patch, green for global).
- PLAY / STOP - the transport.
- BACK - return to Home.
CONTROL Knob rotate picks a Modulator within the current page (Modulators 1-8).
Two kinds of Modulator - patch and global
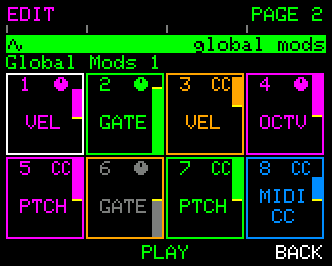
UNA gives you 8 Modulator slots per patch, plus 16 global modulators:
- Patch Modulators (8 slots, coloured cyan) save with the patch. They belong to a song, an arrangement, a specific moment. Switch patches and the Patch Modulators switch with you. These are your song tools.
- Global Modulators (16 slots on two pages, coloured green) shared across every patch. Switch patches and they keep running. These are your studio tools - the slow evolution that shapes a whole set, the live-controlled CC output that always drives your outboard reverb, the manual macro you keep on hand for the whole session.
Both kinds use the same sources, targets and gestures. The only difference is scope. A Patch Modulator lives in this patch; a Global Modulator lives on the unit.
Patch Modulators can target another Patch Modulator or any Global Modulator;
Global Modulators can only target other Global Modulators.
This rule prevents circular loops from forming, and it means the studio setup doesn't accidentally depend on which patch or bank is loaded.
The performance gestures
Before we get to editing, four gestures you can use right on the Modulation page, without opening an edit page.
- Quick press a PARAMETER Knob. Fires the corresponding One-shot Modulator for one Rate period. Great for "chorus is coming, punch it now" moments.
- Hold a PARAMETER Knob. A One-shot Modulator that you hold keeps looping past its natural end - one period, another period, another - until you release. When you release, UNA plays out the remainder of the current period, then stops cleanly. So a held knob gives you a sustained fill; letting go lands it musically at the next period boundary. (If the Modulator is set to Continuous, quick press and hold do the same thing - it's already running.)
- CONTROL + PARAMETER Knob press. Toggles that Modulator between Continuous and One-shot, in place. UNA doesn't restart the modulation - the phase is preserved, so you can flip mid-modulation without a jump.
- CONTROL + PARAMETER Knob rotate. Temporarily changes that Modulator's Amount, live. Release CONTROL and the Amount snaps back to whatever was stored. The on-screen Amount bar tracks the held value so you can see what you're doing. Great for a "push harder for this chorus, then back off" gesture without permanently editing the patch.
These four gestures cover most live use; the edit pages below are where you set Modulators up.
The two CONTROL gestures are Easy-layer only
In Advanced Mode (below) the knobs stop being the eight Modulators and become the fields of the selected one, so Knob 3 is MODE rather than Modulator 3. Both CONTROL combos are turned off there rather than acting on the wrong Modulator.
Advanced Mode - shaping one Modulator without leaving the page
Tap CONTROL on the Modulation page and the eight Knobs change job. Instead of being the eight Modulators, they become the selected Modulator's own settings - so you can shape one without going into its edit page and back out again.
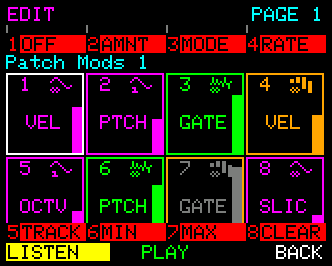
EDIT, PAGE and the transport stay exactly where they were, and Button 4 becomes LISTEN. Tap CONTROL again, or press BACK, to return.
| Knob | Press | Rotate |
|---|---|---|
| ON/OFF | turn the Modulator on or off | right turns it on, left off |
| AMNT | - | Amount |
| MODE | Continuous / One-shot | the same two |
| RATE | - | Rate |
| TRACK | move it one track to the right | move it either way |
| MIN | - | the bottom of the range |
| MAX | - | the top of the range |
| CLEAR | reset this Modulator (asks first) | - |
The first cell names what pressing it will do, not what the Modulator is. It reads OFF while the Modulator is running, because that's what the press is for.
TRACK moves a modulation sideways. A Modulator on Melody Velocity becomes one on Bass Velocity, keeping the parameter and changing only the track. It steps Rhythm → Melody → Bass and stops at each end rather than wrapping round, so you can't overshoot the track you wanted mid-performance. Direction and Jump only exist on Melody and Bass, so a Modulator on one of those won't step across to Rhythm.
A cell with nothing to do shows its number and stays dark. AMNT is blank for a MIDI CC Modulator, whose Amount comes from the incoming CC; MODE and RATE are blank for Macro and MIDI CC, which have no loop and no period; TRACK is blank unless the target is a per-track parameter.
RATE, MIN and MAX flash their value at the top of the screen as you turn them, then get out of the way. They're the three cells with nothing on the page itself to show for them - ON/OFF greys its cell, AMNT moves the Amount bar, MODE changes the icon, TRACK rewrites the target name - so without the read-out you'd be turning blind.
The value reads exactly as it does on the Modulator's own edit page: RATE as a musical time (1 Bar), and MIN and MAX in the target's own units - so a range on Octave reads -3 to 3, and a range on another Modulator's Amount reads as a percentage.
MODE also switches the Modulator off
Changing a Modulator from Continuous to One-shot turns it off as well, so the One-shot has to be armed deliberately. If you press MODE on a running Continuous Modulator it will stop, and ON/OFF will flip to read ON. That's the same rule the edit page has always followed.
CLEAR asks before it acts. Button 4 confirms, Button 6 cancels. It resets the Modulator completely - every setting, its CC output configuration, and its step sequence.
The Modulator anatomy
Every Modulator has these ingredients:
- A source - what generates the modulating value. UNA has six of them, covered below.
- A target - what the Modulator moves. Can be any parameter on any track or sub-mode (including another Modulator's parameters), or a MIDI CC output that leaves UNA and drives your outboard gear.
- An amount - how much the source pushes the target. 0 is no effect; higher amounts push the target further from its base value.
- A rate - how fast the source cycles (for time-based sources).
- A mode - Continuous (runs forever) or One-shot (fires once when triggered, runs for one Rate period, then stops).
One Modulator moves one target. To modulate several parameters together, use several Modulators - they can share the same source, so a single "master swell" wave can drive Melody pitch, Chord layers, and CC-mapped delay on an outboard reverb, all locked in phase.
Editing a Modulator
Select a modulator using CONTROL, then press EDIT.
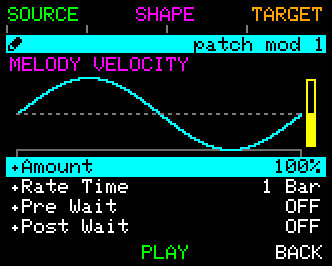
UNA opens Modulator Edit, showing the Modulator's current target in the header and its parameters listed below.
The control layout depends on which source is active, but the top-level shape is:
| SOURCE | (source-specific) | TARGET |
| (varies) | PLAY/STOP | BACK |
- SOURCE - opens the source picker.
- The source-specific control - opens the current source's own configuration page. Its label matches the source: SHAPE for Waveform, SEED for Random, SEQUENCE for a Stepper source, ASSIGN for MIDI CC, and so on.
- TARGET - opens the target picker.
- PLAY / STOP - the transport.
- BACK - return. Edits take effect as you make them.
Editing the parameters
The bottom half of the screen is the parameter list.
Rotate CONTROL to select; press and rotate CONTROL to edit the selected value.
The row set depends on the current source - a time-based source (Waveform, Random, Time Sequence, Step Sequence) shows the full set; a static source (Macro, MIDI CC) hides unrelated parameters.
For time-based sources:
- Amount - how strongly the source pushes the target. 0-200%. 100% is the source's natural depth; below cuts back, above pushes past the natural range (and clips against Min/Max if a range is set).
- Rate Time - how long one full cycle of the source takes. ¼ Bar → 16 Bars, tempo-locked. Default 1 Bar.
- Steps - the length of this Modulator's step lane, 1-32. Only shown for Time Sequence and Step Sequence sources; edits the Modulator's own stepper lane directly.
- Pre Wait - insert time before the modulation begins. The target sits at its resting value for this long, then the source begins. OFF → 16 Bars.
- Post Wait - insert time after the modulation Rate time period completes. Sits between mode rate cycles in LOOP mode; holds after the fire in 1-SHOT mode. OFF → 16 Bars.
- Range Max - upper limit the source can push the target to, shown in the target's own units (e.g.
127for velocity,+7for octave). OFF disables the ceiling, falling back to the target's own maximum value. - Range Min - lower limit, same units. OFF disables the floor, falling back to the target's own minimum value.
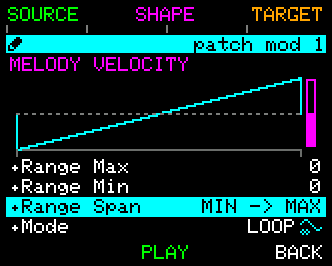
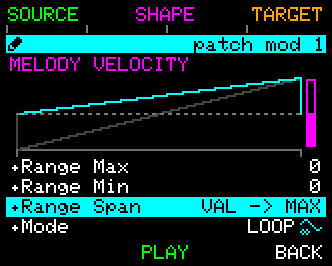
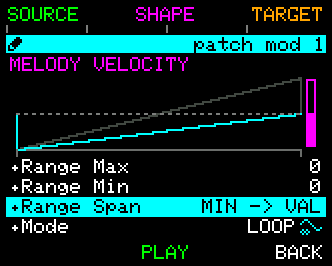
- Range Span - how the shape maps between the current value and those limits. MIN → MAX swings bipolar (full source, centred on the current value); VAL → MAX pushes only upward; MIN → VAL pulls only downward.
- Mode - Sets the modulation behaviour.
- LOOP: runs forever while Enabled
-
1-SHOT: fires once per arming, then disarms itself and awaits re-enable (Switching to 1-SHOT automatically disables the Modulator so you can arm the next fire deliberately).
-
Enabled - ON / OFF for this Modulator. (Also toggled by quick pressing the corresponding PARAMETER Knob on the Modulation page).
For Macro and MIDI CC sources, only four rows are shown - Rate, Waits, Span and Mode are hidden because a static offset has no time-based shape to phase or gate:
- Amount - the raw target value the macro / CC is currently set to, in the target's own units. On Macro it moves when you turn the Modulator's knob; on MIDI CC it's read-only and driven by the last incoming CC value.
- Range Max - upper limit the macro / CC can reach on the target.
- Range Min - lower limit.
- Enabled - ON / OFF for this Modulator.
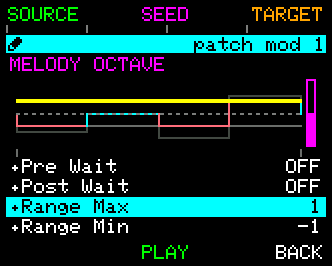
The Modulator Edit diagram
The top half of the screen draws a live picture of what this Modulator will do to its target - the shape, the timing, the amount, the range, and where they interact.
Every row you edit updates the diagram in real time.
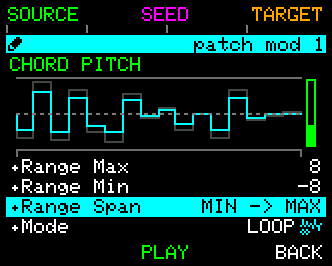
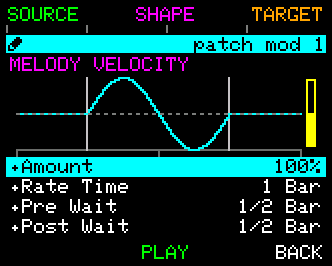
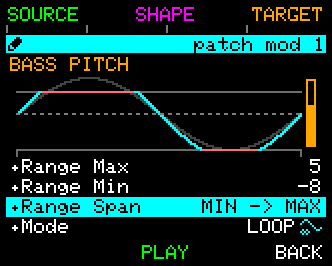
Five elements make up the picture:
- The shape trace. The main coloured line - the source's actual output at its current settings.
-
For Waveform it's the LFO curve; for Random, Time Sequence and Step Sequence, the step pattern. For Macro and MIDI CC, an icon and the live incoming CC value.
-
The dark-grey reference shape sits behind the coloured trace and shows the source at 100% Amount and full Span, ignoring Range.
-
It's a design aid - no matter how much you cut Amount or squeeze Range, you can always see the shape you picked.
-
The Min / Max range lines are the horizontal grey lines across the diagram, positioned in the target's own units.
-
The active modulation shape is clamped between them. Where the coloured trace hits one of those limits it turns RED, so you can see where the modulation has reached the range limits.
-
The Amount bar on the far right shows the amount of modulation currently applied.
-
On Macro / MIDI CC it shows the deviation relative to the target's current base value.
-
Pre and Post Wait periods appear as flat lines on either side of the shape, sized proportionally to their bar counts.
- Faint vertical dividers mark the pre|active and active|post boundaries.
Below the trace, a row of grey markers spans the full cycle; one per bar. Useful for reading the length of a slow cycle at a glance.
Highlighting. Whichever parameter you have selected, in the list, lights up in YELLOW on the diagram.
Modulation Range - SPAN, MIN, and MAX
Range Span decides which direction the shape pushes the target from its current value; Min and Max decide how far it can go.
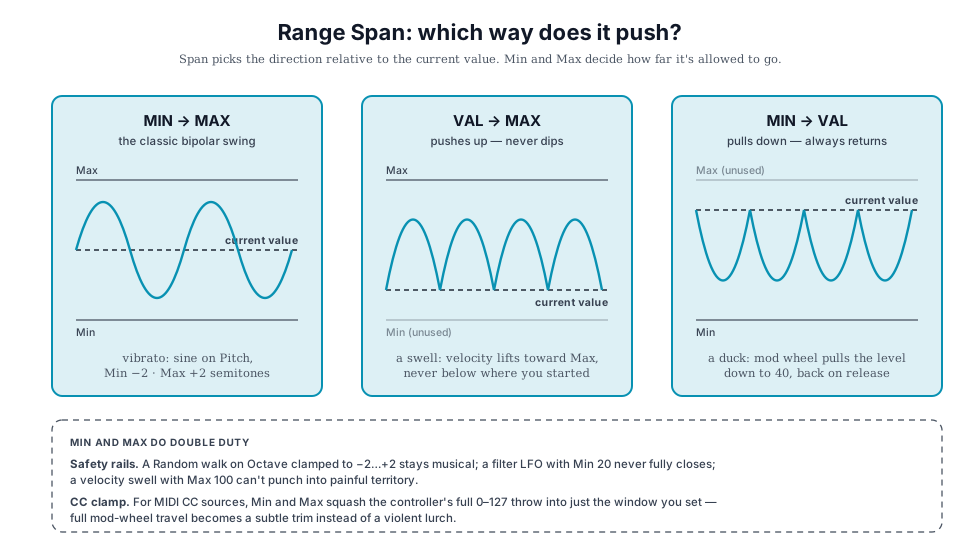
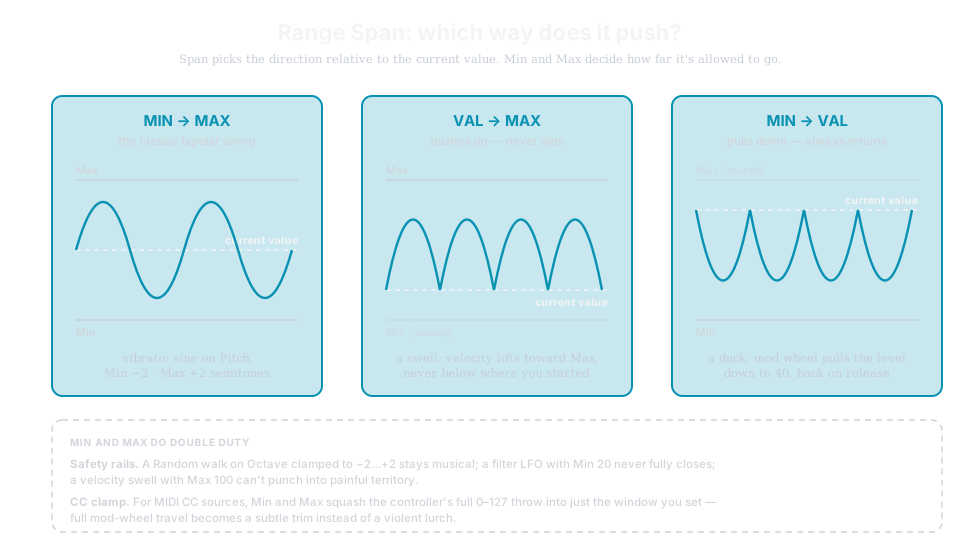
- MIN → MAX is the classic bipolar swing: the shape moves the target both above and below the current value.
- Sine on Pitch with Min = −2 semitones, Max = +2 gives you a subtle vibrato either side of the note; an LFO on filter cutoff (via CC) with Min = 40 and Max = 100 swings across those two values around wherever the knob currently sits. This is what most people mean when they say "LFO on a parameter".
- VAL → MAX only ever pushes up from the current value.
- A velocity swell that lifts your current dynamic toward Max but never drops below where you started; a reverb send that opens up into the chorus but never mutes; a slow rise that crescendos and doesn't retreat.
- MIN → VAL only ever pulls down from the current value.
- A "duck" on velocity level, mod wheel at rest sits at 100, holding pulls it down to 40 and back on release.
Min and Max as safety rails. Even with the classic MIN → MAX swing, tight range limits keep an adventurous source under control.
- A Random modulator on Octave will walk anywhere from −10 to +10 if you let it - set Min = −2, Max = +2 and the walk stays inside a musical band.
- A filter LFO with Min = 20 will never fully close, so even at minimum Amount you don't drop into sudden silence.
- A velocity swell with Max = 100 gives you a comfortable ceiling so the source can't ever punch through into painful territory.
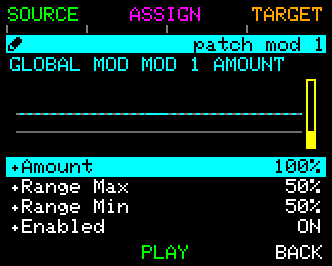
Min and Max as a CC mapping clamp. For MIDI CC sources, Min and Max squash the incoming CC's full 0-127 travel down into just the window you set.
- Set Min = 45, Max = 75 on a velocity target and full mod-wheel travel now feels like a subtle trim rather than a violent lurch.
- Set Min = 30 on a filter cutoff target and no matter how far you push the wheel back, the filter can't ever fully close.
Any incoming CC stays inside the window you define, and the target parameter can't leave that window regardless of what your controller sends.
Choosing a source
Press SOURCE from Modulator Edit.
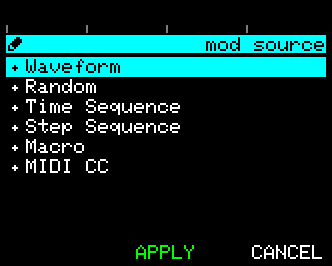
UNA opens the six-option source picker.
| Source | What it does |
|---|---|
| Waveform | LFO-style time-based modulation. A shape (sine, triangle, saw, square, and 12 more) sweeps the target back and forth at your chosen Rate. |
| Random | Steps to a random value on every cycle. Great for organic, human-like variation. |
| Time Sequence | A 32-step pattern of values spread evenly across the Rate period. Sequenced modulation on a timeline. |
| Step Sequence | A 32-step pattern locked to the target track's step timing - advances one value per sequencer step, whatever the track's Time setting is. Sequenced modulation locked to the music. |
| Macro | A static offset value that you set by hand. Doesn't move on its own; moves when you turn the Modulator's Amount knob. Useful for "give me a manual filter knob mid-performance." |
| MIDI CC | Driven by an external MIDI source - a CC number, a mod wheel, aftertouch - that you assign via MIDI Learn. What you play on your keyboard reshapes what UNA plays. |
Rotate the CONTROL Knob to select from six sources; press APPLY to commit.
The rest of this section covers each source type's own config page.
Waveform
Press SHAPE in Modulator Edit when Waveform is the source. UNA opens the shape editor.
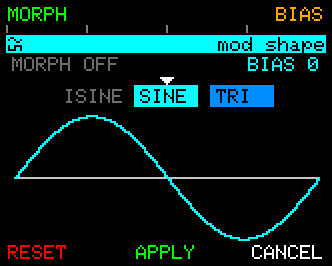
Sixteen base shapes are available: SINE, TRI, BELL, LOG, SAW, EXP, SQUARE, HIGH, LOW, and their inverses.
- Rotate the CONTROL Knob to browse (the current shape draws live so you can see what you're picking).
Two extra controls sit alongside the shape picker:
- Quick press MORPH and rotate the CONTROL Knob to blend the current shape into the next one. So SINE morphed 40% toward TRI is a triangle-ish sine, midway between the two.
- Quick press BIAS and rotate the CONTROL Knob to shift the phase of the wave. Push it forward to have the wave land its peak earlier in the cycle.
MORPH and BIAS can both be toggled with a quick press, or press and hold + rotate CONTROL to quick change without toggling.
- RESET / REVERT works the same way as elsewhere in UNA: press to snap back to the entry state, press again to bring your edits back.
- APPLY commits;
- CANCEL discards.
Random
Press SEED when Random is the source. UNA opens the seed picker.
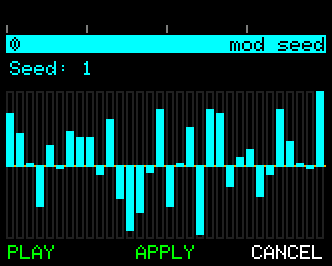
Each of the 256 seed values produces a deterministic sequence of random values: same seed → same sequence, every time.
-
Rotate the CONTROL Knob to browse seeds; the modulation previews live as you scroll.
-
APPLY commits.
Time Sequence and Step Sequence
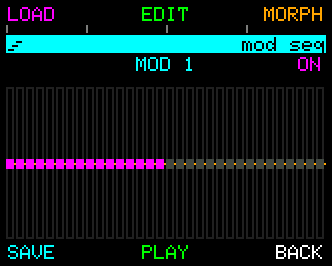
Both stepper sources share the same editor - press SEQUENCE in Modulator Edit. UNA opens a familiar-looking screen: the same 32-step editor as the Melody Stepper (Chapter 10).
Because it's the same machinery, the control layout matches:
| LOAD | EDIT | MORPH |
| SAVE | ON / OFF | BACK |
Toggling the lane on and off. Press ON / OFF (button 5) to switch this modulator's lane on or off; the button lights while it's on. Press-and-releasing the CONTROL Knob does the same thing. A disabled lane keeps its step values but stops modulating. There's no transport on this screen - press BACK to leave and start the sequencer from there.
Everything Chapter 10 says about editing a Stepper lane applies here:
- rotate CONTROL to pick a step
- press-and-rotate to change its value
- MULTI for block selection
- RESET/REVERT as the safety net
The difference between the two source types is when the pattern advances:
- Time Sequence spreads the step pattern evenly across the Rate period. Set Rate to 4 bars and the pattern walks slowly; set it to 1 bar and it walks four times faster.
- Step Sequence advances with each step made by the target track. No Rate - the pattern is locked to the music. Set the modulator to 16 steps and the pattern cycles every time the target track has advanced 16 steps.
Time Sequence is for modulation that lives on its own timeline. Step Sequence is for modulation that stays married to the rate of the music.
Macro
Macro has no dedicated editor page - the Modulator's own Amount value is the Macro's output. Turn the Modulator's Amount knob and the target moves; leave it and the target holds. It's a manual offset with no automation on top.
Useful for creating an on-the-fly "filter knob," a "pitch bend," or any parameter you want to sweep by hand mid-performance.
Assign a Macro Modulator to a target parameter, and now that PARAMETER Knob has become a manual controller for the target - even on Home, without drilling in.
Because a Macro is static rather than time-based, its only presents four options: Amount, Min, Max and Enabled.
A Macro nudges the target; it doesn't seize it. When you arm a Macro, UNA remembers the target's value at that moment, and from then on the Macro applies the difference between the Amount knob and that remembered value.
The offset rides on top of whatever the target is currently doing. So if the underlying parameter changes (you edit it, or another Modulator sweeps it) your Macro offset follows along rather than overriding it.
Min and Max fence the result. They set the working range for the target, and the value the Macro produces is held inside it.
On the edit page, a Macro's Amount doesn't show a percentage like the other sources. It shows the value the target will actually become, in the target's own units, because that's the number you care about when you're using a knob as a hand controller.
MIDI CC
MIDI CC behaves in the same manner as a Macro but is driven by an external source. The Modulator Amount is driven by an incoming CC, rather than by your fingers on the knob.
Its edit page is the same short one: Amount, Min, Max, Enabled.
Min and Max matter more here, because they're what stop a controller's full 0-127 sweep from throwing the target to its extremes.
Press ASSIGN when MIDI CC is the source. UNA opens the MIDI CC assignment page.
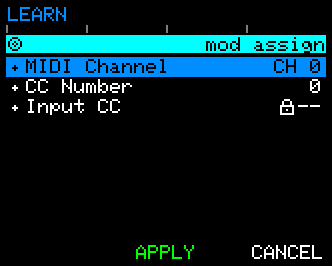
- MIDI Channel - which channel to listen on (1-16).
- CC Number - which CC number to react to (0-127; mod wheel is 1, aftertouch varies).
- Input CC readout - a live display of the CC value currently coming in.
You can press:
- LEARN to arm MIDI Learn.
-
Move a controller on your MIDI setup (mod wheel, aftertouch, a slider) and UNA fills in the Channel and CC Number automatically. This is the fastest way to hook a live controller to a UNA parameter.
-
APPLY commits.
-
CANCEL discards.
Worked example - Mod Wheel to Melody Pitch
MIDI Learn lets you assign a controller to an UNA parameter without knowing its CC number in advance.
To put your mod wheel on the Melody Pitch:
- From Home, press TRACKS → MOD, then EDIT on an unused Modulator.
- SOURCE → MIDI CC → APPLY.
- ASSIGN → LEARN → move your mod wheel. UNA fills in the Channel and CC number automatically.
- TARGET → PARAMS → find Melody Pitch → APPLY.
Your mod wheel now controls the pitch live.
Note. There a no hardcoded CC mappings for UNA's Track parameters. Routing a CC through a Modulator, as above, is the way to do it.
Starting from the parameter instead - the MOD shortcut
The target list has over a hundred and fifty entries, and walking to Modulation Mode to find a parameter you were already looking at is the long way round. So UNA lets you start from the other end.
- On Melody, tap CONTROL for Advanced Mode and press MOD (Knob 6). The target is the selected lane's parameter - if you're looking at the Gate lane, you get Melody Gate.
- On any Track Parameters list, press MOD (Button 2). The target is the selected row.
Either way UNA takes you straight to that Modulator's edit page.
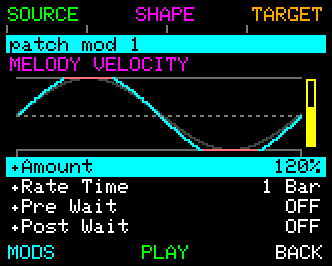
From there you have two ways out, and they go in opposite directions:
- BACK - returns you to the screen you pressed MOD on, so you can carry on where you were.
- MODS (Button 4) - takes you on to the Modulation page, to see this Modulator alongside the other seven.
Button 4 only appears when a shortcut brought you here. Come in the normal way, from the Modulation page, and it's blank - BACK already goes there.
MODS is a jump, not a step deeper
It rebuilds the trail as though you'd walked to the Modulation page yourself, so BACK from there goes Home rather than retracing the shortcut you took. That keeps the way out short no matter how you got in.
What it does depends on what's already there:
- A Modulator already aimed at that parameter? You go to it, and nothing is written. This is the quick way back to a modulation you set up earlier.
- A free Modulator slot? UNA takes the lowest one, points it at your parameter, and opens it - switched off, at its defaults. Turn AMOUNT up and enable it when you want it. A shortcut that started changing your sound the moment you pressed a knob would be a surprise rather than a shortcut.
- All eight patch Modulators in use? UNA asks which one to give up.
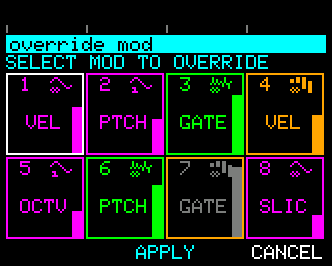
The cells are the same eight Modulation Mode shows, in the same colours, so you can see what each one currently does. Rotate CONTROL to choose, then APPLY or CANCEL.
APPLY is a full reset, not a re-aim
The old Modulator's rate, shape, span and step sequence have nothing to do with the new target, so they go. There's no second confirmation - choosing a slot and pressing APPLY is the confirmation.
The shortcut only ever uses patch Modulators. Your 16 global Modulators are never touched by it.
Rhythm and Bass reach this the same way
Melody is the only track screen with a MOD Knob, because it's the only one with a selected parameter on screen - Rhythm's Advanced cursor is a step on the grid, and Bass has no per-parameter cursor at all. Both reach the same door through PARAMS on their Advanced layer and then MOD.
Choosing a target
Press TARGET from Modulator Edit. UNA opens the target picker.
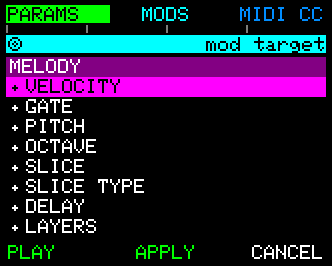
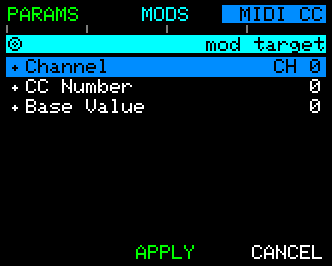
| PARAMS | MODS | MIDI CC |
| PLAY / STOP | APPLY | CANCEL |
Targets are organised into three categories:
-
PARAMS - every parameter across every track and sub-mode.
-
Melody, Chord, and Bass parameters, all 8 Stepper parameters per track, and their morph/rotation/length values. If UNA has a parameter, it can be targeted here.
-
MODS - Modulator Amount targets. Pick another Modulator here and this Modulator will move its Amount.
-
The forward-reference rule applies: Patch Modulators can pick any earlier Patch Modulator; Global Modulators can only pick earlier Global Modulators. Targets that would form a loop are hidden.
-
MIDI CC - CC output.
-
Opens a nested config sub-page where you pick the output channel, CC number, and base value the Modulator will send.
- Changing a setting sends nothing. Press TEST (B4) to send the base value to your gear, or hold TEST and rotate the CONTROL Knob to sweep up and down from it. Each press of TEST starts again from the base value.
To use this page:
-
Rotate the CONTROL Knob to walk the list within the current tab;
-
Hold-and-rotate to jump between category groupings.
- APPLY commits
- CANCEL discards.
Each target previews live as you highlight it. You'll hear the modulation start affecting the highlighted target before you commit.
Continuous vs One-shot
Every Modulator has a Mode setting:
- Continuous - the Modulator runs forever.
-
Waveforms cycle. Random re-rolls. Steppers loop. This is the default for "modulation that's always alive."
-
One-shot - the Modulator waits for a trigger, then fires for one Rate period, then stops.
- Waveforms complete one cycle. Random rolls once. Steppers walk their pattern once. Great for fills, drops, and drama.
You can toggle Mode via CONTROL + PARAMETER Knob press on the Modulation page, or by editing the Mode row in Modulator Edit.
There are 2 ways to trigger a One-shot, using the PARAMETER Knobs:
- Quick Press for one period
- Press and hold for a sustained loop that runs out the cycle on release.
Modulator-of-modulator
The MODS tab in the target picker lets a Modulator target another Modulator's Amount.
A slow Modulator on one Modulator's Amount is a "conductor" that shapes how strongly the target modulator affects its own target. A slow Waveform pointed at a fast Waveform's Amount gives you a fast tremolo whose depth rises and falls over 8 bars - you get subtle motion at first, dramatic motion at the peak, subtle again as the outer wave falls.
Worked Recipes - for Modulators
The "slow sweep" recipe. Enter Modulate. Pick Mod 1. EDIT → SOURCE → Waveform → APPLY. SHAPE → pick SINE, APPLY. Back in Edit, set Rate to 4 bars, Amount to about 60%. TARGET → PARAMS → pick a track's parameter, e.g. Melody Pitch . APPLY. Set Mode to Continuous. Now the value changes slowly across every four bars.
The "one-bar fill" recipe. Mod 2. EDIT → SOURCE → Waveform → SAW rising. Rate = 1 bar. Amount = high. TARGET → e.g. the Chord Track's Layers parameter. APPLY. Set Mode to One-shot. Now quick press PARAMETER Knob 2 when you want a chord swell fill; hold it if you want the swell to loop until you release, then land cleanly.
The "evolving groove" recipe. Mod 3. Random source. Rate = 1 bar. Amount = low (20%). TARGET → Melody Track's Velocity. APPLY. Continuous mode. The Random source draws one value per step and reseeds at each cycle boundary, so the same pattern of step values repeats every Rate cycle. With Rate = 1 bar over a 4-step bar, you get four small velocity nudges that loop bar after bar - a static groove becomes a consistent played groove. Lengthen the Rate to fit more distinct steps before the pattern repeats; change the Seed to audition a different pattern.
The "conductor" (modulator-of-modulator) recipe. Mod 1 is a fast Waveform (Rate = ⅛ note) targeting Melody Pitch - a fast trill. Mod 2 is a slow Waveform (Rate = 8 bars) targeting Mod 1's Amount. Now the trill moves over time - subtle at the start of every 8 bars, dramatic in the middle, subtle again at the end. You're modulating the modulator.
The "mod wheel to parameter" recipe. Mod 4. SOURCE → MIDI CC. ASSIGN → LEARN → move your mod wheel - UNA fills in Channel and CC number. APPLY. TARGET → PARAMS → pick a Track parameter. Now your mod wheel modifies the parameter live.
The "CC LFO/control your synth" recipe. Mod 5. SOURCE → Waveform (any shape and rate). TARGET → MIDI CC → set the output channel to whichever your outboard synth is on, set the CC number to whatever that synth's filter cutoff CC is. APPLY. Now UNA is driving your outboard synth's filter as if it had a built-in LFO. Combine with the "master swell" recipe to modulate outboard gear in phase with UNA's internal parameters.
The "studio tool" recipe. Press PAGE to select the Global Mods. Configure Global Mod 1 with a slow Waveform that drives a MIDI CC to your outboard reverb's decay time. Rate = 256 bars. Now every song/patch you engage carries this same slow reverb drift, that gets longer as the set progresses. Set once; forget about it for the rest of the show.
What's next
The Stepper (Chapter 10) is Modulate's natural companion - Modulate can drive Stepper parameters like Rotation or Length, meaning a static Stepper pattern can be made to walk through variations without your ever entering EDIT.
Chapter 15 (MIDI) covers UNA's MIDI plumbing in detail - worth reading if the MIDI CC source or MIDI CC target got you interested in wiring UNA into a bigger MIDI rig.