Chapter 8 - Chord Mode
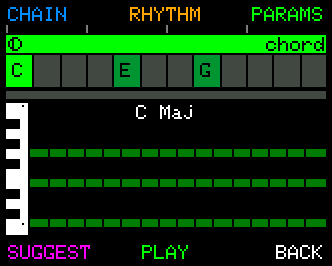
Chord Mode is where you capture and edit the chords that drive the other tracks. - The chord chain (progression) creates the harmony across all tracks. - The chord rhythm provides the structure for the Chord Track.
The Chord Track itself aims to provide padding for your music, in the form of a rhythmic chord pattern or drone.
Getting in and out
From Home, press CHORD to enter Chord Mode (Chapter 6).
Chord Mode and the chord chain are two screens, and Chord Mode's CHAIN button (B2) is the door between them. Chord Mode is the chord you are on; Chord Chain is the progression. Press BACK to return to Home. The sequencer keeps playing throughout - Chord Mode is for editing, not for stopping.
The six buttons have two sets of meanings, and the CONTROL Knob switches between them.
| Layer | B1 | B2 | B3 | B4 | B5 | B6 |
|---|---|---|---|---|---|---|
| EASY | SUGGEST | CHAIN | SCALE | SELECT | PLAY / STOP | BACK |
| ADVANCED | FOLLOW | CHAIN | SCALE | LISTEN | PLAY / STOP | BACK |
Tap the CONTROL Knob to bring ADVANCED up; tap again to put it away. It is a latch, so it stays until you dismiss it, and it survives a trip into any of the screens it opens. SCALE opens Scale Options from either layer.
B2 is CHAIN on both layers, and means two different things. On EASY it opens the Chord Chain screen; on ADVANCED it switches the chain into the music or out of it. That split is the same one Patches uses, so the gesture carries over.
LISTEN is on button 4 and PLAY / STOP on button 5, the same as every other ADVANCED row. Chord Mode is where the LISTEN toggle means most - it is what decides whether the keyboard sets the chord you are looking at.
Reading the Chord Mode screen
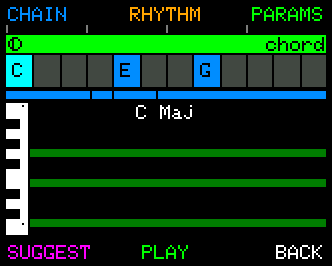
From top to bottom:
- The chain strip across the top is the whole progression, each link as wide as it is long musically, with a marker creeping through the current one. It is blue while the chain is switched into the music and grey while it is not - and it keeps moving either way, so a chain you have switched out still tells you where the beat is and when to bring it back. This is the one part of the screen that is about the chain rather than the chord.
- The chord name, large and centred, is the sounding chord: root, octave and quality. While the chain is running this is the chain's current chord, live, and it changes as the chain does. The rest of the time it is the chord you played. It is cyan when the chain owns it and green when it is yours.
- The degree sits to its right -
I,IV,V,bVII. This is the chord's position relative to the one you started from, not a fresh reading of it in its own key: walking out toVand back is only meaningful ifVsaysV. It is the same naming the eight knobs use, so the read-out and the knob you could have pressed always agree. - The keyboard shows the actual notes in the actual octave, with the bass where the bass is - so a 1st inversion looks like one rather than being described as one.
- The footer says where the chord came from -
MANUAL, orCHAIN 2/4- with its inversion on the right. The picture above cannot say that on its own: a chord looks the same whoever put it there, and which it is decides whether playing will change it.
The chord you are on
The chord Chord Mode holds is a store, not a meter. Play a chord on your keyboard and it appears; let go and it stays, so you can play something, look at it, and decide what to do with it afterwards. That is what makes SUGGEST and SELECT useful - they act on the chord that was under your fingers a moment ago.
While the chain is driving the music, the screen shows the chain's chord instead and follows it live. Your stored chord is still there underneath, waiting for your hands.
Playing a chord by hand switches the chain out automatically. You took over, so the chain gets out of the way - no menu option, nothing to arm. (Unless FOLLOW is on, which changes this chord-for-chord into a transposition instead - see FOLLOW below.)
Walking the degrees
Press the CONTROL Knob and rotate to walk the degrees of the key the chord is in. Turn right
for ii, IV, V; the chord sounds as you land on each one, so you can find the move by ear
rather than by name.
Turning back returns you to the chord you started from - that exact chord, voicing and all, not a rebuilt approximation of it. The starting chord stays the starting chord across as many grips as you like: letting go of the knob does not quietly make wherever you stopped the new home.
What does move home is a new chord: one played by hand, or one applied from SUGGEST or SELECT. Pressing one of the eight knobs does not - those are moves within the same key, so you can always turn back.
The eight suggestions
The eight PARAMETER Knobs are eight chords, named by degree in the two red bars. Press one to take it; it sounds immediately.
They behave the same on both layers, which is unusual on UNA and deliberate: on this screen the knobs are the thing you are choosing between, so taking them away on the layer where you fine-tune the chord would mean leaving the layer to pick a chord.
METHOD (B3 on the Suggest screen) decides what the eight are: Degrees gives the seven diatonic chords of the key; Smart gives the engine's picks - borrowed chords, secondary dominants, common substitutions.
Rotating the knobs still edits the Chord Track parameters, on both layers, as everywhere else.
FOLLOW
FOLLOW (ADVANCED B1) changes what playing a chord means. Normally, playing a chord by hand switches the chain out of the way - you have taken over. With FOLLOW on, it re-roots the running chain instead: the whole progression transposes to follow you, keeps its shape, and keeps rolling. The chord changes straight away, and the chain's timing does not move - links still turn over exactly where they were going to.
A worked example. Say your chain is C - Am - F - G. Turn FOLLOW on, start the transport, and
play an E♭ somewhere on the keyboard. The chain immediately becomes:
| Chain as written | C | Am | F | G |
|---|---|---|---|---|
| Sounding, after playing E♭ | E♭ | Cm | A♭ | B♭ |
Everything moved up three semitones, and nothing changed shape: the second chord is still minor, the fourth is still the one a fifth up. Only the root of what you play is read - the quality is ignored - so you can steer with whatever chord falls under your fingers. Play a single note if you like.
Every chord is measured from the chain's own first chord, never from wherever the last one
left it. So two chords in a row never stack: from E♭, playing a G gives you the chain a fifth
up from C, not a fifth up from E♭. And it means the way back is simply to play the chord the
chain starts on - a C, here - which lands you on no transposition at all. There is no separate
reset to learn.
Let go of the keys and the transposition stays. That is deliberate: it is a performance
control, not a momentary one. Every chord name on every screen reads as what you are actually
hearing, so the display always tells you where you are. The scale degrees do not move - a IV
is still a IV, because transposing a progression moves it without reshaping it.
Switching FOLLOW off snaps the chain back to its written roots at once. FOLLOW itself is remembered when you power down. The transposition is not: it also clears when you change patch, and when you load or capture a chain, because each of those brings a new progression that the old transposition was never measured against.
Your saved chains never move
FOLLOW is a performance transposition. The chain stored in your patch is untouched, so SAVE always writes the progression as you wrote it, the chain browsers always preview chains at their own roots, and Connect always sees the original. Turn FOLLOW off and everything is exactly where you left it.
The chord chain
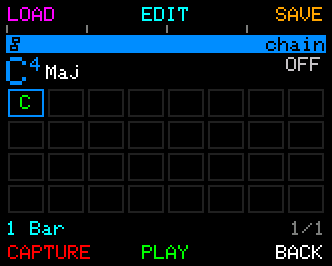
The chord chain is your harmonic timeline - the sequence of chords UNA cycles through as it plays, and the progression every other track follows. Each link has a chord and a duration. A chain can be anywhere from 1 to 32 links.
Press CHAIN (EASY B2) from Chord Mode to open it.
Reading the screen - three bands
Each band answers one question, so nothing on this screen has to freeze while something else is read.
- The overview, the thin bar at the top, is the whole chain - every link, each as wide as it is long, and it never scrolls. A cyan column crosses it at the playhead, and a pale rule above it shows which stretch of the chain the selector below is looking at. Once the selector scrolls, this is the only place that still says where you are in the whole progression.
- The head names the chord you are hearing on the left, with its scale degree beside
it, and on the right it names the key that degree is counted from -
KEY C. Stopped, the left side falls back to the chord you are pointed at. - The timeline is the scrolling band: tiles travelling leftwards past a fixed playhead, each as wide as it is long musically, with a bar ruler beneath and a bright seam where the chain loops back - so you can see the restart coming. Each tile names its chord, truncated to whatever the tile is wide enough for. It never stops tracking, not while you edit and not on Advanced Mode.
- The selector below it is seven cells around the cursor, all the same width, each naming its chord. This is what editing aims at. Chevrons in the margins say there is more chain that way. The window nudges rather than re-centring, so the chain does not slide about under your hand.
- The footer carries the link number and count, the link's length, and the cursor's chord name in grey.
Height means "this is sounding". The playing tile stands full height; every other tile is inset - including the current one when the chain is switched out, which is being tracked but is not making the sound.
Degrees, and what key they are in
The little numeral beside the chord name in the head band is a scale degree - where that chord
sits relative to the key, rather than what it is called. I is the home chord, V the one that
pulls back to it, vi the minor one three steps up. Lower case means the chord is minor; a b in
front means it has been flattened out of the scale, as in bVII.
Counting this way is what tells you the shape of a progression rather than just its notes:
I - V - vi - IV is the same four moves in C as it is in E flat. It sits next to the chord it
describes, and only there - the timeline and the selector spell chord names, because those are the
bands you read at speed and while you are aiming an edit, and a numeral makes you translate.
The head band names the key the count is measured from, on the right - KEY C, or KEY Am
for a minor one. Two colours, and the difference matters:
- Coloured means you declared the key - on Scale Options, or simply by turning KEY on this screen's ADVANCED knob 7. The degree is counted from a key you chose.
- Grey means UNA guessed it from the chords in the chain. A guess is usually right and occasionally not - C, Am, F, G and Am, F, C, G are the same four chords, and any listener needs more than the notes to tell which one is home. If the numerals look wrong, that is what a grey key is telling you: pin the key and they will agree with you.
A chord UNA cannot name gets no numeral at all, just its name - the band would rather say nothing than count from a chord it has not understood.
Taking the chain out of the music
ON / OFF (B2) is the chain toggle, and it lights while the chain is engaged. Switch it off and the current chord plays on by itself. The setting is saved with the patch.
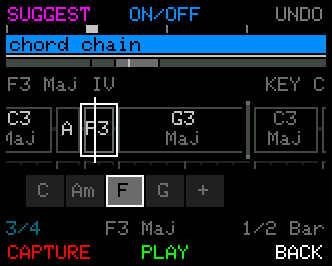
A switched-out chain keeps moving. The tiles and the overview grey, but the playhead still crosses, the belt still scrolls, and the overview still shades what has played. That is what you time the press against to bring the chain back in - and it is why the strip on Chord Mode keeps creeping too. A chain that went blank the moment you played a chord could not tell you when to come back.
The buttons
| Layer | B1 | B2 | B3 | B4 | B5 | B6 |
|---|---|---|---|---|---|---|
| EASY | SUGGEST | ON / OFF | UNDO | CAPTURE | PLAY / STOP | BACK |
| ADVANCED | REPLACE | TIME | UNDO | SAVE | PLAY / STOP | BACK |
- SUGGEST browses progressions - thirty factory shapes, your sixteen saved chains, or a random one - in any key you like, with live preview and cancel.
In Easy Mode the eight PARAMETER Knobs are the chord track's parameters, the same as they
are on Chord Mode and everywhere else - turn one and the display names it and its value. The ADVANCED
layer is where they become chain tools; see below.
- CAPTURE records a chain from your keyboard (see below).
- REPLACE swaps the chord on the focused link. It greys out on the +, where there is no link
to replace.
- TIME is the link's length: tap to cycle it, or hold it and turn CONTROL to sweep.
- UNDO is on both layers, because this is the screen where edits happen. Hold CONTROL and
press B3 for REDO.
Moving along it, growing it and shrinking it
Rotate CONTROL to move the cursor, on either layer. Past the last link sits a dim +:
that is where the chain grows. Land on it and the footer reads TURN TO ADD; press CONTROL
and rotate right to add links - one per detent, the whole drag counting as a single undo step.
Each new link takes the length of the one before it.
Growing the chain is deliberately a press and turn, not a plain turn, so that walking to the end of the chain to look at it never lengthens it by accident.
Shrinking works from the other end, on Easy Mode. Put the cursor on the last link, press CONTROL and rotate left. Once the walk has nowhere further to go - past the chord you started from - the first detent marks the link: it greys out and the footer reads TURN TO DELETE. One more detent left removes it, and the cursor steps back onto the new last link - so you can keep going. Removing a link is its own undo step. Any other move - turning right, moving the cursor, letting go of CONTROL - calls it off. From a fresh grip that is simply turn left, turn left. A chain of one link can't be shrunk this way.
Press CONTROL and rotate on a link instead and you walk that link's degrees - the same gesture Chord Mode gives your own chord, aimed at the link the cursor is on.
Editing the chain
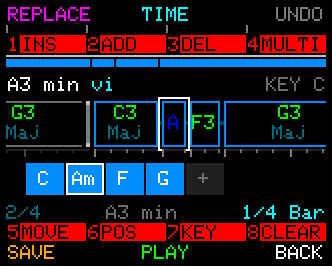
Tap CONTROL for ADVANCED. The layer changes the buttons and the knobs, not the picture: the timeline is a few pixels shorter and the footer lifts, and that is the whole difference. Nothing freezes.
With ADVANCED up, the two red bars label what the eight PARAMETER Knobs do when you press them:
| P1 | P2 | P3 | P4 | P5 | P6 | P7 | P8 | |
|---|---|---|---|---|---|---|---|---|
| Press | INS | ADD | DEL | MULTI | MOVE | POS | KEY | CLEAR |
- INS inserts a link before the cursor; ADD appends one at the end, copying the chord and length of the one you are on; DEL removes the one under the cursor.
- MULTI selects a block, so the value edits act on all of it at once.
- CLEAR empties the chain back to a single link, leaving it switched in - CLEAR resets the content, it does not take the chain out of the music.
- MOVE shifts the selected link - or the whole MULTI block - one place along the chain. It only rotates: there is no sensible single direction for a press to guess at, so P5's press does nothing. It stops at both ends rather than wrapping, and the cursor travels with the link.
- POS cycles the link's inversion, and also rotates both ways.
A cell that cannot act right now is drawn grey rather than removed: INS and ADD at 32 links, DEL
at one link, MOVE and POS on the +.
KEY - the key, and the chain, together
P7 is KEY: the patch's key, put on the screen where the key matters most. It is the only knob on this row that acts on the whole chain rather than on the link under the cursor, which is why it never greys out - it does not care where the cursor is.
Turn it and two things happen at once, as one act: the key advances a semitone and the whole
progression transposes to match. The key read-out changes under your hand, the music moves with
it, and the degree beside the chord name does not budge - which is the point. Move the music
without the key and I - V - vi - IV becomes a row of accidentals; move the key without the music
and you have relabelled chords you never touched. A whole sweep counts as one undo step.
Turning it while Key is on Auto declares a key, counting on from whatever UNA had inferred - so the read-out goes from grey to coloured on the first detent. That is the quickest way to pin a key: turn it one step and back.
It has no press, deliberately - the same as MOVE. Once the knob is the key, there is nothing left for a press to mean.
To put the chord track in a different register, use the track's own Octave parameter - it moves the whole track and is saved with the patch. See Chord Track Parameters.
Capturing a chord chain from your keyboard
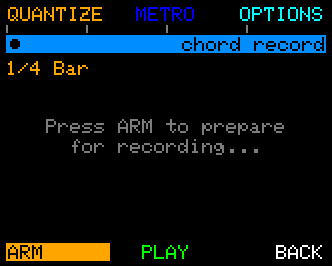
Capture is the fastest way to get a progression into UNA. Press CAPTURE (EASY B4) and you are in Chain Record. The whole take is one undo step, so a capture you do not like costs one press of UNDO.
The screen controls:
| Function | What it does |
|---|---|
| QUANTIZE | Quick-edit the snapping grid: press to select, rotate the CONTROL Knob to choose (e.g. ¼ bar, ½ bar). Each chord-change you play lands on the nearest grid line. Locked once recording starts. Capture also supports Step Recording, in which case Quantize is labelled as TIME, which sets the length of each captured link. |
| METRO | Toggles the metronome click during capture. Lights when on. |
| OPTIONS | Opens the Record Options mode (see below). Becomes UNDO during a step record. |
| ARM | Primes the capture. From here on this one button drives the whole take, and its label changes at each stage to show what happens next - see below. |
| PLAY / STOP | Audition the existing chain before you record. Available before the take only. |
| CANCEL | Back out without writing anything. (Reads BACK before you arm.) |
Watch the ARM button - it renames itself. It's the same button in the same place throughout; only the label changes, and the label always tells you what pressing it will do next:
| The button reads | Where you are | Press it to |
|---|---|---|
| ARM | Nothing recorded yet. | Prime the capture |
| START | Primed and waiting. | Begin the take - or just play, and the first chord starts it |
| WAIT | The one-bar count-in is running (METRO on). From stopped, only the click plays and the tracks come in on the downbeat. | nothing - wait for the bar line |
| END | Recording. The live bar counter is on screen. | Finish the take |
| DONE | The take is written and the new chain is active. | nothing |
Record Options
Press OPTIONS to open the Record Options mode. Move through the list with the CONTROL Knob, change a value by holding and rotating CONTROL, and press BACK to return to the Record screen.
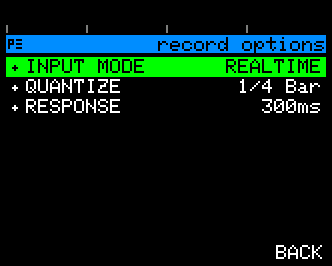
The options are:
- INPUT MODE
- REALTIME - the default: play the progression live and it's recorded against the clock.
-
STEP REC - (step record) add links to the chain one chord at a time; see below.
-
QUANTIZE - the same snapping grid available as the QUANTIZE shortcut on the main Record screen. In Step Record this row is relabelled TIME, because it sets each new link's length rather than a snapping grid.
- RESPONSE - the note settle window (default 300ms). This can help tolerate fingers landing slightly out of sync; and be tuned to your playing.
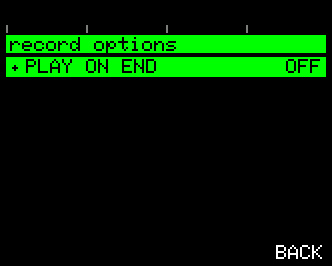
- PLAY ON END - what END does when the sequencer was stopped before you pressed START.
- OFF - the default: the sequencer stops again.
- ON - the sequencer keeps playing your new chain from the first chord, so you can hear it straight away.
If the sequencer was already running, it always keeps running. CANCEL always puts the sequencer back the way it was, and PLAY ON END has no effect in Step Record.
When the sequencer keeps running after END, the new chain carries on in time: if you press END slightly late, it jumps straight to the first chord rather than waiting for the next bar. This holds whenever the take started from the top; see RUNNING SYNC.
- RUNNING SYNC - what START does when the sequencer is already playing.
- RESTART - the default: the take starts the sequencer again from the top on its first beat (after the count-in, or straight away with the metronome off). Your new chain then plays exactly as it will after a STOP and PLAY. If UNA sends MIDI Start, your other gear restarts with it.
- CONTINUE - the sequencer keeps its place. After END the chain picks up where PLAY would put it, so the first pass may not line up with your take.
RUNNING SYNC has no effect in Step Record, or when UNA follows an external clock and transport.
Realtime capture
With INPUT MODE = REALTIME:
- press ARM to prime
- then either press START (for a 1-bar count in) or simply play your first chord - the moment notes arrive, UNA starts recording.
- Play the chord of your progression.
- While recording, a live bar counter appears on the screen so you can see how many bars your chain has grown to as you play.
- Press END to finish the capture.
The new chain becomes active immediately.
- CANCEL backs out at any point.
With METRO on, you get a count-in. Pressing START runs a one-bar click track before capture begins, so your first chord lands on beat one. If the sequencer was stopped, only the click plays during the count-in. The tracks wait and come in from the top on the downbeat, playing the chord you play during WAIT. That chord is also the first chord of the chain, even if you let go before the bar line.
If the sequencer is already running, the tracks keep playing and the count-in waits for the next bar line, keeping the take bar-aligned.
Capture is fairly forgiving, if you play late at the beginning of recording, or don't press end right on the bar, UNA will do its best to clean up. You can always edit the result.
Step-record capture
With INPUT MODE = STEP REC you build the chain one chord at a time, independent of playback or the metronome:
- Press ARM to start.
- Play a chord to add a link. Each new link takes the current TIME value as its length (1 bar by default).
- Change TIME between chords to vary link lengths - it only affects the next link added.
-
Play the same chord twice in a row to extend the previous link by one TIME unit instead of adding a duplicate. (A rolled chord that takes a moment to form is treated as one strike, not two.)
-
UNDO removes the last link you added.
- END commits the chain; CANCEL discards it.
Step Record never starts the transport - there's no clock and no metronome running, so you can take as long as you like over each chord.
The chord-name label. While recording, the screen labels the chord you're playing with its root, its quality and its inversion (e.g.
E3 min, orC4 Maj 2ndif you're voicing a C major with G at the bottom) - the same label the chain will show once the link is stored. See How UNA names a chord below.Capturing while the music plays. If you capture a new chain without stopping the sequencer, the changeover is clean: the last live chord rides out the current bar, then the new chain takes over on the next bar line - link transitions land on natural bar boundaries, so the melody stays in sync - and playback begins from the chain's first link, looping from there.
How UNA names a chord
Every screen that names a chord - Home, the Tracks INFO views, Chord Mode, Chord Chain Capture, and the chain's card, footer and tiles - uses one rule, so the same chord always reads the same way.
The name comes from the notes, not from the bass. UNA looks at the pitch classes you're
playing and finds the chord they spell, then names it from that root. Play G-C-E and you'll
see C4 Maj 2nd - a C major triad with G at the bottom - not a chord rooted on G.
The tag on the end is the inversion, counted the usual way: 1st means the third is in the
bass, 2nd the fifth, and so on. Root position carries no tag at all.
The octave is the root's, not the bass's. In C4 Maj 2nd the 4 says the C of that chord is
sounding at C4 - middle C - even though the lowest note you're holding is the G below it. Octave
numbers are the standard ones: middle C is C4, and the C an octave below is C3.
Root detection doesn't change the name. Each track's ROOT NOTE setting decides whether
that track follows the chord's detected root or the note you played lowest - a performance choice -
and UNA shows you that separately as the G>C read-out in the Tracks INFO views. What a chord is
called is a different question, and it is answered the same way whichever the tracks are set to.
Two places deliberately show the playing root instead of the named one, because they carry no chord name to disagree with: the note strip's bright lane, and the letters in the 8x4 grid on the Edit and Load screens. On an inverted chord those show the bottom note.
If a set of notes isn't a chord UNA recognises, the screen shows just the root note and octave
(C4) rather than guessing.
Replacing a chord in a chain
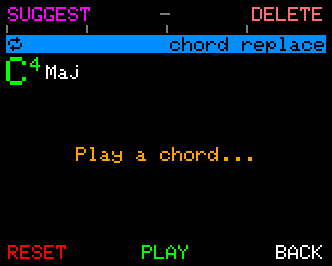
Put the cursor on a link and press REPLACE (ADVANCED B1) to swap the chord there. On your chord card there is no link to substitute into, so REPLACE asks the Suggest engine for a next chord instead.
Chain Replace forces listening on and holds the current chord while it is open, so you can audition a substitution against a steady bed. The easiest way to replace a chord is just to play one: UNA detects the chord under your fingers and offers it as the replacement. If you would rather pick from suggestions, SUGGEST opens the Suggest engine in substitute mode - it offers chords that fit the surrounding harmony.
If you know exactly which chord you want, SELECT opens the Chord Select picker (see below) on this link, so you can dial it in by name. Its APPLY writes the chord into the link and takes you straight back to Chord Mode - you do not pass back through this screen. CANCEL returns you here with the link untouched.
When you've found the new chord, press APPLY - the chord you're hearing is written into the chain as you leave. CANCEL does the opposite: it puts back the chord the link held when you arrived and leaves without writing anything. Nothing on this screen touches your patch until you press APPLY.
RESET is a third, gentler option, and it is the one to reach for while you are still deciding:
- RESET restores the link to the chord it held when you arrived - and stays on the screen.
- Press it again - it now reads REVERT - to bring your replacement back.
So you can flip between the original and your new chord as many times as you like, hearing each against the chain, and only then decide with APPLY or CANCEL.
Saving and loading chains
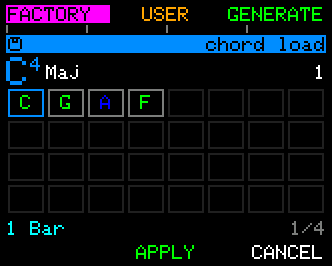
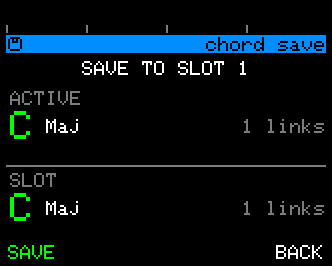
SAVE (ADVANCED B4) stores the current chain to the USER library.
- Rotate the CONTROL Knob to pick a slot.
- Press SAVE to commit, or CANCEL to back out.
SUGGEST (EASY B1), with the chain as the target, browses the library. Three tabs across the top, and two knobs, because a chain here is a progression plus a key:
| FACTORY (B1) | The thirty shipped progressions, familiar ones first. |
| USER (B2) | Your sixteen saved chains. |
| GENERATE (B3) | A random progression in a random key. Turn CONTROL to roll again. |
| CONTROL turn | Which progression. |
| CONTROL press + turn | What key to hear it in, C through B. |
One knob, two questions. Turn it to walk the list; hold it down and turn to change the key.
The head band says where you are on the left and what key on the right, on every tab. On
FACTORY the left slot is the number and the name - 12 Minor Rock - because the list is thirty
long and the number is how you say where you are in it. A saved slot has no name to give, so on
USER the number is the whole of it. The key is on the right either way, and for a saved chain UNA
works it out from the chords.
Everything you land on previews live, so you hear each one in the key you have chosen. The key holds while you browse, which is the whole point of splitting the two: pick E flat once with a press and turn, then walk the list hearing every progression in E flat. The USER tab works the same way - a saved chain arrives in the key you saved it in, and a press and turn transposes it from there.
APPLY keeps what you are hearing; CANCEL puts back the chain you arrived with. The whole browse is one undo step, however many you previewed on the way.
APPLY may set your patch's key. If Key is on Auto, applying a factory or generated progression declares the key and mode you chose - so the numerals on the chain stop being a guess and Chord Suggest agrees with them. A key you set yourself is never overwritten. If you have pinned Key at Chord Suggest ▸ OPTIONS, APPLY leaves it exactly as you set it. CANCEL declares nothing. See Chord Suggest for where that setting lives.
Chord Suggest
If you're looking for chord ideas to build a progression, or alternative chords to vary an existing one, UNA's chord suggestion engine can help.
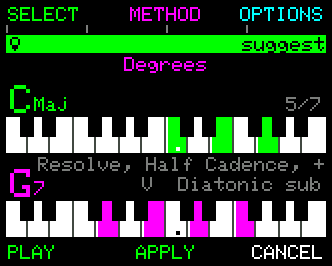
From Chord mode, press SUGGEST and UNA offers chord ideas that fit the current harmonic context.
Suggest comes in two flavours depending on how you reached it:
- From Chord Mode directly: "what should come next?" UNA looks at the chain you've built and proposes chords that lead well from where you are.
- From Chain Replace: "what could substitute here?" UNA looks at what surrounds this link and proposes chords that fit between them.
In the Suggest screen:
| Function | What it does |
|---|---|
| SELECT | Open Chord Select if you'd rather build the chord by hand. (See below) |
| METHOD | Toggle between SMART (engine-driven suggestions) and DEGREES (diatonic chords I-vii° of the key). The current method is shown at the top right of the browser. |
| PLAY / STOP | The transport, so you can hear the highlighted suggestion in time. |
| APPLY | Commit the highlighted suggestion. |
| BACK / CANCEL | Return without committing. |
Key and Mode are the same settings the chord chain counts its degrees from, and they live on the Scale Options screen rather than here - Key is set directly, and Mode is read off the Scale you declare, so the two can never disagree. Pin Key and the chain's key read-out turns from grey to colour, because the numerals are now measured against a key you chose rather than one UNA inferred - see Degrees, and what key they are in. Two things can set it for you: APPLY in the chain browser, and the chain's ADVANCED KEY knob, which sets it outright and transposes the chain to match.
Rotate the CONTROL Knob to browse the suggestions.
The first eight PARAMETER Knobs are also wired as shortcuts: i.e. pressing Knob 4 jumps directly to suggestion 4.
-
The DEGREES method offers exactly the seven diatonic chords of the current key/mode (I, ii, iii, IV, V, vi, vii°).
-
SMART uses UNA's engine to widen the field - borrowed chords, secondary dominants, common substitutions.
If the suggestions feel too "vanilla," switch to SMART; if they feel too unpredictable, switch to DEGREES.
Suggested chords will preview in real-time. Pressing APPLY commits the chosen chord and returns you to the previous mode.
Chord Select - Building a chord from scratch
If you'd rather build a chord by hand, the Chord Select picker lets you do just that.
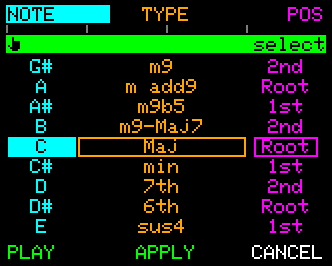
There are three ways in: SELECT (EASY B4) on Chord Mode, SELECT on the Suggest screen, or SELECT from Chain Replace. Each opens the three lists on the chord you are changing, rather than on whatever you last played.
Select Mode presents three scrollable lists:
- NOTE sets the root note (C through B).
- TYPE sets the chord quality.
-
42 types are available - every common quality from major and minor through 7ths, 9ths, sus, dim, aug, and a long tail of jazz extensions.
-
POSITION sets the voicing.
- Voicing determines which note of the chord is at the bottom - root position, first inversion, second inversion, etc. The number of available positions depends on the chord type.
Press NOTE, TYPE, or POS to select the active list, then rotate the CONTROL Knob to choose.
The current chord will preview live - you'll hear what you are choosing.
The PARAMETER Knobs are a shortcut for NOTE. Knobs 1-8 map to the white keys C, D, E, F, G, A, B, C respectively. Hold CONTROL and press a knob to select a sharp note.
Once you have what you want, APPLY commits the chord and returns to the previous mode; CANCEL discards. Arriving from Chain Replace, APPLY writes the chord into that chain link and returns you straight to Chord Mode rather than back through Replace.
A note on POSITION when replacing a chain link. A chain link records the notes of a chord, not its name - UNA works out the root and the inversion again each time it draws or plays the link. Most inversions survive that intact. Some can't: C#-F#-B is equally readable as F# sus4 in second inversion or as a chord rooted on C#, and read either way the label would be a guess. Rather than leave you with a link labelled as a chord you didn't choose, UNA checks whether the inversion reads back correctly and, when it doesn't, stores the chord in root position instead. You'll always get the chord you picked; you may not always keep the inversion.
Chord Rhythm - how the chord track plays in time
From Home, press TRACKS, then RHYTHM (button 1), to enter Chord Rhythm mode.
Where the chord chain decides which chord is played, the Chord Rhythm decides when and how chord notes are triggered as the chord track plays.
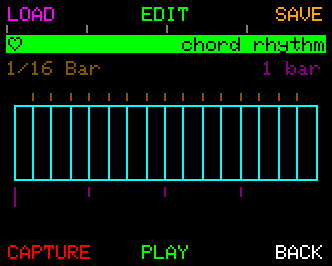
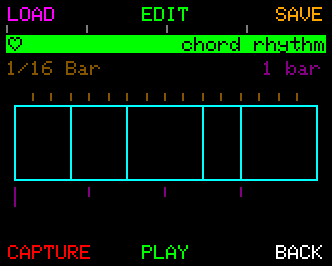
Two examples. A rhythm can be anything from a punchy 16th-note groove to an Afro-Cuban syncopation - completely different feels for the same chord.
Everything happens on this one screen. Browsing rhythms, auditioning them and editing them by hand are the same activity, not three sub-modes with their own APPLY and CANCEL buttons. Every change you make is live the moment you make it, so you are always listening to the thing you are shaping. Leaving the screen keeps your work - there is nothing to commit.
If you change your mind, that is what UNDO is for. See Undo and redo, below.
Reading the screen
The rhythm is drawn as a row of blocks. Each block is a trigger - a point where the chord fires - and its width is the gap until the next one.
- Top left is the grid: the spacing everything snaps to while you edit. Top right
is the length of the loop (
1 bar,2 1/2 bars, orDRONE- see Length and drone). - Along the bottom, left reads loop over pattern - how many blocks actually sound, out of how many the pattern holds. When the first number is lower, the blocks past it are greyed: they are part of the pattern but sit outside the loop, so they never fire. Right is the trigger the cursor is on, numbered from 1.
- A white cursor marks the selected trigger. Both ends of the pattern are selectable too: the left end is where you pull a new trigger in, and the right end is the loop end.
- During playback the current trigger is highlighted so you can see where you are in the loop.
- Below the blocks are the bar and quarter-note markers (purple), and above them the grid ticks, so you can see where a trigger will land before you move it.
The two button layers
The six buttons have two sets of meanings. The CONTROL Knob switches between them.
| 1 | 2 | 3 | 4 | 5 | 6 | |
|---|---|---|---|---|---|---|
| EASY | SUGGEST | - | UNDO | CAPTURE | PLAY / STOP | BACK |
| ADVANCED | GRID | - | PARAMS | SAVE | PLAY / STOP | BACK |
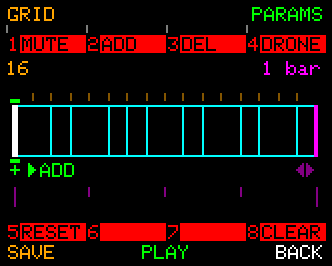
On ADVANCED, the two red bars label what the eight PARAMETER Knobs do when you press them. Each cell shows its knob NUMBER on the left and the action on the right; a cell with a number and no word is a knob that does nothing on this screen.
Tap the CONTROL Knob to bring ADVANCED up; tap again to put it away. It is a latch, so it stays until you say otherwise - holding the knob does not bring it up, because holding and turning CONTROL is how you move a trigger.
BACK on ADVANCED returns you to EASY; press BACK again to leave Chord Rhythm.
UNDO is EASY B3. REDO is on the COMMON row: hold CONTROL and press B3.
Choosing a rhythm
Two routes, both live - you hear each rhythm as it arrives:
- SUGGEST (EASY B1) opens the rhythm browser: FACTORY, USER (your 16 saved rhythms) or GENERATE. Turn the CONTROL Knob to browse, hearing each rhythm as you land on it. APPLY keeps it, CANCEL puts back what you had. The whole visit is one UNDO step.
Knob 5 is RESET. It puts the whole track back to its defaults - every parameter, and this track's own pattern content with them. It asks first, and the question takes the whole screen - the track view, the knob bars and all - so there is nothing to misread it against. Press it once for a confirm reading Reset / Chord Track? / Params and pattern, then press the same knob again to go through with it. Anything else at all - another knob, another button, a tap of CONTROL - calls it off, and that press is spent cancelling rather than doing its own job. YES sits on button 4 and CANCEL on button 6, so either the knob or the button will do it. A reset also empties the undo history: it is a new starting point rather than another edit to step back through.
RESETandCLEAR(Knob 8) are not the same act, which is why both keep a knob:CLEARempties the pattern to a single downbeat trigger and leaves every parameter alone.
- Knob 8 (
clear) empties the bar back to a single trigger on the downbeat - a blank canvas to build on.
All of them are undoable, so browsing costs you nothing.
Editing by hand
- Turn the CONTROL Knob to select a trigger. The cursor walks the whole pattern including both ends.
- Hold the CONTROL Knob and turn to move the selected trigger, snapped to the grid.
- With the cursor on the left end, hold and turn inward to pull in a new trigger.
- Push a trigger out through the left end to delete it. The gap it leaves is absorbed by its neighbour, so the loop keeps its length.
- On ADVANCED, Knob 2 (
add) and Knob 3 (del) are the named versions of those two, and work wherever the cursor is. Repeated presses ofdelwalk leftwards through the pattern. - GRID (ADVANCED B1) changes the spacing you are snapping to; each press steps to the next grid and the label top-left follows. Hold GRID and turn the CONTROL Knob to run through the grids in either direction. Existing triggers are left where they are - the grid is for what you do next.
- Knob 1 (
mute) mutes the chord track, the same switch as the Mixer's.
Moving a trigger onto one that is already there merges them: let go of the CONTROL Knob and the two become one.
Length and drone
The right end of the pattern is the loop end, and dragging it is how you set the length. Put the cursor there, hold the CONTROL Knob and turn.
- On EASY the length moves in whole bars - 1, 2, 3, 4. A length change is a musical decision, and this makes it hard to land badly.
- On ADVANCED you get every length in between, in 1/16 steps, for when a loop needs to be a beat and a half rather than a bar.
Push the loop end out past four bars and the chord track becomes a drone: it holds the
chord as a sustained pad instead of playing a rhythm, and the length label reads DRONE. The
loop-end line turns purple to show the loop no longer closes. Drag back inward and the rhythm
returns at four bars, exactly as you left it.
Knob 4 (drone) on Advanced Mode is the direct route in and out, for when you know where
you want to be. Turning drone off puts back the length you had - it was never overwritten.
Chord Rhythm stays fully available while the chord track is droning: drone is the far end of the length axis.
Undo and redo
Chord Rhythm remembers the last 16 states of the pattern for as long as you are on the screen.
- UNDO is EASY B3. Keep pressing and you walk back through everything you have done - edits, generated patterns, clears, browser visits, grid changes - until you reach the rhythm you arrived with.
- REDO is COMMON B3: hold CONTROL and press B3.
- One press undoes one act. A whole drag counts as one, however many detents it took, so nudging a trigger ten grid positions steps back in a single press rather than ten.
- Making a new edit after undoing discards the redo branch, as you would expect.
- Pressing CAPTURE records the state first, so one UNDO steps back over an entire take.
The history is cleared each time you come into the screen, so UNDO can never take you further back than the rhythm you started this visit with.
Capturing a rhythm
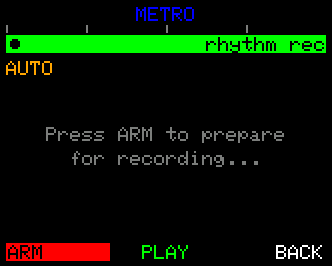
Press CAPTURE (EASY B4) to tap a rhythm in from your keyboard. The flow is similar to Chain Record but with one nice twist: UNA stores the inter-tap intervals in milliseconds while you play, and auto-detects a sensible quantize grid when you press END. You don't have to know in advance what subdivision your taps land on.
- QUANTIZE. Locked during capture; on END, it shows the auto-detected grid.
- After END you can rotate the CONTROL Knob to override the grid, and snap the step position to the new grid.
- METRO. Pre-record click toggle. With METRO on, START runs a one-bar count-in. If the sequencer was stopped, only the click plays until the downbeat, when the other tracks come in from the top. Tap before the bar line and the take starts on that tap instead.
- LENGTH. After END, sets the loop length. Default is AUTO (the natural duration of what you played). Override manually if you need to adjust - LENGTH moves in 1/16 steps and is independent of the QUANTIZE grid. Landing back on the natural length returns it to AUTO.
- OPTIONS. Before a take, button 3 opens Record Options. It has one setting, PLAY ON END. OFF is the default: the sequencer stops again at END. With ON, a take started from stopped keeps playing after END, in time, so you hear the rhythm while you tidy it. APPLY keeps it playing; RETRY and CANCEL stop it.
- ARM -> START -> END -> RETRY on button 4.
- APPLY (button 5) commits the rhythm. CANCEL (button 6) discards it.
While recording, a live bar counter appears on the screen so you can watch how many bars your rhythm has grown to as you tap.
Saving a rhythm
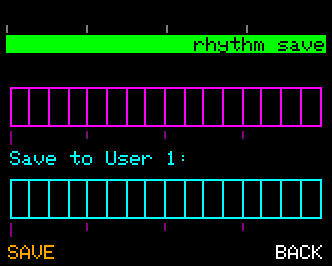
SAVE lives on Advanced Mode (B4) - tap the CONTROL Knob, then press B4. It stores the current rhythm to one of 16 user slots - the ones SUGGEST lists under USER.
- Rotate the CONTROL Knob to pick a slot
- Press SAVE - UNA asks YES to confirm the overwrite or CANCEL to back out.
- Press BACK to leave without saving.
A note on STEPS
Chord Rhythm never changes STEPS behind your back. STEPS is yours to set, so whatever you have chosen survives editing; only CAPTURE re-seeds it, because a capture replaces the whole pattern. Shortening the loop can therefore leave STEPS higher than the number of blocks - the footer's pair of numbers shows you when that has happened, and the greyed blocks on the grid show you which ones.
Adding a block inside a shortened loop is the one exception: STEPS goes up by one so the new block joins the loop and the loop keeps repeating at the same rate. Add a block outside the loop and STEPS stays where it is. (32 blocks is the ceiling, so no block can ever push STEPS past its own maximum.)
Scale Options
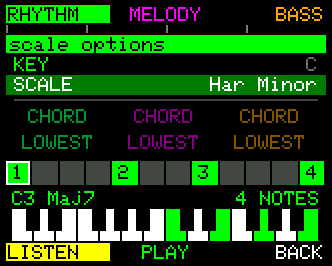
Everything about what notes the tracks are allowed to play, and where they call home. The device's KEY and SCALE at the top; under them, per track and per patch, a SOURCE row and a ROOT row - so the bass can wander a scale while the melody stays on the chord, and either can follow the chord's real root while the other stays on the note you played.
Press SCALE (button 3) on either layer to open it.
The four sources
The SOURCE row - the upper of the two - is what decides which notes are in a track's set.
- CHORD - the notes of the chord you are holding. Three to five notes, and the default on all three tracks.
- SCALE - a scale over that chord. Six or seven notes, so the track walks rather than leaps. This is what buys walking basslines.
- BLEND - both sets at once: chord tones on the landings, scale colour in between.
- CHROMA - all twelve. A chromatic crawl; pair it with a short STEPS for texture rather than melody.
The strip, and the keyboard under it
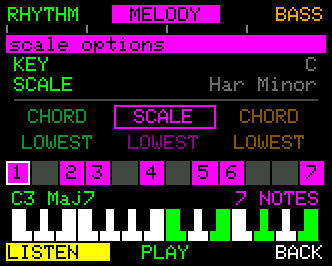
The strip is the chosen track's set of notes, one cell per note of the octave. Lit cells are the notes that track can play, numbered in the order a plain rising sequence reaches them; 1 is where it starts.
The keyboard beneath it answers a different question - that is what you are playing. Put the two together and the setting explains itself: hold a four-note chord with the melody on SCALE and the keyboard shows four keys while the strip shows seven.
Scale
AUTO is the default, and it is the setting to leave alone. It fits a scale to each chord as you play it - a minor seventh gets a minor scale, a dominant gets Mixolydian, a half-diminished gets Locrian. The rule is that the scale must contain every note of the chord, which is what makes it impossible for AUTO to put a note against one that is already ringing. While AUTO is on, the caption names the scale it derived, so you can play a progression and watch it track.
Choose a scale by name instead and that shape re-roots on every chord: set Har Minor and a C chord gives C harmonic minor, an F chord gives F harmonic minor. That is a deliberate colour rather than a safe default - a named scale can disagree with the chord under it.
When a named scale fights the chord
Compare the chord's notes to the scale's. Every chord tone in the scale, and it is always consonant. One chord tone a semitone off a scale tone - a C major 7th under C harmonic minor, say, where the scale's Eb meets the chord's E - and you have the spicy case. BLEND is the fix: both thirds are then in the set and the line can slide between them instead of contradicting the chord.
KEY is the patch's declared key. It drives the chord suggestions and the chain's degree read-outs; it is shown here because this is where you are thinking about key and scale together. It does not change the notes a track plays.
The tracks
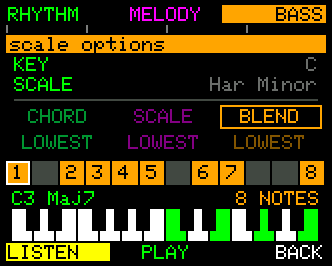
The two rows of three sit under the buttons that name them and are drawn in those tracks' colours: the upper row is each track's SOURCE, the lower one its ROOT. Buttons 1, 2 and 3 point the strip at a track - and at the same time choose which column the SOURCE and ROOT rows edit. The cursor stays where it is, so you can park on ROOT and flick between the three tracks to compare them.
One exception, on the Rhythm track: with LAYERS on LOCKED it voices the chord whatever the note source says, because LOCKED means "play all the chord's notes" and that only means anything against the chord. Note source applies to Rhythm from LAYERS 1 upward.
Diatonic sevenths from plain triads
Set the Rhythm track to SCALE with LAYERS 4. Play a plain C triad and you get Cmaj7; play A minor and you get Am7. The track stacks scale degrees in thirds from each chord's root.
Root - where a track calls home
The ROOT row decides the note a track's walk starts from.
- LOWEST - the lowest note you played. The default on all three tracks.
- DETECT - the chord's real root, worked out from the whole chord.
The two only ever differ over an inversion. Hold C major as C-E-G and both call C home. Hold it as G-C-E and the lowest note is G, but the chord is still a C: on LOWEST the track treats G as home, on DETECT it treats C as home and the walk is rooted where your ear says it is. Root-position chords sound identical either way.
The usual pairing
Bass on DETECT, Melody and Rhythm on LOWEST. The bass follows the harmony while the other two stay on the voicing you fingered - so an inverted chord keeps its shape up top and still gets its proper root underneath.
Whenever any track is on DETECT, the Tracks Info views (Chapter 6) show a small G>C read-out - the note you played lowest, then the root UNA detected. With every track on LOWEST nothing acts on the difference, so the read-out is hidden.
Getting here
- Chord → SCALE (button 3, either layer)
- A track's params → NOTE SOURCE, the row under PITCH - tap CONTROL, or press SCALE
- Performance Mode → CHORD row → SCALE (knob 6)
Both settings also have a row of their own in each track's params - NOTE SOURCE and ROOT NOTE, together under PITCH. NOTE SOURCE is a door into this screen; ROOT NOTE is a two-value toggle you can change in place. Use the rows when you are working through one track's settings, and this screen when you want to see all three tracks at once.
Controls
- Turn CONTROL - move between the four settings (KEY, SCALE, SOURCE, ROOT), wrapping both ways
- Press + turn CONTROL - change the selected one
- Buttons 1 / 2 / 3 - Rhythm, Melody, Bass. The cursor does not move, so the row you are on simply changes track.
- Buttons 4 / 5 / 6 - LISTEN, PLAY/STOP, BACK
Chord Track Parameters
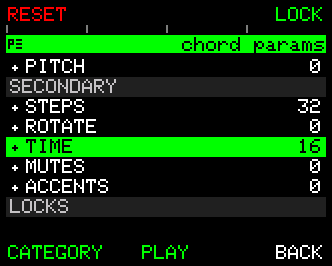
Press PARAMS (Chord Rhythm, ADVANCED B3) to open the Chord Track parameters menu. This is where the Chord Track's full parameter list lives; including those not accessible via the PARAMETER knobs.
Drone Mode (CHORD vs. DRONE)
Inside PARAMS, the first item under the PRIMARY group is MODE. It has two values:
- CHORD (default): the chord track plays a rhythmic pattern - the rhythm you set in Chord Rhythm.
- DRONE: the chord track holds the chord as a sustained pad, ignoring the rhythm.
The drone only changes when the chord changes, the sequencer stops, you release all live-play keys, you change Octave/Channel/Layers/Pitch on the chord track, or you mute the Chord Track from the Mixer.
You can use the Mixer as a drone on/off, the chord snaps back cleanly when you bring it in.
DRONE is useful for ambient pad textures and for letting another instrument carry the rhythm while UNA supplies sustained harmony underneath.
RHYTHM stays open while you are droning. Drone is the far end of the rhythm's length axis - see Length and drone above. The screen shows
DRONEwhere the length normally reads, and dragging the loop end back inward returns the rhythm at four bars.
SLICE and SLICE TYPE disappear from the parameter list in DRONE for the same reason: they subdivide a rhythm step, and a drone has no steps. Their knobs go quiet too. Your settings are kept, and come back the moment you switch to CHORD.
Lock Octave, Lock Note, Lock Chord
Further down the parameter list, under the LOCKS group, you'll find three "override" parameters that pin the chord track's voicing; disengaging certain aspects from the current chord.
- LOCK > OCTAVE. Pins the track's octave to a fixed value (instead of inheriting from the chord chain). Use the OCTAVE knob as normal to set the octave position.
- LOCK > NOTE. Overrides the root pitch class. The chord shape stays the same; but the track's root note is forced to whichever note you've locked.
- LOCK > CHORD. Overrides the chord intervals - picks one of 42 chord types and forces that quality regardless of what the chord chain is playing, or your keyboard input.
Use the locks for compositional tricks like "every chord becomes a pedal-point on D" or "every chord plays as a major 7th regardless of what the chain says."
They also apply to the Melody and Bass tracks (you'll find the same LOCKS group in their PARAMS menus), making locks a useful per-track override layer.
A safety detail: all three locks reset to OFF when you capture a fresh chord chain, melody, or bass line, so newly recorded material plays back uncoloured.
For a full reference to every Chord Track parameter - what it controls, its range, and how it differs from Melody/Bass - see Chapter 7 - Track Parameters. Chapter 7 also documents the RESET, LOCK, CATEGORY, PLAY/STOP, and BACK button behaviours inside the PARAMS menu.
Worked Recipes - for Chords
The "capture a progression" recipe. Plug a keyboard in. Press CHORD on Home, then CHAIN, then CAPTURE. Set QUANTIZE to 1 bar (press QUANTIZE, rotate CONTROL Knob). Press ARM. Play four chords, one per bar. Press END. Press APPLY - the chain is now active and the Melody/Bass tracks will follow it.
The "substitute one chord" recipe. You've got a four-chord chain but the third chord doesn't sit right. CHAIN → walk to chord 3 with CONTROL → tap CONTROL → REPLACE (B1). Either play the new chord on your keyboard (UNA detects it), or press SUGGEST for ideas. APPLY when satisfied.
The "drone pad" recipe. You want the chord track to hold a long pad while the melody dances over the top. PARAMS → select MODE → set DRONE. The Chord Track is now a sustained pad. Tip: Set GATE to a high value if you want the pad to slow release when chords change.
The "force every chord to a major 7th" recipe. PARAMS → LOCK CHORD → set to MAJOR 7. Every chord in your chain now plays as a major 7th regardless of chord input. Useful for getting a quick "everything sounds like Steely Dan" effect.
What's next
Chord Mode controls the harmony. Chapter 9 covers Melody Mode - the track that runs over that harmony - and Chapter 10 covers the Stepper, where you can sculpt the melody step by step. Chapter 12 (Modulate) shows how to add movement once you've built a few chains, such as a slow filter sweep on the chord track or an evolving rhythm pattern.